
1. Sarrera
The Sigma SD14 is a 14-megapixel Digital Single-Lens Reflex (DSLR) camera designed for advanced photographers. It features the Foveon X3 direct-image sensor, which captures full RGB color information at each pixel layer, aiming for high-definition images with rich gradation. This manual provides essential information for setting up, operating, and maintaining your SD14 camera.
Key features include a 2.5-inch LCD monitor, a durable shutter mechanism rated for over 100,000 cycles, a 5-point autofocus system, and continuous shooting capabilities. The camera supports both RAW and JPEG image recording formats and includes Sigma Photo Pro 3.0 software for RAW image processing.

1.1. irudia: Aurrealdea view of the Sigma SD14 Digital SLR Camera, showing the lens mount and body design.
2. Zer dago kutxan
Verify that all the following items are included in your Sigma SD14 package:
- Sigma SD14 Digital SLR Camera Body
- Lithium-ion Power Battery BP-21
- Battery Charger BC-21
- USB kablea
- Bideo kablea
- Lepoko uhala
- Eye Cap
- Gorputz Txapela
- Okularra Txapela
- SIGMA Photo Pro 3.0 CD-ROM
- SD14 Instruction Manual (this document)
3. Konfigurazioa
3.1. Bateria kargatzea eta instalatzea
- Insert the Lithium-ion Battery BP-21 into the Battery Charger BC-21.
- Konektatu kargagailua entxufe batera. Kargatzeko adierazlea piztuko da.
- Charging typically takes approximately 120 minutes for a full charge.
- Guztiz kargatuta dagoenean, kendu bateria kargagailutik.
- Open the battery compartment cover on the camera body.
- Insert the charged battery into the compartment, ensuring correct orientation.
- Itxi bateriaren konpartimenduaren estalkia ondo.
A fully charged BP-21 battery can capture approximately 500 images.
3.2. Memoria Txartela sartzea
The SD14 uses CompactFlash (CF) Type I/II cards. Ensure the card is formatted in the camera before first use.
- Ireki kameraren alboan dagoen CF txartelaren zirrikituaren estalkia.
- Insert the CF card with the correct orientation until it clicks into place.
- Close the CF card slot cover securely.
3.3. Lente bat jartzea
The Sigma SD14 uses the Sigma SA Bayonet mount. Only Sigma SA mount lenses are directly compatible.
- Kendu gorputzaren estalkia kameratik eta atzeko lentearen estalkia lentetik.
- Align the red index mark on the lens with the red index mark on the camera body's lens mount.
- Lotu lentea erlojuaren orratzen noranzkoan biratuz klik batekin bere lekuan finkatu arte.
- Lentea kentzeko, sakatu kameraren gorputzeko lentea askatzeko botoia eta biratu lentea erlojuaren orratzen kontrako noranzkoan.
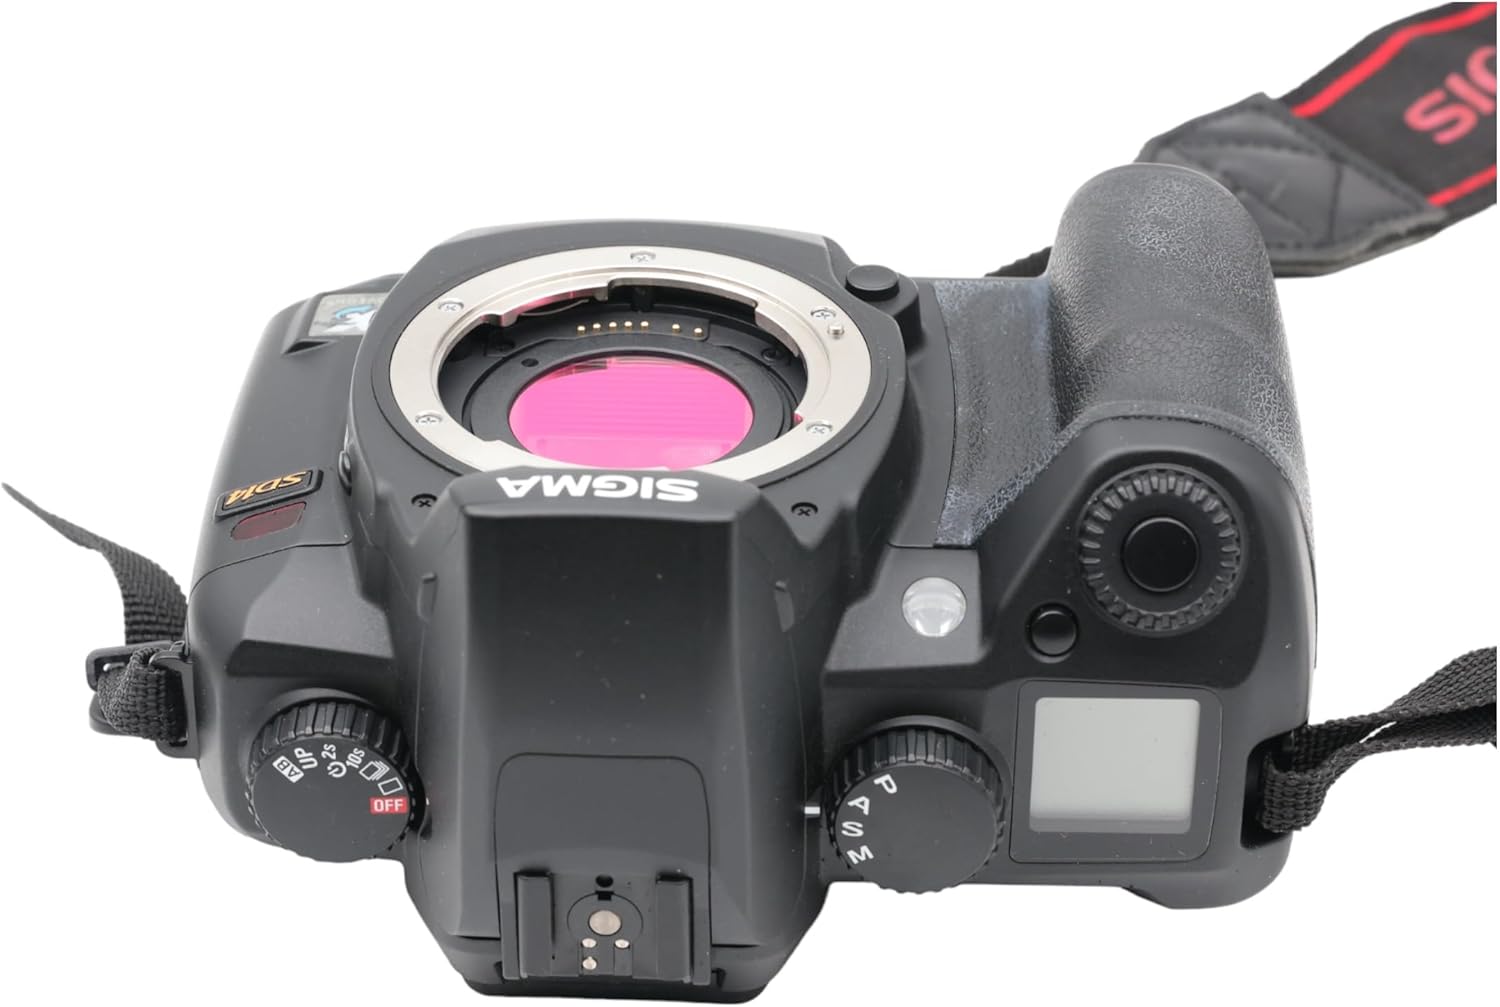
3.1. irudia: Goikoa view of the Sigma SD14, illustrating the lens mount and mode dials.
4. Funtzionamendua
4.1. Piztu/Itzaltzea
Rotate the power switch to the ON position to turn on the camera. Rotate it to OFF to power down.
4.2. Oinarrizko kontrolak eta pantaila
The SD14 features a 2.5-inch LCD monitor for reviewing images and navigating menus, and a pentaprism viewfinder for composing shots. The top LCD panel displays key settings such as resolution, metering mode, battery status, and remaining shots.

4.1. Irudia: Atzealdea view of the Sigma SD14, showing the LCD monitor, viewbilatzailea eta kontrol botoiak.
Key buttons include MENU, ISO, WB (White Balance), and a 4-way controller with an OK button for navigation. The INFO button displays shutter speed, aperture, and other settings on the LCD.
4.3. Enfokatzea
The camera utilizes a 5-point autofocus (AF) system (center, left, right, up, and down). The center AF point features a cross-type sensor for enhanced precision. AF point selection can be automatic or manual.
4.4. Neurketa moduak
The SD14 offers three metering modes:
- 8-segment Evaluative Metering: Analyzes the entire scene for balanced exposure.
- Center Area Metering: Prioritizes the central area of the frame.
- Center Weighted Average Metering: Measures the entire frame but gives more weight to the central area.
Exposure compensation and auto bracketing functions are available for fine-tuning exposure.
4.5. Irudien Grabaketa
The camera supports both RAW (X3F) and JPEG formats. JPEG recording offers four sizes (Super High, High, Medium, Low) and three quality settings (Fine, Normal, Basic).
- Super High (4608 x 3072 pixels): Suitable for A3 or larger prints.
- High (2640 x 1760 pixels): Suitable for A4 prints.
- Medium (1776 x 1184 pixels): Suitable for regular size prints.
- Low (1296 x 864 pixels): Egokia web pages and email.
4.6. Etengabeko filmaketa
The SD14 can shoot continuously at 3 frames per second. The number of frames captured in a burst depends on the resolution setting:
- Altua: 6 fotograma
- Ertaina: 12 fotograma
- Baxua: 24 fotograma
These figures apply to both RAW and JPEG modes.
4.7. Built-in Flash
The built-in flash has a guide number of 11 (ISO 100) and covers a 17mm lens angle (28mm equivalent on 35mm format). It supports S-TTL automatic flash metering and can synchronize with shutter speeds up to 1/180 second.
4.8. Mirror Lock-up
Activate the mirror lock-up mechanism to prevent camera shake caused by mirror movement during exposure. This is particularly useful for macro photography, long telephoto shots, or scientific applications. For best results, use with a remote controller or cable release (sold separately).
4.9. Sigma Photo Pro 3.0 Software
The included Sigma Photo Pro 3.0 software is a RAW image developer. It allows for quick conversion of RAW data and offers three adjustment modes: X3F Mode (original settings), Auto Adjustment Mode, and Custom Mode for manual adjustments (exposure, contrast, shadow, highlight, saturation, sharpness, fill-light). The software supports 8-bit TIFF, 16-bit TIFF, and JPEG file formats, and sRGB, Apple RGB, Adobe RGB, and ColorMatch RGB color spaces.
5. Mantentzea
5.1. Image Sensor Dust Protector
The SD14 features a dust protector positioned in front of the image sensor. This design prevents dust from adhering directly to the sensor, minimizing its impact on image quality. If dust accumulates on the protector, it will be out of focus and generally not visible in images.
5.2. Kameraren gorputza eta lentea garbitzea
- Use a soft, lint-free cloth to wipe the camera body. For stubborn dirt, slightly dampeu zapi urarekin edo garbiketa-soluzio leun batekin.
- For lenses, use a lens brush to remove loose dust, then a lens cleaning solution and a microfiber cloth. Avoid touching the lens surface with your fingers.
- Never use organic solvents like paint thinner or benzene to clean the camera or lens.
5.3. Bateria zaintzea
- Gorde bateriak leku fresko eta lehor batean erabiltzen ez dituzunean.
- Saihestu bateria maiz erabat deskargatzea, haren iraupena luzatzeko.
- Kamera denbora luzez erabiliko ez baduzu, kendu bateria.
6. Arazoak
| Arazoa | Kausa posiblea | Irtenbidea |
|---|---|---|
| Kamera ez da pizten. | Bateria agortuta dago edo gaizki sartuta dago. | Kargatu bateria guztiz eta ziurtatu behar bezala sartuta dagoela. |
| Irudiak lausoak dira. | Foku okerra, kameraren dardaraka edo lente zikina. | Ensure proper focus. Use a faster shutter speed or tripod. Clean the lens. |
| Images are too dark or too bright. | Incorrect exposure settings or metering mode. | Adjust exposure compensation. Select an appropriate metering mode for the scene. |
| Color blotching in underexposed areas. | Characteristic of the Foveon sensor when severely underexposed. | Aim to slightly overexpose images (e.g., +.7 EV) to retain shadow detail and avoid this effect. |
| Ezin dira irudiak grabatu. | Memoria txartela beteta, blokeatuta edo behar bezala sartuta ez dago. | Insert an empty card, unlock the card, or reinsert it correctly. Format the card if necessary (this will erase all data). |
| Kamera blokeatu egiten da edo ez du erantzuten. | Softwarearen aldi baterako akatsa. | Kendu bateria eta sartu berriro kamera berrezartzeko. |
For more detailed troubleshooting or error codes, please refer to the comprehensive instruction manual included with your camera or visit the Sigma support webgunea.
7. Zehaztapenak
| Ezaugarri | Xehetasuna |
|---|---|
| Ereduaren izena | SD14 |
| Argazki sentsorearen bereizmena | 14 MP (Foveon X3 direct-image sensor) |
| Argazki-sentsorearen tamaina | APS-C |
| Muntaketa bateragarriak | Sigma SA Bayonet |
| Onartua File Formatuak | JPEG, RAW (X3F), TIFF |
| Pantailaren tamaina | 2.5 Inches (150,000 pixels) |
| Viewaurkitzailea | Optical Pentaprism (98% coverage, 0.9x magnification) |
| Autofokatze puntuak | 5-point (Phase Detection) |
| Etengabeko jaurtiketa abiadura | 3 fotograma segundoko |
| Obturadorearen Gehienezko Abiadura | 1/4000 segundo |
| Obturatzeko gutxieneko abiadura | 30 segundo |
| ISO tarte zabaldua | 100 - 1600 |
| Neurketa moduak | 8-segment Evaluative, Center Area, Center Weighted Average |
| Built-in Flash Guide Number | 11 (ISO 100) |
| Biltegiratze euskarria | Compact Flash (CF) Type I/II |
| Energia iturria | Lithium-ion Battery BP-21 |
| Konektibitatea | USB, Video Out |
| Elementuaren pisua | 1.65 kilo (748 g inguru) |
| Modelo zenbakia | C23900 |
| UPC | 085126924416 |
7.1. Optional Accessories (Sold Separately)
- Sigma Lenses (over 40 compatible models)
- Flashguns: EF-500 DG SUPER, EF-500 DG ST, EM-140 DG
- Power Grip PG-21
- Cable Release CR-21
- Remote Controller RS-31
- AC Adapter SAC-21
8. Bermea eta laguntza
8.1. Bermearen informazioa
For detailed warranty terms and conditions, please refer to the warranty card included with your product or visit the official Sigma webgunea. Bermearen estaldurak normalean material eta fabrikazio akatsak barne hartzen ditu erosketa-datatik aurrerako denbora-tarte jakin baterako.
8.2. Bezeroarentzako arreta
If you encounter any issues or have questions not covered in this manual, please contact Sigma customer support. Contact information can usually be found on the official Sigma webgunean edo bermearen dokumentazioan.
Sareko baliabideak: Bisitatu Sigma ofiziala website for product registration, firmware updates, FAQs, and additional support resources.