1. Produktua amaitu daview
The Skytronic Compact Hifi Stereo Karaoke DJ PA Amplifier (Model 103.102) is designed for versatile audio applications, offering a blend of compact size and powerful performance. It features multiple input options for various audio sources and microphones, along with adjustable sound controls for an enhanced listening and karaoke experience.
1.1 Ezaugarri nagusiak
- Ultra-compact dimensions for easy placement.
- 400 W Max Power (equivalent to 2 x 50 W RMS).
- Two 6.3 mm jack microphone inputs with adjustable echo effect.
- Three RCA stereo line inputs (CD/VCD, AUX, AC-3).
- One 3.5 mm jack AUX input (front panel).
- One RCA stereo line output.
- Two sets of screw terminals for speaker connections.
- 2-band equalizer with adjustable bass and treble.
- Adjustable balance and master volume controls.
- Large input-selection knob for easy source switching.
1.2 Aurreko paneleko kontrolak eta adierazleak

Figure 1: Front Panel Layout. This image displays the amplifier's front panel, highlighting the power button, input selection knob, volume control, microphone inputs, and tone controls.
- POWER botoia: Txandakatzen ditu ampargitzailea piztu/desaktibatu.
- Input Selector (CD/VCD, AUX, AC-3): Rotates to select the desired audio input source.
- BOLUMENaren botoia: Irteerako bolumen orokorra doitzen du.
- OREKA eskuoia: Ezkerreko/eskuineko kanalaren balantzea doitzen du.
- TREBLE botoia: Maiztasun handiko erantzuna doitzen du.
- BASS botoia: Maiztasun baxuko erantzuna doitzen du.
- MIC1 / MIC2 Inputs: 6.3mm jack inputs for microphones.
- M. VOL Knob: Mikrofonoaren bolumena doitzen du.
- ECHO botoia: Adjusts the echo effect level for microphones.
- Pantaila argiztatua: Shows current input selection and audio level indicators.
1.3 Atzeko panelaren konexioak
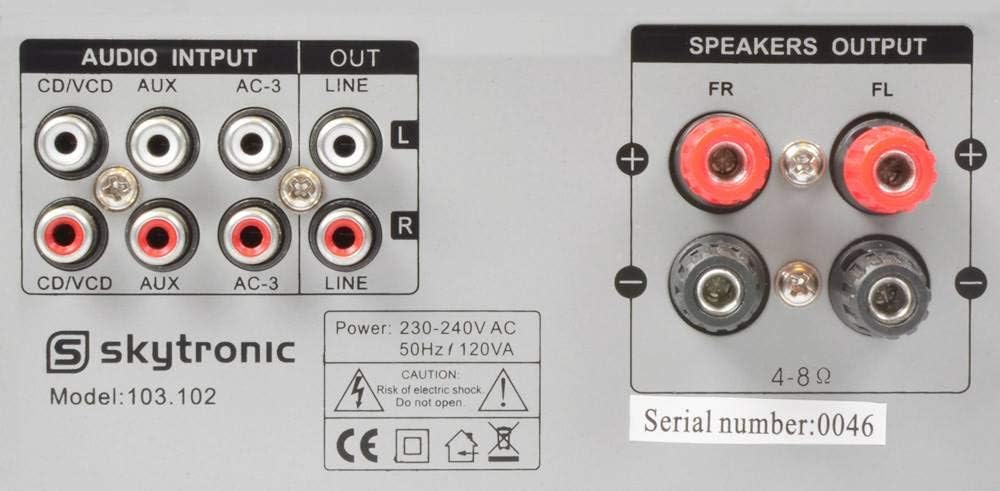
Figure 2: Rear Panel Connections. This image illustrates the various audio input and output ports, including RCA inputs, line output, and speaker terminals.
- AUDIO INPUTS (CD/VCD, AUX, AC-3): RCA stereo inputs for connecting external audio sources like CD/DVD players, media players, or other audio devices.
- LERROA: RCA estereo irteera beste batera konektatzeko ampbiziagoa edo grabatzeko gailua.
- SPEAKERS OUTPUT (FR, FL): Screw terminals for connecting passive speakers. Ensure correct polarity (+ to + and - to -).
- Potentzia sarrera: For connecting the 230V, 50Hz power supply cable.
2. Konfiguratzeko argibideak
Follow these steps to properly set up your Skytronic ampbiziagoa.
2.1 Bozgorailuak konektatzea
- Ziurtatu ampLikidorea itzalita eta korronte-entxufetik deskonektatuta dago.
- Connect your passive speakers to the "SPEAKERS OUTPUT" terminals on the rear panel.
- Match the positive (+) terminal on the amplifier to the positive (+) terminal on your speaker, and the negative (-) terminal on the amplifier to the negative (-) terminal on your speaker.
- Ensure all speaker wire connections are secure and there are no loose strands that could short circuit.
- The ampLifier-ek 4-8 ohm arteko inpedantzia duten bozgorailuak onartzen ditu.
2.2 Audio iturriak konektatzea
- Connect your audio sources (e.g., CD player, DVD player, media streamer) to the appropriate RCA "AUDIO INPUTS" (CD/VCD, AUX, AC-3) on the rear panel using RCA cables.
- For devices with a 3.5mm output (e.g., smartphone, MP3 player), use a 3.5mm to 3.5mm audio cable to connect to the "AUX" input on the front panel.
- If connecting to another amplifier or recording device, use RCA cables from the "LINE OUT" on the rear panel of this amplifier to the input of the other device.
2.3 Mikrofonoak konektatzea
- Insert 6.3mm jack microphones into the "MIC1" or "MIC2" inputs on the front panel.
2.4 Energia-konexioa
- Audio eta bozgorailu konexio guztiak egin ondoren, konektatu amplifier's power cable into a standard 230V, 50Hz AC power outlet.
3. Funtzionamendu-argibideak
This section details how to operate your Skytronic amperrendimendu optimorako zalifikatzailea.
3.1 Oinarrizko funtzionamendua
- Sakatu BOTEREA botoia pizteko amplifier. The illuminated display will light up.
- Biratu Sarrera hautatzailea knob to choose the desired audio source (CD/VCD, AUX, AC-3).
- Start playback from your selected audio source.
- Egokitu BOLUMENA knob to your desired listening level. Start with a low volume and gradually increase it.
3.2 Soinua doitzea
- BAXUA: Turn the BASS knob clockwise to increase low frequencies (deeper sound) or counter-clockwise to decrease them.
- Treble: Turn the TREBLE knob clockwise to increase high frequencies (brighter sound) or counter-clockwise to decrease them.
- OREKA: Adjust the BALANCE knob to shift the audio output between the left and right speakers. Set to the center for balanced sound.
3.3 Using Microphones for Karaoke
- Ensure microphones are connected to the MIC1 or MIC2 inputs.
- Egokitu M. VOL (Microphone Volume) knob to control the microphone's output level.
- Egokitu OHARRA knob to add or remove echo effect to the microphone sound.
- Sing into the microphone while playing background music from your selected audio source.
4. Mantentzea
Mantentze egokiak zure iraupena eta errendimendu optimoa bermatzen ditu ampbiziagoa.
- Garbiketa: Erabili zapi leun eta lehor bat kanpoaldea garbitzeko ampLikido garbitzailerik ez erabili, akabera edo barneko osagaiak kaltetu baitezakete.
- Aireztapena: Ensure the ventilation slots on the top and sides of the amplifier are not blocked. Adequate airflow is crucial to prevent overheating.
- Biltegiratzea: gordez gero ampLikidorea denbora luzez erabiltzen ez baduzu, deskonektatu entxufetik eta gorde leku fresko eta lehor batean, eguzki-argitik eta muturreko tenperaturetatik babestuta.
- Elikatze kablea: Regularly inspect the power cord for any signs of damage. If damaged, do not use the amplifier and seek professional repair.
5. Arazoak
Zurekin arazoak badituzu amplifier, jo ezazu honako arazo eta irtenbide ohikoenei.
| Arazoa | Kausa posiblea | Irtenbidea |
|---|---|---|
| Botererik ez | Kable elektrikoa ez dago konektatuta; Entxufea akastuna; AmpLikidorraren fusiblea erreta. | Ensure power cord is securely plugged in; Test power outlet with another device; Contact qualified service personnel for fuse replacement. |
| Ez dago soinu irteerarik | Incorrect input selected; Volume too low; Speakers not connected or faulty; Audio source not playing. | Select correct input source; Increase VOLUME knob; Check speaker connections and ensure speakers are functional; Verify audio source is playing correctly. |
| Soinu distortsionatua | Volume too high; Incorrect impedance speakers; Loose connections. | Reduce VOLUME; Ensure speakers are 4-8 ohms; Check all audio and speaker connections. |
| Mikrofonoa ez dabil | Microphone not connected; M. VOL too low; Microphone faulty. | Ensure microphone is securely plugged into MIC1/MIC2; Increase M. VOL knob; Test microphone with another device if possible. |
| Burrunba edo burrunba zarata | Ground loop issue; Interference from other electronics; Loose audio cables. | Try plugging amplifier into a different outlet; Move amplifier away from other electronic devices; Ensure all audio cables are securely connected. |
Irtenbide hauek probatu ondoren arazoa konpontzen ez bada, jarri harremanetan bezeroarentzako arreta-zerbitzuarekin.
6. Zehaztapenak
Detailed technical specifications for the Skytronic Stereo Karaoke Amplifier (Model 103.102).
| Ezaugarri | Zehaztapena |
|---|---|
| Modelo zenbakia | 103.102 |
| Gehienezko potentzia irteera | 400 W (equivalent to 2 x 50 W RMS) |
| Maiztasun Erantzuna | 20 Hz eta 20 kHz artean |
| Seinaleen eta zarataren arteko erlazioa | > 76 dB |
| Inpedantzia | 4-8 ohm |
| Elikatze Hornidura | 230 V, 50 Hz |
| Produktuaren neurriak (L x W x H) | 11.02 x 8.66 x 37.4 hazbete |
| Elementuaren pisua | 5.73 kilo |
| Fabrikatzailea | Skytronics |
7. Bermea eta Laguntza
This section provides general information regarding product warranty and customer support.
7.1 Bermearen informazioa
Specific warranty details for the Skytronic Stereo Karaoke Amplifier (Model 103.102) are typically provided at the point of purchase or within separate warranty documentation included with the product. Please refer to your purchase receipt or the manufacturer's official website for the most accurate and up-to-date warranty terms and conditions. Standard warranties usually cover manufacturing defects for a specified period from the date of purchase.
7.2 Bezeroarentzako laguntza
For technical assistance, troubleshooting beyond this manual, or inquiries regarding parts and service, please contact Skytronic customer support. Contact information can usually be found on the manufacturer's official website or on the product packaging. When contacting support, please have your product model number (103.102) and purchase details ready.
Note: As specific contact details are not provided in this manual, please refer to the official Skytronic website or your retailer for support contact information.