1. Sarrera
This manual provides essential instructions for the safe installation, operation, and maintenance of your Schonbek 1250-82SJ Rondelle Semi Flush Mount Lighting Fixture. Please read this manual thoroughly before beginning installation and retain it for future reference. This fixture is designed to provide elegant illumination and is crafted with high-quality crystal components.
2. Segurtasun informazioa
OHARRA: Deskarga elektrikoaren arriskua. Deskonektatu zirkuitu-hausletik korrontea instalazioa edo mantentze-lanak egin aurretik.
- Konexio elektriko guztiak tokiko kodeen, ordenantzen edo Kode Elektriko Nazionalaren (NEC) arabera egin behar dira. Kontsultatu elektrizista kualifikatu bati kableatu elektrikoen konexio egokiekin ohituta ez bazaude.
- Ziurtatu muntatzeko gainazalak euskarriaren pisua eutsi dezakeela.
- Ez instalatu gailu hau leku heze edo lehorrean.amp kokapenak.
- Handle crystal components with care to prevent breakage or injury. Wear gloves to avoid fingerprints.
- Erabili zehaztutako bonbilla mota eta wat bakarriktage gehiegi berotzea eta sute arriskuak saihesteko.
- Mantendu material sukoiak argiztapen-gailutik urrun.
3. Paketearen edukia
Carefully unpack your fixture and inspect all components for damage. Keep all packaging materials until you are certain all parts are present and in good condition. Refer to the diagram below for identification of parts.
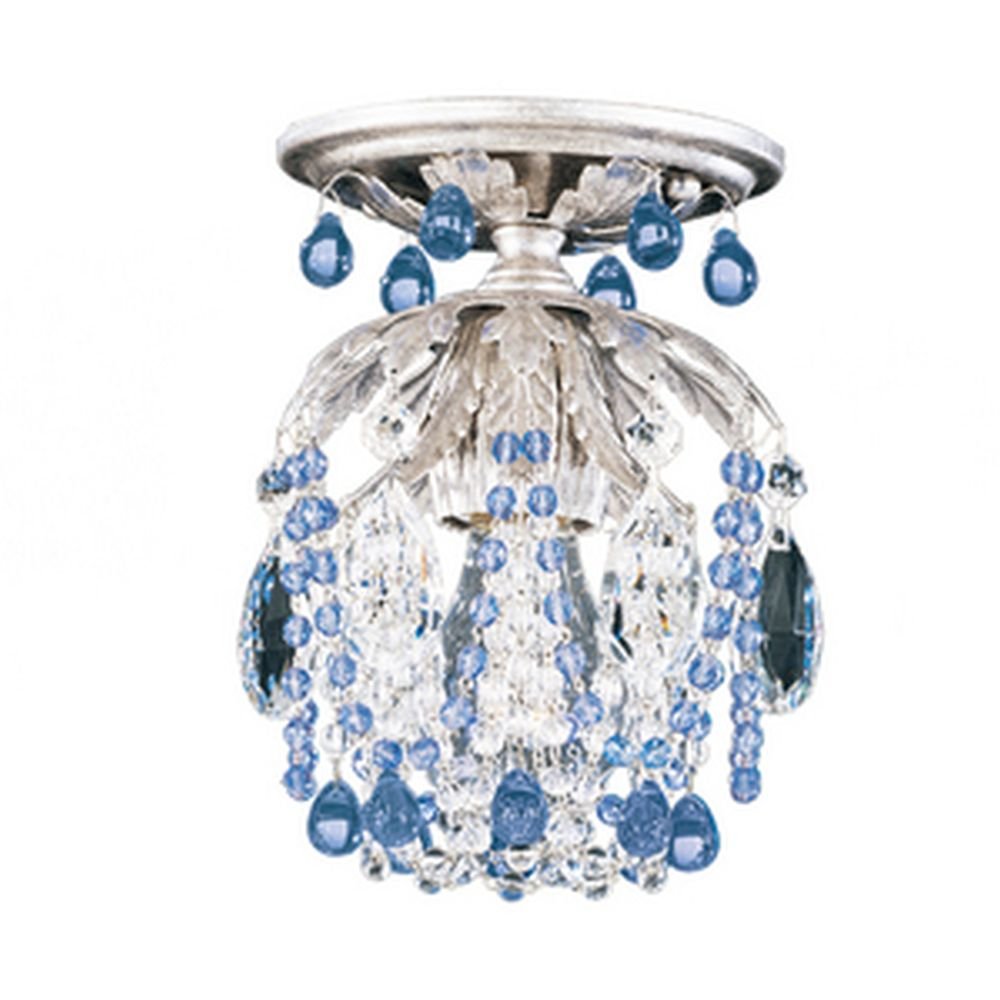
Image: The Schonbek 1250-82SJ Rondelle Semi Flush Mount Lighting Fixture, showcasing its crystal design and semi-flush mounting. This image represents the complete product as it appears when installed.
Zure paketeak eduki behar du:
- Fixture body with mounting hardware
- Crystal components (various shapes and sizes, depending on design)
- Argibide eskuliburua
Note: Bulbs are not included and must be purchased separately.
4. Konfigurazioa eta instalazioa
4.1. Beharrezko tresnak
- Phillips buruko bihurkina
- Bihurkin laua
- Wire strippers
- Zinta elektrikoa
- Aliketak
- Segurtasun betaurrekoak
- Laneko eskularruak
4.2. Instalazio urratsak
- Itzali energia: Locate the circuit breaker that supplies power to the light fixture outlet box. Turn off the power at the circuit breaker. Verify the power is off using a voltage probatzailea.
- Muntaketa prestatu: Remove the existing fixture (if any). Attach the mounting bracket to the outlet box using the screws provided. Ensure the bracket is securely fastened.
- Hari-konexioak: Carefully connect the fixture's wires to the house wires. Match the black wire (live) from the fixture to the black wire from the outlet box, the white wire (neutral) from the fixture to the white wire from the outlet box, and the ground wire (bare copper or green) from the fixture to the ground wire from the outlet box. Secure connections with wire nuts and electrical tape.
- Muntaketa-elementuaren gorputza: Carefully lift the fixture body and align it with the mounting bracket. Secure the fixture body to the mounting bracket using the provided screws. Ensure the fixture is flush against the ceiling and stable.
- Attach Crystal Components: Refer to the specific crystal diagram (if provided separately or on packaging) for your model. Carefully attach each crystal component to the fixture body using the provided hooks or pins. Handle crystals by their edges to avoid smudges.
- Instalatu bonbillak: Insert the recommended A19-1, 60 Watt maximum bulbs (not included) into the sockets. Do not exceed the maximum wattage.
- Berrezarri boterea: Instalazioa amaitutakoan eta osagai guztiak ondo finkatuta daudenean, piztu berriro korrontea etengailu elektrikoan.
5. Funtzionamendu-argibideak
5.1. Piztu/Itzaltzea
The Schonbek 1250-82SJ fixture operates via a standard wall switch connected to the electrical circuit. Simply toggle the wall switch to turn the light fixture on or off.
5.2. Bulb Information
This fixture requires A19-1 type bulbs, with a maximum wattage of 60 watts per bulb. Ensure bulbs are fully seated in their sockets for proper operation. Using bulbs with higher wattage than specified can lead to overheating and damage to the fixture or create a fire hazard.
6. Mantentzea
6.1. Garbiketa
Always turn off power at the circuit breaker before cleaning the fixture.
- Crystal Components: Gently wipe crystals with a soft, lint-free cloth dampened with a mild glass cleaner or distilled water. Avoid abrasive cleaners or harsh chemicals, as these can damage the crystal finish.
- Metalezko piezak: Wipe metal surfaces with a soft, dry cloth. Do not use abrasive pads, powders, or creams, as they may scratch the finish.
- Ziurtatu aparatua guztiz lehor dagoela korrontea berrezarri aurretik.
6.2. Bonbilla ordezkatzea
Always turn off power at the circuit breaker and allow bulbs to cool before replacing them.
- Kontu handiz askatu bonbilla zaharra bere zokalotik.
- Screw in a new A19-1 bulb, ensuring it does not exceed 60 watts.
- Ez estutu bonbilla gehiegi.
- Berrezarri energia etengailuan.
7. Arazoak
If you experience issues with your fixture, consult the table below for common problems and solutions.
| Arazoa | Kausa posiblea | Irtenbidea |
|---|---|---|
| Argia ez da pizten |
|
|
| Argi distira |
|
|
| Aparkalekuaren burrunba |
|
|
| Kristalak tristeak agertzen dira |
|
|
If the problem persists after attempting these solutions, please contact a qualified electrician or Schonbek customer support.
8. Zehaztapenak
| Ezaugarri | Xehetasuna |
|---|---|
| Modelo zenbakia | 1250-82SJ |
| Marka | Schonbek |
| Muntatze Mota | Erdi Flush Mount |
| Materiala | Kristala |
| Neurriak (L x W x H) | 5.5 x 5.5 x 7.5 hazbete |
| Elementuaren pisua | 2 kilo |
| liburukiatage | 110 Volt |
| Wattage (gehienez) | 60 watt bonbilla bakoitzeko |
| Bonbilla mota | A19-1 (not included) |
| Energia iturria | Kable elektrikoa |
9. Bermea eta Laguntza
Schonbek products are manufactured to the highest standards and are backed by a limited warranty against defects in materials and workmanship. The specific terms and duration of your warranty may vary. Please retain your proof of purchase for warranty claims.
For detailed warranty information, technical support, or to inquire about replacement parts, please visit the official Schonbek webwebgunera edo jarri harremanetan bezeroarentzako arreta-zerbitzuarekin. Harremanetarako informazioa normalean fabrikatzailearen webgunean aurki daiteke. webgunea edo produktuaren ontziak.
Please note that improper installation, misuse, or unauthorized modifications may void your warranty.