
1. Sarrera
The Fotodiox Pro Lens Mount Adapter (Model 10LA-FD-XLp) allows you to mount Canon FD, FL, and New FD series lenses onto Canon XL mount video cameras, including models such as the XL-1, XL-1s, XL-2, and XL-H1 HDV Camcorder. This adapter provides a robust and precise connection, enabling the use of a wider range of lenses for creative control over your videography.
This adapter is designed with a 'no play' mechanism, ensuring a secure fit between your lens and camera body. It is important to note that this is a mechanical adapter. As such, automatic diaphragm control, auto-focusing, and other electronic functions between the lens and camera body will not operate. Manual control of focus and aperture is required. For accurate exposure metering, the 'stop-down mode' must be utilized, and shooting should be performed in manual or aperture priority mode.
2. Konfigurazioa eta instalazioa
2.1 Identifying Adapter Sides
The adapter has two distinct sides: one for the lens and one for the camera body. The side marked 'Fotodiox PRO CANON FD-XL L' is for Canon FD lenses, and the other side is for Canon XL camera bodies.

1. irudia: Goian view of the Fotodiox Pro Lens Mount Adapter, showing the lens mount side.
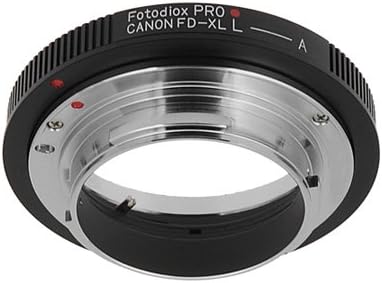
2 irudia: Behealdea view of the Fotodiox Pro Lens Mount Adapter, showing the camera mount side.
2.2 Egokitzailea kameraren gorputzera lotzea
- Ensure your Canon XL camera is powered off.
- Remove the body cap from your Canon XL camera.
- Align the red dot on the adapter with the red dot or indicator on your Canon XL camera body mount.
- Insert the adapter into the camera mount and rotate it clockwise until it clicks securely into place. Do not force the adapter.
2.3 Lentea egokitzailera lotzea
- Align the red dot or indicator on your Canon FD lens with the red dot on the adapter's lens mount side.
- Sartu lentea egokitzailean eta biratu erlojuaren orratzen noranzkoan ondo blokeatu arte.

Image 3: An assembled unit showing a Canon XL Camera, the Fotodiox Pro Lens Mount Adapter, and a Canon FD Lens.
2.4 Detaching the Lens and Adapter
- To remove the lens from the adapter, press the lens release button on the adapter (if present) or rotate the lens counter-clockwise until it unlocks, then carefully remove it.
- To remove the adapter from the camera body, press the camera's lens release button and rotate the adapter counter-clockwise until it unlocks, then carefully remove it.
3. Funtzionamendu-argibideak
When using the Fotodiox Pro Lens Mount Adapter, all lens functions will be operated manually.
- Enfokatzea: Adjust the focus ring on your Canon FD lens manually to achieve sharp focus.
- Irekidura kontrola: Adjust the aperture ring on your Canon FD lens manually to control the depth of field and exposure.
- Neurketa: Since the camera cannot control the lens's aperture, you must use 'stop-down mode' for metering. This means setting the desired aperture on the lens before taking a light reading or shooting.
- Kamera modua: Operate your Canon XL camera in Manual (M) mode or Aperture Priority (Av) mode emaitzarik onenak lortzeko.
- Infinity Focus: This adapter is designed to guarantee infinity focus with compatible lenses.
4. Mantentzea
Proper care will ensure the longevity and performance of your lens mount adapter.
- Garbiketa: Use a clean, dry microfiber cloth to wipe the exterior of the adapter. Avoid using harsh chemicals or abrasive materials. For internal dust, use a blower brush.
- Biltegiratzea: Erabiltzen ez duzunean, gorde egokitzailea leku lehor eta hautsik gabeko batean. Mantendu bi muturrak tapoiekin estalita hautsa eta hondakinak sartzea saihesteko.
- Manipulazioa: Avoid dropping or subjecting the adapter to strong impacts, as this can affect its precision and functionality.
5. Arazoak
If you encounter issues while using your Fotodiox Pro Lens Mount Adapter, consider the following:
- Lentea ez dago ondo lotuta: Ensure the lens and adapter are correctly aligned (red dots matched) and rotated fully until they click into place. Check for any obstructions on the mounting surfaces.
- Adapter not attaching securely to camera: Verify the adapter is correctly aligned with the camera body mount and rotated until it locks. Ensure the camera's lens release button is not stuck.
- Image not sharp: Confirm that you are manually focusing the lens correctly. Check the lens's own focus mechanism for proper operation.
- Exposure issues: Ensure your camera is set to Manual (M) or Aperture Priority (Av) mode. Remember to use 'stop-down mode' for metering, meaning the aperture should be set on the lens before taking a light reading.
- Adapter or lens stuck: Do not force removal. Re-check the release mechanisms on both the lens and camera body. Ensure no foreign objects are preventing release.
6. Zehaztapenak
| Modelo zenbakia | 10LA-FD-XLp |
| Marka | Fotodiox |
| Lentearen muntaia | Canon FD, FL, New FD |
| Kamera Muntaia | Canon XL (XL-1, XL-1s, XL-2, XL-H1) |
| Produktuaren neurriak | 1 x 1 x 1 hazbete (gutxi gorabehera) |
| Elementuaren pisua | 4.2 ontza |
| Materiala | Premium Grade Metal Alloy |
7. Bermearen informazioa
This Fotodiox Pro Lens Mount Adapter comes with a 24 Month Manufacturer Warranty. Please retain your proof of purchase for warranty claims. For specific terms and conditions, refer to the official Fotodiox webwebgunean edo jarri harremanetan bezeroarentzako laguntzarekin.
8. Laguntza
For further assistance, technical support, or inquiries regarding your Fotodiox Pro Lens Mount Adapter, please visit the official Fotodiox website or contact their customer service department. Contact information can typically be found on the Fotodiox webgunea edo produktuaren ontziak.