
1. Sarrera
This manual provides detailed instructions for the installation, operation, and maintenance of your JL AUDIO JX360/2 2-Channel Amplifier. Please read this manual thoroughly before attempting installation or operation to ensure proper use and to prevent damage to the unit or associated components.
The JX360/2 is a Class A/B full-range amplifier designed to deliver reliable power and high-quality audio performance. It features a high-mass heatsink for improved thermal capacity, captured power and speaker connectors for easier installation and enhanced safety, and comprehensive signal processing capabilities.
2. Konfigurazioa eta instalazioa
Proper installation is crucial for optimal performance and safety. If you are unsure about any part of the installation process, consult a qualified professional.
2.1 Muntaketa Ampbiziagoa
Select a mounting location that provides adequate ventilation and protection from moisture and excessive heat. Ensure the ampLikidatzailea gainazal solido bati ondo lotuta dago ibilgailua martxan dagoen bitartean mugimendua saihesteko.

1 irudia: Goitik behera view of the JL AUDIO JX360/2 ampbizitzailea, erakustaldiaasing its brushed aluminum finish and model number.
2.2 Potentzia-konexioak
Konektatu amplifier to the vehicle's electrical system using appropriate gauge wiring. The JX360/2 features captured power and speaker connectors for secure and simplified wiring.
- Konektatu +12VDC terminal to the positive terminal of the vehicle's battery via a fuse or circuit breaker (not included). The fuse/breaker should be located within 18 inches (45 cm) of the battery.
- Konektatu Lurra terminal to a clean, unpainted metal surface of the vehicle chassis. Ensure a solid electrical connection.
- Konektatu Urrunekoa terminal to the remote turn-on output of your head unit. This wire signals the ampunitate nagusiarekin piztu eta itzaltzeko lifatzailea.

2. irudia: View of the JL AUDIO JX360/2 amplifier's power input (+12VDC, Ground, Remote) and speaker output terminals (Bridged, R, L).
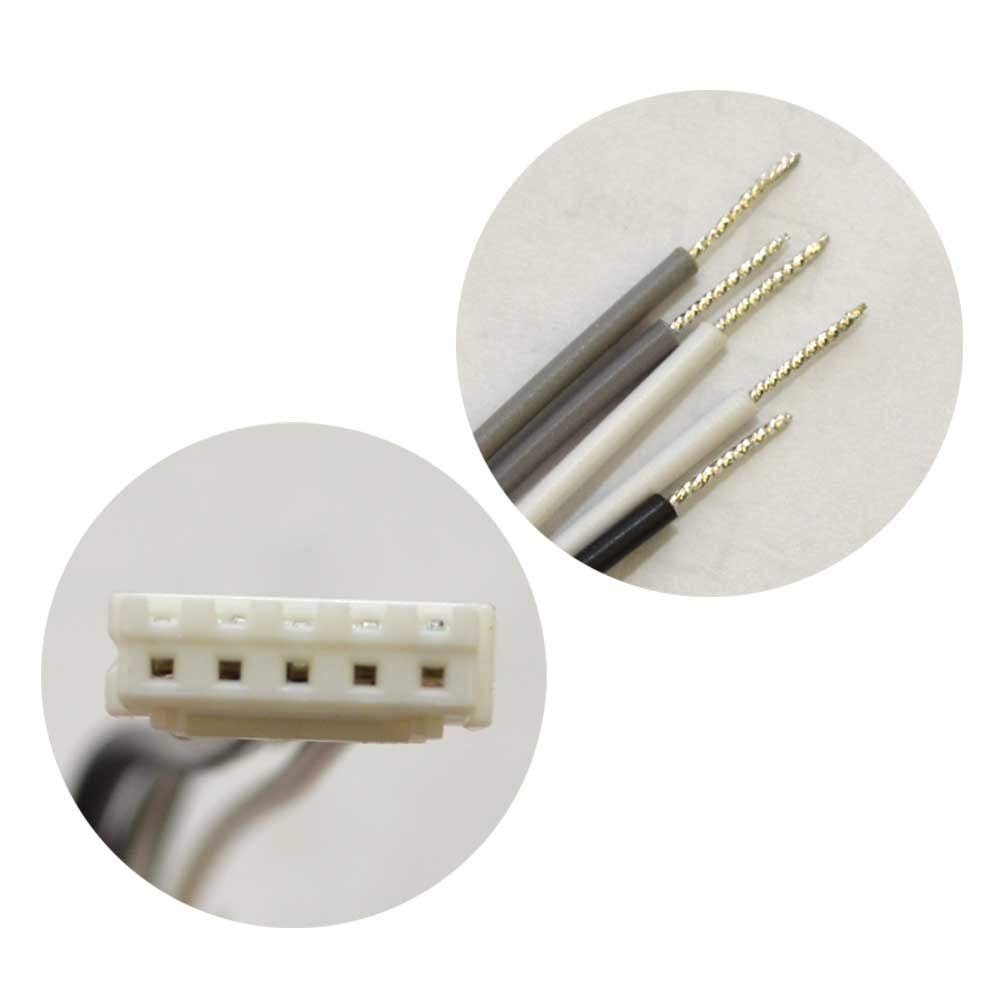
3 irudia: Gertuko planoa view of the captured wiring connectors for the JL AUDIO JX360/2 amplifier, showing the pre-tinned wire ends for easy insertion.
2.3 Audio Sarrerako Konexioak
The JX360/2 supports both high-level (speaker level) and low-level (RCA) inputs.
- Maila baxuko sarrerak (RCA): Konektatu RCA kableak zure unitate nagusiaren aurre-konexiotikamp irteerak amplifier's "Low-Level Inputs."
- Goi-mailako sarrerak: Zure unitate nagusiak RCA irteerarik ez badu, konektatu bozgorailuen kableak zuzenean amplifier's "Hi-Level Inputs" using the provided connector.
2.4 Bozgorailuen irteerako konexioak
Konektatu zure bozgorailuak amplifier's speaker output terminals. Ensure correct polarity (+ to + and - to -) for each speaker.
- For 2-channel stereo operation, connect one speaker to the Left (+) and Left (-) terminals, and another speaker to the Right (+) and Right (-) terminals.
- For bridged mono operation (e.g., for a subwoofer), connect the speaker to the "Bridged" terminals as indicated on the amplifier. The JX360/2 can deliver 360W into a 4-ohm load when bridged.

4. irudia: View of the JL AUDIO JX360/2 amplifier's input and control panel, including RCA inputs, high-level inputs, filter controls, and input sensitivity adjustment.
3. Funtzionamendua Ampbiziagoa
3.1 Hasierako piztea
After all connections are made, turn on your head unit. The amplifier should power on automatically via the remote turn-on wire. Observe the power indicator light on the ampbiziagoa.
3.2 Adjusting Input Sensitivity (Gain)
The "Input Sens." control matches the ampLikidatzailearen sarrera-sentsibilitatea irteerako bolumenarekikotage of your head unit. Start with the control at its minimum setting. Play a dynamic piece of music through your system. Slowly increase the "Input Sens." control until you hear distortion, then back it off slightly. This ensures maximum clean output from the ampbiziagoa.
3.3 Iragazkiaren ezarpenak
The JX360/2 features a 12 dB/octave variable filter, adjustable from 50 Hz to 500 Hz. This allows you to optimize the frequency response for your speakers.
- HP (High-Pass): Use this setting to block low frequencies from reaching your full-range speakers, preventing distortion and improving clarity.
- LP (Low-Pass): Use this setting when driving a subwoofer, allowing only low frequencies to pass through.
- Osoa: Disables the filter, allowing the full frequency range to pass.
Adjust the "Filter Freq." knob to select the desired crossover point.
3.4 Pass-Through Preamp Irteerak
The amplifier includes pass-through preamp outputs, allowing you to send the audio signal to another amplifier in your system without requiring additional RCA outputs from your head unit.
4. Mantentzea
The JL AUDIO JX360/2 ampLikidorea funtzionamendu fidagarrirako diseinatuta dago, mantentze minimoarekin. Jarraitu jarraibide hauek iraupena bermatzeko:
- Garbiketa: Aldian-aldian garbitu ampGarbitu garbigailuaren kanpoaldea oihal leun eta lehor batekin. Ez erabili produktu kimiko gogorrik edo garbitzaile urratzailerik.
- Aireztapena: Ziurtatu hori amplifier's heatsink fins are not obstructed. Adequate airflow is essential for proper cooling.
- Konexioak: Occasionally check all power, ground, and speaker connections to ensure they remain secure. Loose connections can lead to performance issues or damage.
5. Arazoak
Zurearekin arazoak badituzu ampbizigarri gisa, jo ezazu honako arazo eta irtenbide ohiko hauetara:
5.1 No Power / Amplifier Does Not Turn On
- Check the main fuse or circuit breaker on the +12VDC power line.
- Verify the ground connection is secure and making good contact with the chassis.
- Ensure the remote turn-on wire is connected and receiving +12V from the head unit when it is on.
- Check all power and ground connections at the ampbornagailuak.
5.2 Audio Irteerarik Ez
- Berretsi amplifier is powered on (power indicator light is illuminated).
- Check all RCA or high-level input connections from the head unit to the ampbiziagoa.
- Verify speaker wire connections at both the amplifier and the speakers. Ensure correct polarity.
- Check the head unit's volume and source selection.
- Ensure the "Input Sens." control is not set to minimum.
5.3 Distortion or Poor Sound Quality
- Adjust the "Input Sens." (gain) control. If set too high, it can cause distortion.
- Check speaker impedance. Ensure it is within the amplifier's recommended range (2 ohms stereo, 4 ohms bridged).
- Verify filter settings (HP/LP/Full) are appropriate for your speakers.
- Egiaztatu bozgorailu-kableak hari laburrak edo higatuak dauden ikusteko.
- Ensure adequate power supply to the ampargitzaile. liburukiatage drops can cause distortion.
5.4 Amplifier Overheats (Protection Mode)
- Ziurtatu amplifier has sufficient ventilation. Clear any obstructions around the heatsink.
- Check speaker impedance. Running speakers with too low an impedance can cause overheating.
- Reduce the "Input Sens." (gain) setting.
- Verify the power and ground connections are secure and of adequate gauge.
- Baimendu amplifier to cool down. If the issue persists, consult a professional.
6. Zehaztapenak
| Ezaugarri | Xehetasuna |
|---|---|
| Eredua | JX360/2 |
| Amplifier Klase | A/B klasea |
| Kanalak | 2-Kanal |
| Rated Power (RMS) @ 14.4V | 2 x 110 W @ 4 ohms 2 x 180 W @ 2 ohms 1 x 360 W @ 4 ohms (bridged) |
| Irteerako potentzia maximoa | 360 Watt |
| Bolumen eragileatage | 14.4 Volt (nominala) |
| Seinalearen tratamendua | 12 dB/octave High-Pass or Low-Pass Filter |
| Iragazkiaren maiztasun-barrutia | 50 - 500 Hz (variable) |
| Sarrerak | Low-Level (RCA), High-Level (Speaker Level) |
| Irteerak | Pass-Through Preamp Irteerak |
| Neurriak (L x W x H) | 41.4 x 24.13 x 9.65 cm (gutxi gorabehera 16.3 x 9.5 x 3.8 hazbete) |
| Pisua | 3.86 kg (8.5 lb) |
7. Bermea eta Laguntza
For warranty information, please refer to the documentation included with your purchase or visit the official JL AUDIO webgunea. Gorde erosketa-agiria erosketaren frogagiri gisa berme-erreklamazioetarako.
For technical support or service inquiries, please contact JL AUDIO customer service or an authorized JL AUDIO dealer. Contact information can typically be found on the manufacturer's webgunean edo zure produktuaren ontzian.
Note: Spare parts availability information is not provided by the manufacturer.