
1. Sarrera
Thank you for choosing the JL-Audio PWM110-WX Enclosed Subwoofer System. This manual provides essential information for the proper installation, operation, and maintenance of your new car audio component. Please read this manual thoroughly before attempting installation or operation to ensure optimal performance and safety.
The PWM110-WX system features a 10-inch (25 cm) 10WX subwoofer housed in a durable, grey carpet-finished enclosed cabinet, powered by a J2-250.1 mono amplifier. It is designed to deliver powerful and accurate bass reproduction in your vehicle.
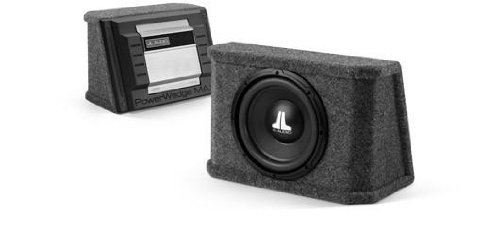
Image 1.1: JL-Audio PWM110-WX Enclosed Subwoofer System. This image shows the compact, grey carpeted enclosure with the JL Audio logo, indicating a robust and ready-to-install unit.
2. Segurtasun informazioa
Beti jarraitu segurtasun neurri hauek produktuari lesioak edo kalteak saihesteko:
- Instalazio profesionala gomendatzen da: Autoko audio ekipoen instalazioa konplexua izan daiteke. Instalazio prozesuaren edozein atalen inguruan ziur ez bazaude, eskatu laguntza instalatzaile profesional kualifikatu bati.
- Deskonektatu bateria: Before beginning any wiring, disconnect the vehicle's negative battery terminal to prevent electrical shorts and damage.
- Kableatu egokia: Ensure all wiring is correctly routed and secured to prevent pinching, chafing, or short circuits. Use appropriate gauge wire for power and ground connections.
- Aireztapena: Ensure the subwoofer enclosure and amplifier have adequate ventilation. Do not block cooling vents or place the unit in an enclosed space without airflow.
- Bolumen mailak: Prolonged exposure to high sound pressure levels can cause permanent hearing damage. Operate your audio system at safe listening levels.
- Muntaketa segurua: The enclosure must be securely mounted within the vehicle to prevent it from becoming a projectile during sudden stops or collisions.
3. Konfigurazioa eta instalazioa
3.1 Paketatzea
Carefully remove the subwoofer system from its packaging. Inspect the unit for any signs of damage that may have occurred during shipping. If damage is present, contact your dealer immediately.
3.2 Kokatzea eta Muntatzea
The PWM110-WX is an enclosed system designed for flexible placement within your vehicle's trunk or cargo area. Choose a location that:
- Allows for adequate ventilation around the ampatal biziagoa.
- Does not obstruct vehicle controls or safety equipment.
- Can be securely fastened to prevent movement. Use straps, brackets, or other appropriate hardware (not included) to secure the enclosure to the vehicle's chassis or floor.
3.3 Kableatutako konexioak
The PWM110-WX system includes a J2-250.1 mono amplifier integrated into the enclosure. Follow these general wiring guidelines:
- Power Wire (B+): Connect a suitable gauge power wire (e.g., 8 AWG or 4 AWG, depending on total system power and wire length) from the vehicle's positive battery terminal to the amplifier's B+ terminal. Install an appropriate fuse holder (e.g., ANL or Mini-ANL) within 18 inches (45 cm) of the battery.
- Lurrerako kablea (GND): Connect a short (less than 3 feet / 1 meter), same-gauge ground wire from the ampKonektagailuaren GND terminala ibilgailuaren xasisaren gainazal metaliko garbi eta margotu gabe batera. Ziurtatu konexio elektriko sendoa dagoela.
- Urruneko pizte-kablea (REM): Connect a small gauge wire (e.g., 18 AWG) from your head unit's remote turn-on output to the amplifier's REM terminal. This wire tells the ampunitate nagusiarekin piztu eta itzaltzeko lifagailua.
- Audio sarrera (RCA): Connect RCA cables from your head unit's subwoofer pre-out (or full-range pre-out if no dedicated subwoofer output is available) to the amplifier-aren RCA sarrera-konektoreak.
- Bozgorailuaren irteera: The subwoofer is pre-wired internally to the amplifier. Do not attempt to connect external speakers to this system.
4. Funtzionamendu-argibideak
Once the system is installed and wired correctly, you can begin to adjust its settings for optimal performance.
4.1 Hasierako piztea
Konexio guztiak egin eta egiaztatu ondoren, konektatu berriro ibilgailuaren bateriaren terminal negatiboa. Piztu zure unitate nagusia. amplifier should power on, indicated by an LED on the amppanel biziagoa.
4.2 Irabaziaren doikuntza
The gain control on the amplifier matches the output voltagzure unitate nagusiaren e-ra amplifier's input. It is ez a volume control. To set the gain:
- Biratu amplifier's gain control all the way down (minimum).
- Ezarri unitate nagusiaren bolumena bere maila maximoaren % 75ean gutxi gorabehera.
- Play a dynamic piece of music with strong bass.
- Pixkanaka handitu amplifier's gain control until you hear distortion, then back it off slightly until the sound is clean.
4.3 Crossover and Bass Boost
The integrated J2-250.1 amplifier typically includes adjustable crossover and bass boost controls. Refer to the specific amplifier's manual for detailed instructions on these settings. Generally:
- Behe-iragazkia (LPF): Adjust the LPF to filter out frequencies above the desired subwoofer range (e.g., 80-120 Hz). This ensures the subwoofer only plays bass frequencies.
- Baxu Boost: Use bass boost sparingly, if at all. Excessive bass boost can lead to distortion and potential damage to the subwoofer.
5. Mantentzea
The JL-Audio PWM110-WX system requires minimal maintenance to ensure long-lasting performance.
- Garbiketa: Use a soft, dry cloth to clean the enclosure and ampEz erabili produktu kimiko gogorrik edo garbitzaile urratzailerik.
- Ikuskapena: Periodically check all wiring connections to ensure they are secure and free from corrosion. Inspect the enclosure for any signs of damage or wear.
- Aireztapena: Ziurtatu amplifier's heatsink remains free of dust and debris to maintain proper cooling.
6. Arazoak
If you experience issues with your JL-Audio PWM110-WX system, consult the following table before contacting support.
| Arazoa | Kausa posiblea | Irtenbidea |
|---|---|---|
| Ez dago soinurik subwooferretik |
|
|
| Soinu distortsionatua |
|
|
| Ampberotze biziagoa |
|
|
7. Zehaztapenak
| Ezaugarri | Zehaztapena |
|---|---|
| Modelo zenbakia | PWM110-WX |
| Hizlari mota | Subwoofer (Enclosed System) |
| Bozgorailuaren tamaina | 10 hazbete (25 cm) |
| Bozgorailuen irteerako potentzia maximoa | 250 Watt |
| Inpedantzia | 4 ohmio |
| Audio irteera modua | Mono |
| Itxitura akabera | Grey Carpet |
| Elementuaren pisua | 35.27 libra (gutxi gorabehera 16 kg) |
| Fabrikatzailea | JL-Audioa |
8. Bermea eta Laguntza
JL-Audio products are designed and manufactured to the highest quality standards. For specific warranty information regarding your PWM110-WX Enclosed Subwoofer System, please refer to the warranty card included with your purchase or visit the official JL Audio webgunea. Bermearen baldintzak eta zehaztapenak eskualdearen eta saltzailearen arabera alda daitezke.
For technical support, service, or further inquiries, please contact your authorized JL Audio dealer or visit the support section of the official JL Audio website. Please have your product model number (PWM110-WX) and purchase information ready when seeking support.


