1. Sarrera
Eskerrik asko erosketagatik.asing the Hello Kitty KT2064 AM/FM Projection Alarm Clock Radio. This device combines a digital alarm clock with an AM/FM radio and a unique projection feature, allowing you to display the time on your ceiling or wall. Please read this manual carefully to ensure proper operation and to fully utilize all features of your new alarm clock radio.

1.1. irudia: Aurrealdea view of the Hello Kitty KT2064 Projection Alarm Clock Radio, showing the digital display and the Hello Kitty design.
2. Ezaugarriak
- Proiekzio Ezaugarri: Projects the time onto your ceiling or wall with adjustable focus and up to 120-degree pivot angle.
- Dual Alarm Options: Wake up to either a buzzer alarm or your favorite radio station.
- AM/FM irratia: Integrated radio tuner for listening to broadcast stations.
- Atzeratzea Funtzioa: Allows for an additional 9 minutes of sleep before the alarm sounds again.
- Sleep to Radio: Set a timer (up to 2 hours) for the radio to play before automatically turning off.
- Bateria babeskopia: Maintains time and alarm settings during power outages (requires 3 CR2025 button cell batteries, not included).
- LED Time Display: Clear red LED display for current time.
3. Paketearen edukia
Mesedez, egiaztatu paketea elementu hauek dituen:
- Hello Kitty KT2064 Projection Alarm Clock Radio Unit
- AC Potentzia Egokitzailea
- Erabiltzailearen eskuliburua (dokumentu hau)
Note: 3 CR2025 button cell batteries for backup are not included and must be purchased separately.
4. Konfigurazioa
4.1 Energia-konexioa
- Unpack the alarm clock radio and its accessories.
- Connect the AC power adapter to the DC input jack located on the back of the unit.
- Plug the other end of the AC power adapter into a standard wall outlet. The unit will power on, and the LED display will light up.
4.2 Installing Backup Batteries
Installing backup batteries ensures that your time and alarm settings are retained during a power outage.
- Locate the battery compartment on the bottom or back of the unit.
- Ireki bateriaren konpartimenduaren estalkia.
- Insert 3 CR2025 button cell batteries, observing the correct polarity (+ and - markings).
- Itxi bateriaren konpartimenduaren estalkia ondo.

4.2. irudia: Atzekoa view of the alarm clock radio, showing control buttons and potential location for battery compartment.
5. Funtzionamendu-argibideak
5.1 Ordua ezartzea
- Eduki sakatuta ORDUA button (or similar button, refer to unit markings) for approximately 3 seconds until the hour digits begin to flash.
- Erabili ORDUA or + / - botoiak ordua doitzeko. Jarri arreta AM/PM adierazleari.
- Sakatu ORDUA botoia berriro sakatu. Minutuen digituak keinuka hasiko dira.
- Erabili MINUTUA or + / - minutuak doitzeko botoiak.
- Sakatu ORDUA botoia berriro sakatu berresteko eta ordua ezartzeko modutik irteteko.
5.2 Alarma ezartzea (1. alarma eta 2. alarma)
This unit supports two independent alarms.
- Eduki sakatuta AL1 SET botoia (1. alarmarako) edo AL2 SET button (for Alarm 2) for approximately 3 seconds until the hour digits of the alarm time begin to flash.
- Erabili ORDUA or + / - alarma-ordua doitzeko botoiak.
- Sakatu dagokion botoia. AL SET botoia berriro sakatu. Minutuen digituak keinuka hasiko dira.
- Erabili MINUTUA or + / - botoiak alarmaren minutuak doitzeko.
- Sakatu AL SET botoia berriro sakatu alarma iturria hautatzeko: BIZARRA or IRRATIA. Erabili + / - buttons to toggle.
- Sakatu AL SET botoia berriro sakatu berresteko eta alarma ezartzeko modutik irteteko.
- Alarma aktibatzeko/desaktibatzeko, sakatu AL1 ON/OFF or AL2 ON/OFF button (or similar) repeatedly until the alarm indicator appears/disappears on the display.
5.3 Using the Radio
- Sakatu IRRATIA ON/OFF botoia irratia pizteko.
- Sakatu AM/FM botoia AM eta FM banden artean aldatzeko.
- Erabili TUNE+ eta TUNE- botoiak nahi duzun irratia eskuz sintonizatzeko.
- For automatic scanning, press and hold TUNE+ or TUNE- for a few seconds until the radio finds the next clear station.
- Doitu bolumena BOLUMENA + eta BOLUMENA - botoiak.
- Irratia itzaltzeko, sakatu IRRATIA ON/OFF botoia berriro.
5.4 Proiekzio Ezaugarria
- Locate the projector lens on top of the unit.
- Sakatu PROIEKTOREA ON/OFF button to activate the time projection.
- Adjust the angle of the projector head (up to 120 degrees) to direct the time display onto your ceiling or wall.
- Biratu FOKUA ring around the projector lens to achieve a clear image.
- To turn off the projection, press the PROIEKTOREA ON/OFF botoia berriro.

Image 5.4: The alarm clock radio actively projecting the time and Hello Kitty logo onto a surface.
5.5 Snooze funtzioa
Alarma jotzen duenean, sakatu botoi handia SNOOZE button (usually located on top of the unit). The alarm will pause for approximately 9 minutes and then sound again.
5.6 Sleep to Radio Function
This feature allows you to fall asleep to the radio, which will automatically turn off after a set period.
- Turn on the radio and tune to your desired station.
- Sakatu LO button repeatedly to cycle through the available sleep timer durations (e.g., 120, 90, 60, 30, 15 minutes, or OFF). The selected duration will appear on the display.
- The radio will play for the chosen duration and then automatically turn off.
6. Mantentzea
- Garbiketa: Garbitu unitatea zapi leun eta lehor batekin. Ez erabili garbitzaile edo disolbatzaile urratzailerik.
- Uraren esposizioa: Mantendu unitatea uretatik edo gehiegizko hezetasunetik urrun.
- Tenperatura: Saihestu unitatea tenperatura altuen edo eguzki-argiaren eraginpean jartzea.
- Bateria ordezkatzea: Replace backup batteries annually or when the low battery indicator appears to ensure continuous functionality during power outages.
7. Arazoak
| Arazoa | Kausa posiblea | Irtenbidea |
|---|---|---|
| Unitatea ez da pizten. | Korronte-egokitzailea ez dago konektatuta edo entxufea akastuna da. | Ensure the power adapter is securely plugged into the unit and a working wall outlet. Test the outlet with another device. |
| Ordu/alarma ezarpenak galtzen dira energia itzaltzeantage. | Erreserbako bateriak agortuta daude edo ez daude instalatuta. | Install new CR2025 button cell batteries or replace existing ones. |
| Proiekzioa lausoa da. | Fokua ez dago behar bezala doituta. | Biratu FOKUA ring around the projector lens until the image is clear. |
| Irratiaren harrera eskasa da. | Antena ez dago luzatuta edo interferentziak daude. | Extend the FM wire antenna fully. For AM, try repositioning the unit. Avoid placing near electronic devices that may cause interference. |
| Alarmak ez du jotzen. | Alarma ez dago aktibatuta edo gaizki konfiguratuta. | Ensure the alarm is set and activated (alarm indicator visible). Check alarm volume if set to radio. |
8. Zehaztapenak
| Marka | Kaixo Kitty |
| Modelo zenbakia | KT2064P |
| Bistaratzeko mota | LED digitala |
| Energia iturria | AC Potentzia Egokitzailea |
| Backup Bateria | 3 x CR2025 Button Cell (not included) |
| Irrati maiztasuna | AM/FM (FM up to 108 MHz) |
| Produktuaren neurriak (L x W x H) | 14.5 x 11.9 x 17.3 cm (gutxi gorabehera 5.7 x 4.7 x 6.8 hazbete) |
| Produktuaren pisua | 885 g (gutxi gorabehera 1.95 lb) |
| Proiekzio angelua | 120 gradu arte |
| Errepikatzeko iraupena | 9 minutu |
| Lo egiteko tenporizadorea | Gehienez 2 ordu |
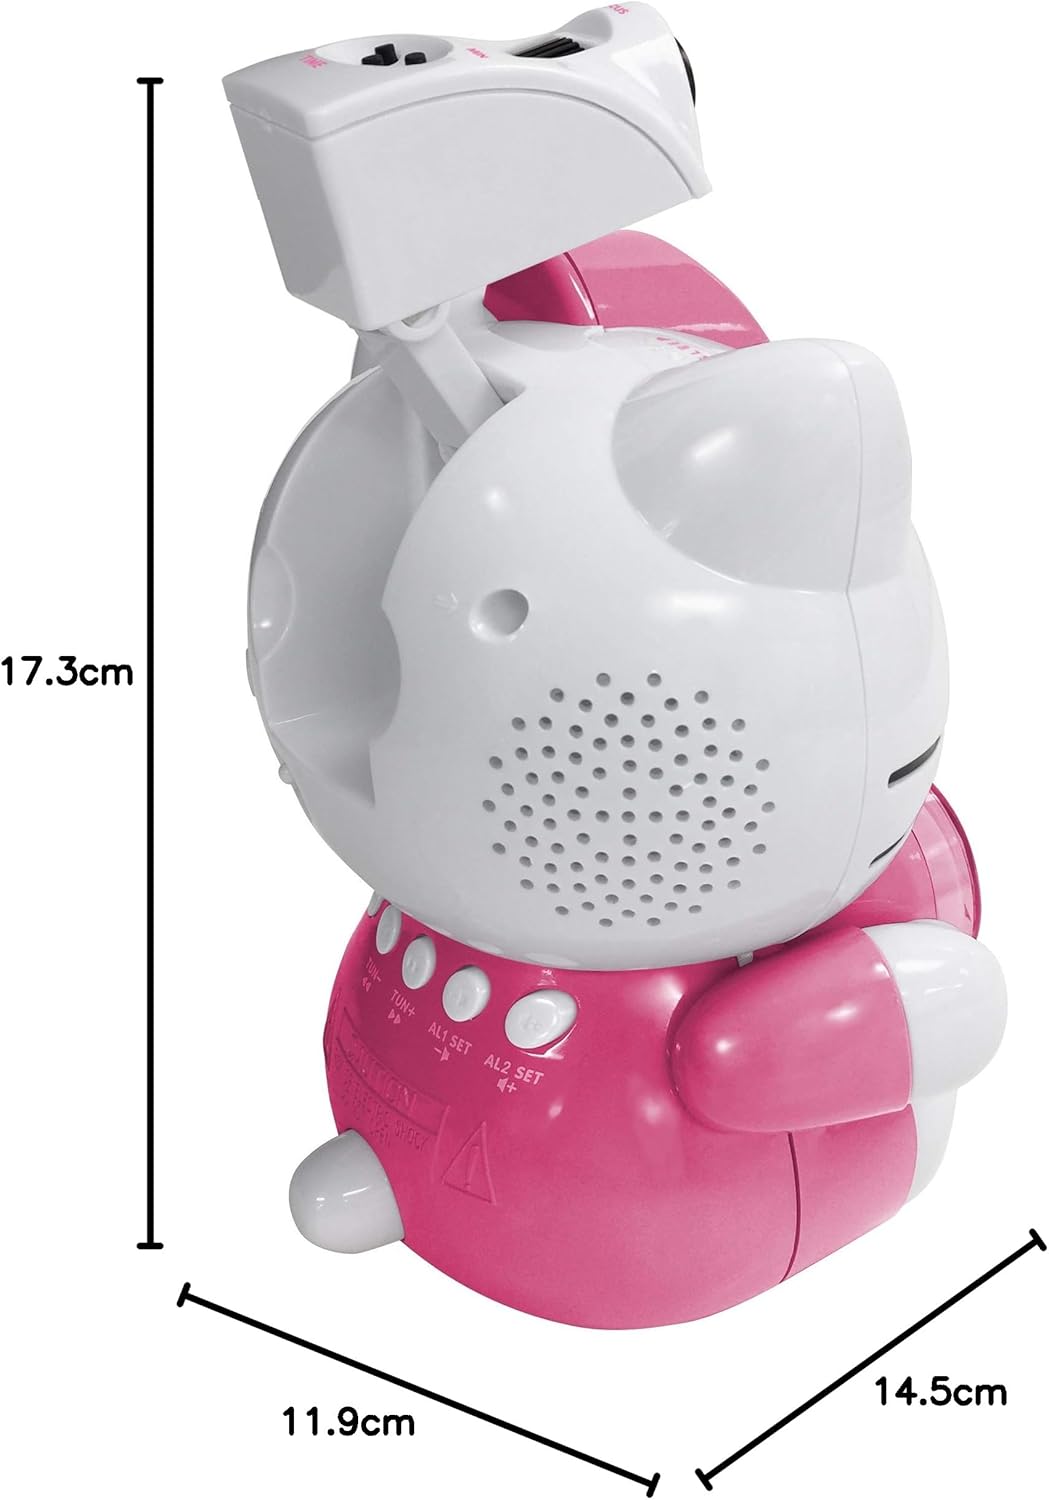
Image 8.1: Dimensions of the Hello Kitty KT2064 Projection Alarm Clock Radio.
9. Bermea eta Laguntza
This product comes with a standard manufacturer's warranty. For specific warranty details, please refer to the documentation provided at the time of purchase or contact your retailer. If you encounter any issues not covered in the troubleshooting section, please contact customer support for assistance.
For support inquiries, please visit the official Hello Kitty product support webgunearekin edo jarri harremanetan zure tokiko banatzailearekin.