
Sarrera
This manual provides detailed instructions for the installation and operation of the TooQ TQDS-802B Dual Bay SATA Docking Station. This device allows for easy connection of 2.5-inch and 3.5-inch SATA I/II/III hard drives or solid-state drives (SSDs) to your computer via USB 3.0, and features an offline cloning function for direct drive duplication without a PC.
Paketearen edukia
- TooQ TQDS-802B Dual Bay SATA Docking Station
- Korronte egokitzailea (DC 12V)
- USB 3.0 Type-A to Type-B Cable
- Erabiltzailearen eskuliburua
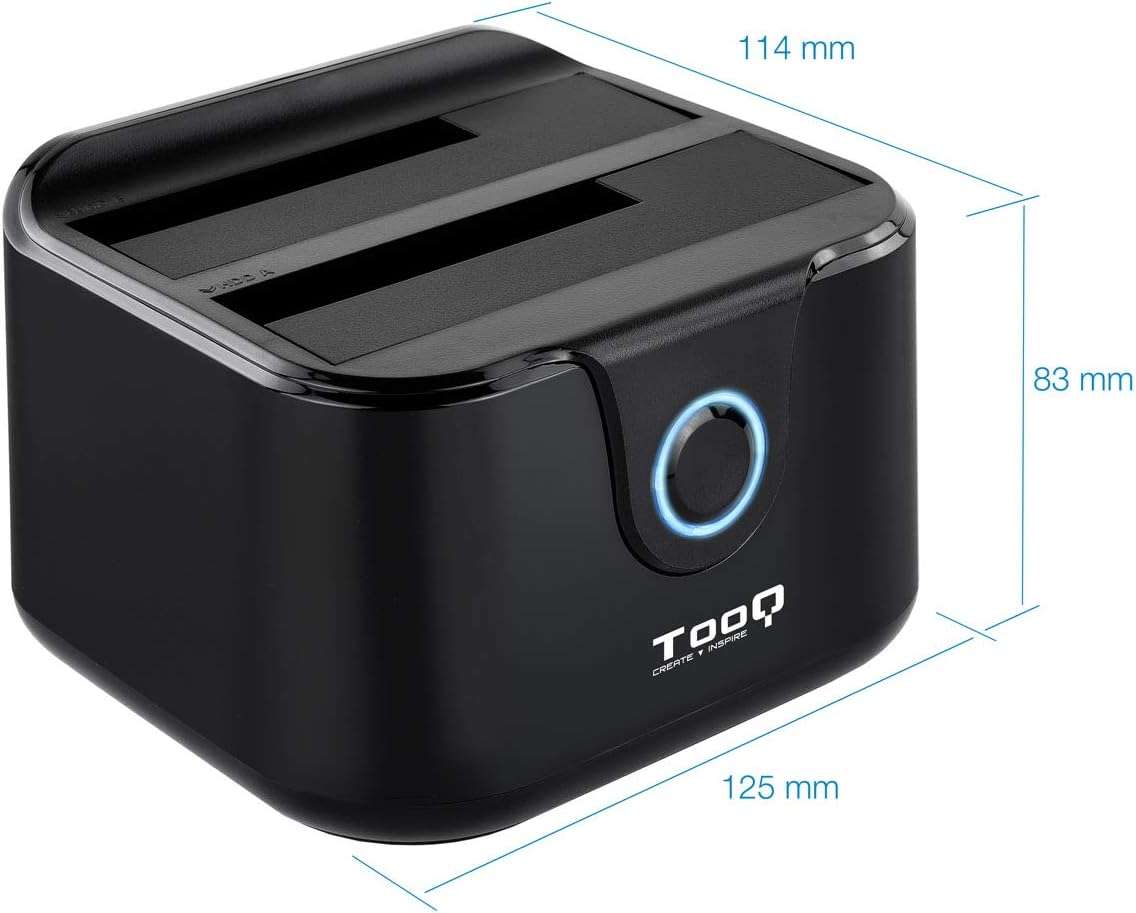
Image: Package contents including the docking station, power adapter, and USB 3.0 cable.
Produktua amaituview
Aurrealdeko panela

Irudia: Aurrealdea view of the docking station. The central button serves as the Clone button, surrounded by an LED indicator.
- LED adierazlea: Pizten da indarra eta jarduera adierazteko.
- Klonatzeko botoia: Initiates the offline disk cloning process.
Atzeko panela

Irudia: Atzealdea view of the docking station, detailing the power switch, DC 12V power input, and USB-B port for computer connection.
- ON / OFF etengailua: Powers the docking station on or off.
- DC 12V Jack: Barneratutako energia-egokitzailera konektatzen da.
- USB-B ataka: Connects the docking station to your computer via the USB 3.0 cable.
Goiena View (Drive Bays)

Irudia: Goian view showing two drive bays, labeled A and B, designed to accommodate both 2.5-inch and 3.5-inch SATA HDDs/SSDs.
- A unitatearen badia: For inserting the source drive during cloning, or a primary drive for data access. Compatible with 2.5" and 3.5" SATA drives.
- B unitatearen badia: For inserting the target drive during cloning, or a secondary drive for data access. Compatible with 2.5" and 3.5" SATA drives.
Konfigurazioa
- Konektatu energia: Connect the included power adapter to the DC 12V jack on the rear of the docking station, then plug the adapter into a power outlet. Do not power on the device yet.
- Ordenagailura konektatu (aukerakoa datuak transferitzeko): If you intend to use the docking station for data transfer with a computer, connect the USB 3.0 cable from the USB-B port on the docking station to an available USB 3.0 port on your computer.
- Txertatu unitateak: Gently insert your 2.5-inch or 3.5-inch SATA hard drives or SSDs into the drive bays (A and/or B) until they are firmly seated. Ensure the SATA connectors align correctly.
- Piztu: Flip the ON/OFF switch on the rear panel to the 'ON' position. The LED indicator will illuminate.
Funtzionamendu-argibideak
A. Data Transfer (Connected to PC)
When connected to a computer via USB, the docking station functions as an external drive enclosure. Insert one or two SATA drives into the bays. Your operating system should automatically detect the drives. You can then access, read, and write data to them as you would with any other external storage device.
- Ensure the docking station is powered on and connected to your computer.
- Insert the SATA drive(s) into the bays.
- The drives will appear as removable storage in your computer's file esploratzailea.
- For safe removal, always eject the drives through your operating system before powering off the docking station or disconnecting the USB cable.
B. Lineaz kanpoko klonazio funtzioa
The offline clone function allows you to duplicate a source drive to a target drive without needing a computer connection. The target drive must be equal to or larger in capacity than the source drive.
- Prestatu unitateak: Ensure both the source drive (the drive you want to copy FROM) and the target drive (the drive you want to copy TO) are free of errors. All data on the target drive will be erased during the cloning process.
- Txertatu unitateak:
- Sartu Iturria Drive sartu A badia.
- Sartu Helburuko unitatea sartu badia B.
- Deskonektatu ordenagailutik: Ensure the USB cable is disconnected from the computer. The docking station must be operating independently for offline cloning.
- Piztu: Turn on the docking station using the ON/OFF switch.
- Klonazioa hasi: Eduki sakatuta Klonatzeko botoia for approximately 3-5 seconds until the LED indicator begins to flash. Release the button.
- Jarraitu aurrerapena: The LED indicator will show the cloning progress. It will typically flash or change color to indicate different stages (e.g., 25%, 50%, 75%, 100%).
- Osatzea: Once the cloning process is complete, the LED indicator will stop flashing and remain solid. You can then power off the docking station and remove the drives.
Important: Do not interrupt the cloning process by powering off the device or removing drives, as this may lead to data corruption on both drives.
Mantentzea
- Keep the docking station in a clean, dry environment, away from direct sunlight and extreme temperatures.
- Saihestu gailua kolpe gogorrak erortzea edo jasaten.
- Garbitu kanpoaldea zapi leun eta lehor batekin. Ez erabili garbitzaile likidorik edo disolbatzailerik.
- Ziurtatu gailua behar bezala aireztatuta dagoela inguruan funtzionamenduan zehar.
Arazoak konpontzea
Drive Not Detected by Computer
- Ensure the docking station is powered on and the USB cable is securely connected to both the docking station and the computer.
- Saiatu ordenagailuko beste USB ataka batera konektatzen.
- Verify that the hard drive is properly seated in the bay.
- Egiaztatu Diskoen Kudeaketa (Windows) edo Diskoen Utilitatea (macOS) unitatea ezagutzen den baina formatu gabe edo esleitu gabe dagoen ikusteko.
- Test the drive directly in a computer or with another enclosure to rule out drive failure.
Offline Clone Fails or Does Not Start
- Ensure the USB cable is disconnected from the computer. Offline cloning requires the device to be standalone.
- Verify that the source drive is in Bay A and the target drive is in Bay B.
- Ziurtatu helburuko unitatearen edukiera iturburuko unitatearen edukieraren berdina edo handiagoa dela.
- Ensure both drives are properly inserted and seated.
- Press and hold the Clone button for the specified duration (3-5 seconds) until the LED indicator responds.
- Check for any errors on the source drive before attempting to clone.
Zehaztapenak
| Modelo zenbakia | TQDS-802B |
| Marka | TOOQ |
| Unitate bateragarriak | 2.5" and 3.5" SATA I/II/III HDDs/SSDs |
| Drive Bays | 2 (Badia Bikoitza) |
| PCrako interfazea | USB 3.0 (atzerako bateragarria USB 2.0-rekin) |
| Datuen transferentzia-tasa | Gehienez 5.0 Gbps (USB 3.0) |
| Offline Clone Function | Supported (PC-independent) |
| Gehienezko disko-ahalmena | Up to 2.0 TB (32-bit/64-bit systems) and 3.0 TB or more (64-bit systems) |
| Onartutako OS | Windows, macOS, Linux (for USB connection) |
| Elikatze Hornidura | DC 12V korronte egokitzailea |
| Neurriak | Gutxi gorabehera 125 mm x 114 mm x 83 mm |
| Pisua | 350 gramo |

Image: Dimensions of the TooQ TQDS-802B Dual Bay SATA Docking Station.
Bermea eta Laguntza
TOOQ products are designed for reliability and performance. For warranty information, please refer to the warranty card included with your product or visit the official TOOQ website. For technical support or further assistance, please contact TOOQ customer service through their official channels.
Manufacturer: Tooq & Nanocable Spain