
1. Sarrera
This manual provides detailed instructions for the safe and effective operation of the Meco 2250-HZ Auto Digital Clamp Meter. This device is designed for measuring various electrical parameters, including AC/DC voltage, AC current, frequency, continuity, and diode testing. Please read this manual thoroughly before use and retain it for future reference.
2. Segurtasun informazioa
Always observe standard safety precautions when working with electrical circuits. Failure to do so may result in injury or damage to the meter. This meter is designed with over-voltage protection up to 200V DC and AC Peak. However, exercise caution.
- Ez saiatu bolumena neurtzentagZehaztutako gehienezko mugak gainditzen dituzten korronteak edo korronteak.
- Ziurtatu proba-kableak egoera onean daudela eta behar bezala konektatuta daudela neurketak egin aurretik.
- Do not operate the meter if it appears damaged or if the battery cover is not securely closed.
- Avoid using the meter in wet environments or in the presence of explosive gases or dust.
- Always disconnect power to the circuit before connecting or disconnecting test leads, especially for current measurements.
3. Produktua amaitu daview
The Meco 2250-HZ Auto Digital Clamp Meter features a robust design for reliable performance. Familiarize yourself with the components shown below.
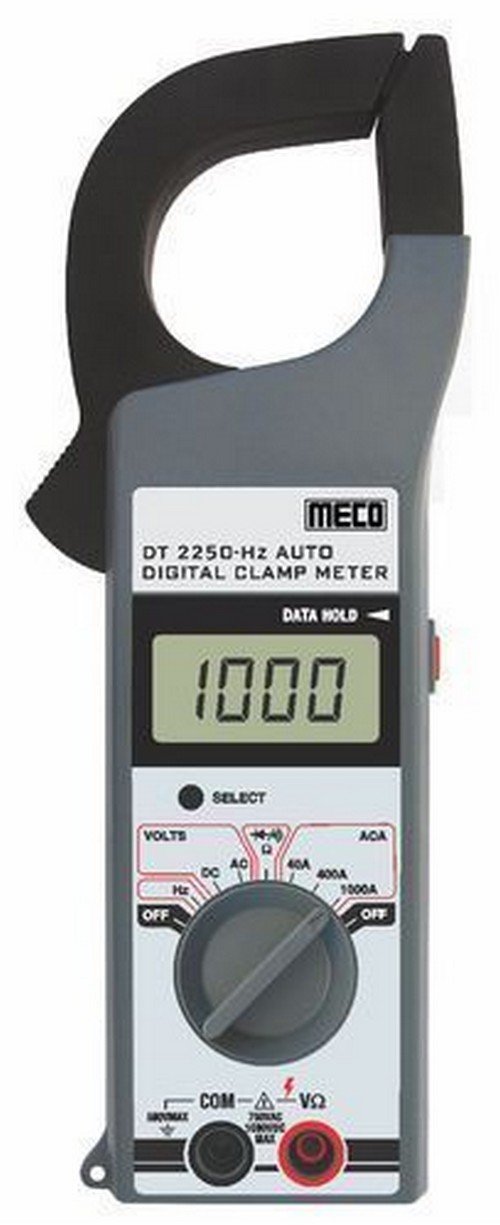
1. irudia: Aurrealdea view of the Meco 2250-HZ Auto Digital Clamp Meter. This image displays the clamp jaw at the top, the LCD screen showing '1000', the function dial, and the input terminals at the bottom. The 'SELECT' and 'DATA HOLD' buttons are visible next to the display.
Funtsezko osagaiak:
- Clamp Baraila: Kontakturik gabeko korronte alternoa neurtzeko erabiltzen da.
- LCD pantaila: 3¾ digit liquid crystal display with a maximum reading of 3999. Shows measurement values, polarity, overrange indication (OL or -OL), and low battery indication.
- Funtzio-markagailua: Rotary switch to select measurement functions (OFF, Volts DC/AC, Hz, ACA 40A/400A/1000A).
- Aukeratu botoia: Used to switch between DC and AC voltage modes, or other sub-functions within a dial setting.
- DATUAK EUTSI botoia: Uneko irakurketa pantailan izozten du. Sakatu berriro askatzeko.
- Input Terminals (COM, VΩ): Bolumenaren proba-kableak konektatzekotage, resistance, continuity, and diode measurements.
4. Konfigurazioa
4.1 Bateriaren instalazioa
The Meco 2250-HZ Auto Digital Clamp Meter requires batteries for operation. Batteries are not included with the product. To install or replace batteries:
- Ziurtatu neurgailua itzalita dagoela.
- Bilatu bateriaren konpartimentua neurgailuaren atzealdean.
- Erabili bihurkin bat bateriaren konpartimentuaren estalkia irekitzeko.
- Insert the required batteries, observing correct polarity (+ and -).
- Jarri bateriaren konpartimenduaren estalkia eta lotu torlojuarekin.
A low battery indication will appear on the display when the battery voltage is low, signaling the need for replacement.
5. Funtzionamendu-argibideak
5.1 Funtzionamendu Orokorra
- Turn the function dial to the desired measurement setting.
- Connect test leads to the appropriate input terminals (COM and VΩ) for voltage, resistance, continuity, or diode tests.
- For current measurements, use the clamp masailezurra eroale bakarraren inguruan.
- Sakatu AUKERATU button to toggle between AC/DC modes or other sub-functions if available for the selected range.
- Sakatu DATUAK HARTZEKO botoia pantailan uneko irakurketa izozteko. Sakatu berriro askatzeko.
5.2 AC/DC Voltage Neurketa
- Set the function dial to the "VOLTS" position.
- Connect the black test lead to the COM terminal and the red test lead to the VΩ terminal.
- Sakatu AUKERATU button to choose between AC or DC voltage measurement. The display will indicate "AC" or "DC".
- Konektatu proba-kableak zirkuitu edo probatu beharreko osagaiarekin paraleloan.
- Irakurri liburukiatage balioa LCD pantailan.
5.3 Korronte alternoaren neurketa (Clamp)
- Set the function dial to the desired AC current range (40A, 400A, or 1000A).
- Ireki clamp masailezurra abiarazlea sakatuz.
- Zirkuituko eroale bakarra sartu cl-aren barruanamp masailezurra. Ziurtatu masailezurra guztiz itxita dagoela.
- Irakurri korronte alternoaren balioa LCD pantailan.
5.4 Frequency (Hz) Measurement
- Set the function dial to the "Hz" position.
- Connect the black test lead to the COM terminal and the red test lead to the VΩ terminal.
- Connect the test leads in parallel to the circuit where frequency needs to be measured.
- Read the frequency value in Hertz (Hz) on the LCD display.
5.5 Audible Continuity Check
- Set the function dial to the continuity/diode symbol (often shared with resistance).
- Connect the black test lead to the COM terminal and the red test lead to the VΩ terminal.
- Touch the test probes across the component or circuit to be tested.
- Jarraitutasuna badago (erresistentzia baxua), neurgailuak bip soinu entzungarri bat igorriko du.
5.6 Diodoaren proba
- Set the function dial to the continuity/diode symbol.
- Connect the black test lead to the COM terminal and the red test lead to the VΩ terminal.
- Connect the red test lead to the anode of the diode and the black test lead to the cathode. The display will show the forward voltage tanta.
- Reverse the test leads. The display should show "OL" (overload) for a good diode.
6. Mantentzea
6.1 Garbiketa
Garbitu neurgailuaren casiniragarkiarekin gamp cloth and a mild detergent. Do not use abrasives or solvents. Keep the display clean and dry.
6.2 Bateria ordezkatzea
Refer to Section 4.1 for battery installation and replacement instructions. Replace batteries promptly when the low battery indicator appears to ensure accurate readings.
7. Arazoak
| Arazoa | Kausa posiblea | Irtenbidea |
|---|---|---|
| Neurgailua ez da pizten. | Bateriak hilda edo gaizki instalatuta. | Egiaztatu bateriaren polaritatea eta, beharrezkoa bada, ordezkatu bateriak. |
| "OL" or "-OL" displayed. | Overrange condition; measurement exceeds meter's range. | Hautatu tarte handiago bat edo ziurtatu neurtutako balioa neurgailuaren gaitasunen barruan dagoela. |
| Irakurketa okerrak. | Low battery, poor test lead connection, or incorrect function selection. | Replace batteries, ensure secure connections, verify function dial setting. |
| No audible beep during continuity test. | Open circuit or high resistance. | Verify the circuit is closed and resistance is low enough for continuity. |
8. Zehaztapenak
| Ezaugarri | Xehetasuna |
|---|---|
| Bistaratzea | 3¾ digit LCD, max reading 3999 |
| Polaritatea | Automatic, negative polarity indication |
| Gehiengoaren Adierazpena | "OL" or "-OL" displayed |
| Zero doikuntza | Automatikoa |
| Bateriaren iraupena | 200 ordu tipikoa |
| Voltage Babesa | 200V DC and AC Peak |
| Audible Continuity Check | Bai |
| Diodo proba | Bai |
| Bateria baxuaren adierazlea | Bai |
| Elementuaren pisua | 600 g (1.32 libera) |
| Produktuaren neurriak | 21 x 13 x 6 cm |
| Materiala | Plastikoa |
| Fabrikatzailea | Meco Instruments |
9. Bermea eta Laguntza
For warranty information or technical support, please contact the retailer or the manufacturer, Meco Instruments, directly. Keep your purchase receipt as proof of purchase.