1. Sarrera
This manual provides detailed instructions for the installation, operation, and maintenance of your ASRock H110M-DGS Micro ATX Motherboard. Please read this manual thoroughly before attempting any installation or configuration to ensure proper functionality and to prevent damage to your components.
2. Segurtasun informazioa
- Always disconnect the power cord from the wall outlet before touching any internal components.
- Erabili eskumuturreko antiestatiko bat plaka basea edo beste osagai batzuk maneiatzen dituzunean, deskarga elektrostatikoen (ESD) kalteak saihesteko.
- Osagaiak ertzetik heldu, zati sentikorrak ez ukitzeko.
- Ziurtatu ordenagailuaren karkasa behar bezala aireztatuta dagoela gehiegi berotzea saihesteko.
- Mantendu plaka nagusia hezetasunetik eta muturreko tenperaturetatik urrun.
3. Paketearen edukia
Egiaztatu elementu guztiak zure plaka basearen paketean daudela:
- ASRock H110M-DGS Motherboard
- I / O ezkutukoa
- SATA datu kableak
- Support CD (Drivers and Utilities)
- Instalazio azkarraren gida
4. Plakaren diseinua
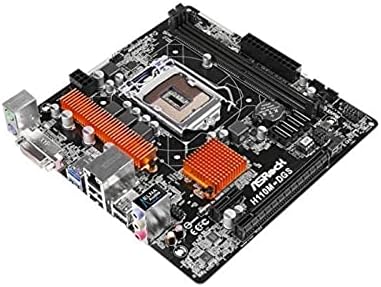
The ASRock H110M-DGS is a Micro ATX motherboard designed for Intel LGA 1151 processors. Below is an overview of the motherboard's key components and connectors.

4.1. irudia: Goitik behera view of the ASRock H110M-DGS Micro ATX Motherboard, showing the CPU socket, RAM slots, PCIe slots, and various headers.
4.2. irudia: Angelukoa view highlighting the CPU socket area, DDR4 memory slots, and the chipset heatsink.
5. Konfigurazioa eta instalazioa
Jarraitu urrats hauek zure plaka basea eta osagaiak behar bezala instalatzeko.
5.1. CPUaren instalazioa
- Ireki CPUaren socket-aren palanka eta altxa metalezko karga-plaka.
- Carefully align the notches on your LGA 1151 CPU with the socket and gently place the CPU into the socket. Do not force it.
- Itxi karga-plaka eta finkatu palankarekin.
5.2. Memoriaren (RAM) instalazioa
The H110M-DGS supports DDR4-2133 memory modules. It features two DIMM slots, supporting a maximum of 32GB in dual-channel configuration.
- Ireki DIMM zirrikituaren bi muturretan dauden klipak.
- Lerrokatu DDR4 memoria-moduluko koska DIMM zirrikituan dagoen giltzarekin.
- Insert the module firmly until the clips snap into place.
5.3. Biltegiratze gailuaren instalazioa
The motherboard provides four SATA3 ports for connecting storage devices such as HDDs and SSDs.
- Connect one end of the SATA data cable to a SATA3 port on the motherboard.
- Konektatu SATA datu-kablearen beste muturra zure biltegiratze-gailura.
- Konektatu SATA kable bat elikatze-iturritik (PSU) biltegiratze-gailura.
5.4. Hedapen-txartelaren instalazioa
The motherboard includes one PCI-Express 3.0 x16 slot for a graphics card and one PCI Express 2.0 x1 slot for other expansion cards.
- Align your expansion card with the appropriate PCIe slot.
- Press down firmly until the card is seated correctly in the slot.
- Txartela torloju batekin ordenagailuaren kaxan finkatu.
5.5. Front Panel and Power Connections
Connect the various cables from your computer case to the corresponding headers on the motherboard.
- Aurrealdeko paneleko goiburuak: Connect power switch, reset switch, HDD LED, and power LED cables. Refer to the motherboard diagram for correct pin orientation.
- USB goiburuak: Connect front panel USB 3.0 (2 ports via header) and USB 2.0 (2 ports via header) cables.
- Audio Header: Connect the front panel audio cable.
- Potentzia-konektoreak: Connect the 24-pin ATX power connector and the 8-pin (or 4-pin) CPU power connector from your PSU to the motherboard.

5.1. irudia: Rear I/O panel showing PS/2 ports, DVI-D, USB 3.0, USB 2.0, RJ45 LAN, and audio jacks.
6. Zure sistemaren funtzionamendua
6.1. Hasierako abiarazpena eta BIOS konfigurazioa
- Sistema muntatu ondoren, konektatu monitore bat, teklatua eta sagua.
- Piztu sistema. Abiarazteko prozesuan zehar, sakatu botoia DEL or F2 BIOS/UEFI konfigurazio utilitatean sartzeko tekla.
- Configure boot order, system time, and other settings as needed. Save changes and exit.
6.2. Sistema eragilearen eta kontrolatzaileen instalazioa
- Install your preferred operating system (e.g., Windows 8.1, Windows 10).
- After OS installation, install the necessary drivers from the provided support CD or download the latest versions from the ASRock official website. This includes chipset drivers, audio drivers, LAN drivers, and any other relevant device drivers.
7. Mantentzea
7.1. Garbiketa
- Regularly clean dust from inside your computer case, especially around fans and heatsinks, to maintain optimal cooling.
- Erabili aire konprimatua hautsa iristeko zailak diren guneetatik kentzeko.
7.2. BIOS eguneraketak
Aldian-aldian egiaztatu ASRock-a website for updated BIOS versions. BIOS updates can improve system stability, compatibility, and performance. Follow the instructions provided by ASRock carefully when performing a BIOS update.
8. Arazoak
Atal honek aurki ditzakezun arazo ohikoenei heltzen die.
- Potentziarik gabe: Ensure all power cables (24-pin ATX, 8-pin CPU) are securely connected to the motherboard and the power supply is switched on. Check the power button connection to the front panel header.
- Ez dago pantailarik: Verify that your graphics card is properly seated in the PCIe slot and connected to the power supply (if required). Ensure the monitor cable is securely connected to the graphics card or motherboard's integrated graphics port.
- System Not Booting / POST Errors: Check that the CPU, RAM, and graphics card are correctly installed. Listen for beep codes from the motherboard, which can indicate specific issues.
- Memoria arazoak: If experiencing issues with RAM, try installing one memory module at a time to identify a faulty stick or slot. Ensure memory modules are fully seated.
- USB atakak ez dira funtzionatzen: Ensure front panel USB headers are correctly connected. Check device manager in your operating system for driver issues.
- Ez dago Interneteko konexiorik: Verify the Ethernet cable is connected to the RJ45 LAN port and your router. Install the latest LAN drivers.
If problems persist, consult the ASRock support webgunea edo jarri harremanetan laguntza teknikoarekin.
9. Zehaztapenak
Key technical specifications for the ASRock H110M-DGS Motherboard:
| Ezaugarri | Zehaztapena |
|---|---|
| CPU Socketa | LGA 1151 |
| Chipset | Intel H110 |
| Memoria zirrikituak | 2 x DDR4 DIMM, Dual Channel |
| Memoria Mota | DDR4 SDRAM |
| Memoria Abiadura | 2133 MHz (Max 32GB) |
| PCI-Express Slots | PCIe 3.0 x16 1, PCIe 2.0 x1 1 |
| SATA portuak | 4 x SATA3 |
| USB 3.0 Portuak | 4 (2 rear, 2 via header) |
| USB 2.0 Portuak | 6 (4 rear, 2 via header) |
| Bideo Irteera | 1 x DVI-D |
| LAN | Gigabit Ethernet |
| Audioa | HD audio-konektoreak |
| Forma-faktorea | Mikro ATX |
| Neurriak | 7.5 x 7.4 x 2.8 hazbete |
10. Bermea eta Laguntza
Bermeari buruzko informazioa lortzeko, mesedez, kontsultatu zure produktuarekin batera datorren berme-txartela edo bisitatu ASRock-en webgune ofiziala. website. For technical support, driver downloads, and BIOS updates, please visit the ASRock support page:
When contacting support, please have your motherboard model (H110M-DGS) and serial number ready.