
1. Sarrera
This manual provides essential information for the safe and efficient operation of your KitchenAid 5KMT223GER 2-Slot Automatic Toaster. Please read all instructions carefully before first use and retain for future reference.

1.1. irudia: Aurrealdea view of the KitchenAid 5KMT223GER 2-Slot Automatic Toaster.
2. Segurtasun-argibide garrantzitsuak
Etxetresna elektrikoak erabiltzean, oinarrizko segurtasun-neurriak bete behar dira beti, besteak beste:
- Irakurri argibide guztiak.
- Ez ukitu gainazal beroak. Erabili heldulekuak edo eskutokiak.
- Deskarga elektrikoetatik babesteko, ez murgildu kablea, entxufeak edo tostagailua uretan edo beste likido batean.
- Gainbegiratzea beharrezkoa da aparaturen bat umeek edo umeen ondoan erabiltzen dutenean.
- Deskonektatu entxufetik erabiltzen ez duzunean eta garbitu aurretik. Utzi hozten piezak jarri edo kendu aurretik.
- Do not operate any appliance with a damaged cord or plug, or after the appliance malfunctions or has been dropped or damaged in any manner. Return appliance to the nearest authorized service facility for examination, repair, or adjustment.
- Gailuaren fabrikatzaileak gomendatzen ez dituen osagarriak erabiltzeak lesioak eragin ditzake.
- Ez erabili kanpoan.
- Ez utzi kablea mahaiaren edo erakusmahaiaren ertzetik zintzilik zintzilik, ezta gainazal beroak ukitu ere.
- Ez jarri gas edo erregailu elektriko bero baten gainean edo inguruan, edo berotutako labe batean.
- Deskonektatzeko, jarri edozein kontrol "itzali" posizioan, eta gero atera entxufea hormako entxufetik.
- Ez erabili aparatua aurreikusitako erabilera ez den beste baterako.
- Tamaina handiko elikagaiak, metalezko paperezko paketeak edo tresnak ez dira txigorgailuan sartu behar sutea edo deskarga elektrikoa izateko arriskua izan dezaketelako.
- Sutea gerta daiteke txigorgailuak estaltzen badira edo material sukoia ukitzen badute, gortinak, estalkiak, hormak eta antzekoak barne, funtzionatzen ari direnean.
- Ez saiatu janaria kanporatzen txigorgailua entxufatuta dagoenean.
- Ez operatu arretarik gabe.
- Always remove the crumb tray for cleaning. Do not operate the toaster without the crumb tray in place.
3. Zatiak eta Ezaugarriak
Familiarize yourself with the components of your KitchenAid 2-Slot Automatic Toaster:
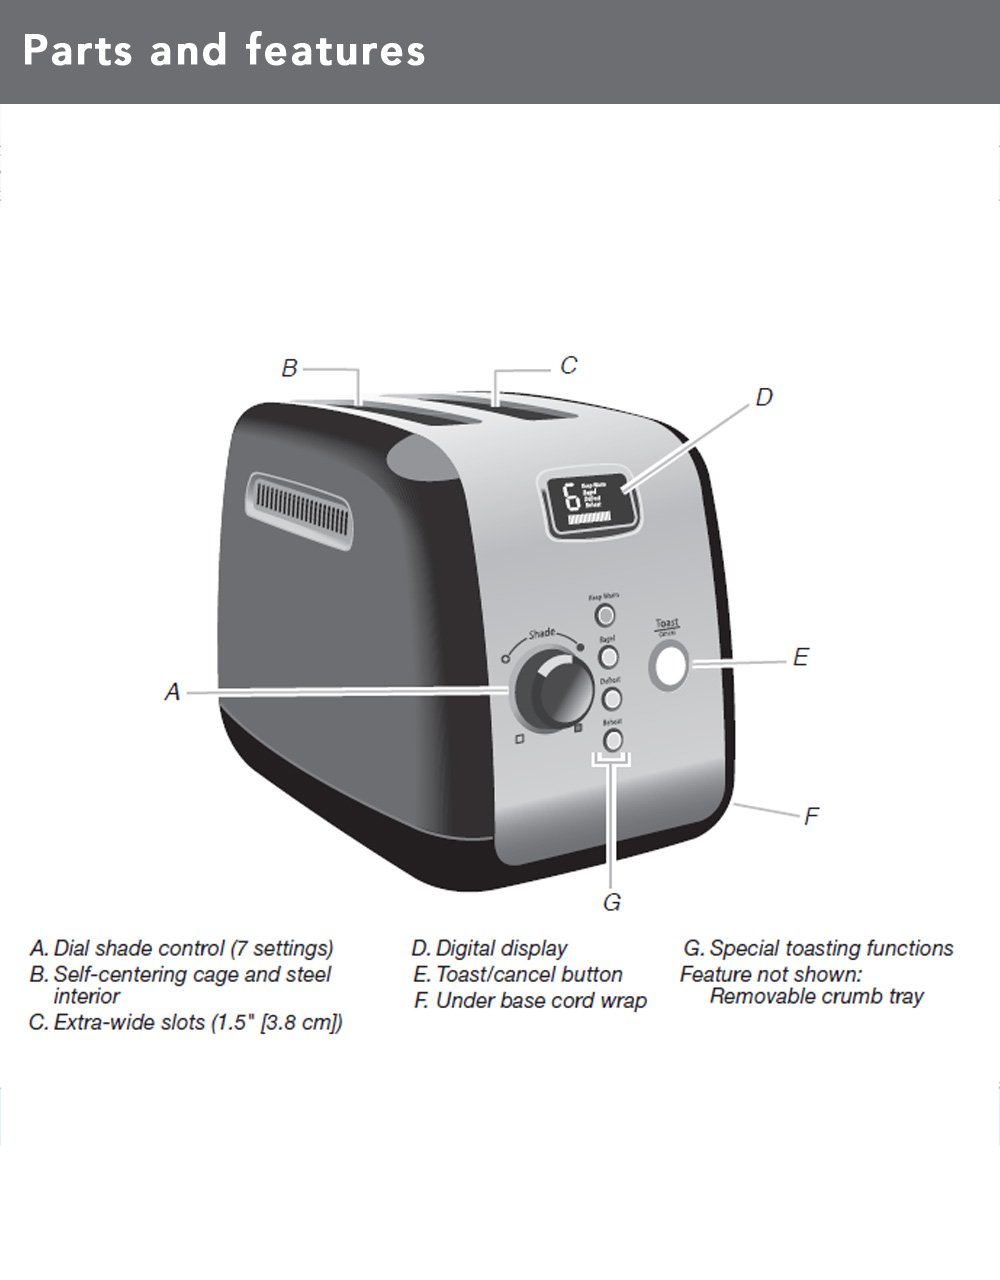
Image 3.1: Diagram illustrating the main parts and features of the toaster.
- Shade Control Dial (A): Adjusts the browning level with 7 settings.
- Self-Centering Bread Racks (B): Automatically centers bread for even toasting.
- Extra-Wide Slots (C): 3.8 cm (1.5 inches) wide slots accommodate various bread types.
- Digital Display (D): Shows selected shade setting and a countdown timer for toasting progress.
- Toast/Cancel Button (E): Initiates or cancels the toasting cycle. Features motorized lift.
- Under Base Cord Wrap (F): Kablea eroso gordetzeko.
- Special Toasting Functions (G): Includes Keep Warm, Bagel, Defrost, and Reheat buttons.
- Kendu erretilua: Located at the back for easy cleaning (not shown in diagram).
4. Konfigurazioa
Before using your toaster for the first time:
- Desontziratu txigorgailua eta kendu bilgarri guztiak.
- Garbitu iragarkiarekin txigorgailuaren kanpoaldeaamp oihal bat. Ziurtatu guztiz lehor dagoela konektatu aurretik.
- Place the toaster on a stable, flat, heat-resistant surface, away from flammable materials.
- Ensure the crumb tray is properly inserted at the back of the toaster.
- For the first use, operate the toaster without bread on the highest shade setting (7) to burn off any manufacturing residues. A slight odor or smoke may be present; this is normal. Allow the toaster to cool completely.
5. Funtzionamendu-argibideak
Follow these steps to toast bread and use the special functions:

Image 5.1: Bread slices inserted into the toaster's extra-wide slots.
5.1 Oinarrizko txigortzea
- Plug the toaster into a grounded electrical outlet.
- Place bread slices into the toasting slots. The self-centering racks will automatically adjust.
- Biratu Itzal kontrolatzeko dial to select your desired browning level (1 for lightest, 7 for darkest). The digital display will show the selected shade.
- Sakatu Toast/Cancel Button. The motorized lift will lower the bread into the slots, and the toasting cycle will begin. The digital display will show a countdown.
- Once the cycle is complete, the toaster will automatically raise the toasted bread.
- Tostada zikloa edozein unetan gelditzeko, sakatu botoia Toast/Cancel Button. The bread will be raised.
5.2 Funtzio bereziak
Your toaster includes dedicated buttons for specialized toasting needs:
- EGIN BERO: Press this button after a toasting cycle to keep toasted food warm for up to one minute. The toaster will gently lower and raise the bread after the warming period.
- BAGEL: This function toasts the cut-side of a bagel while gently warming the outer surfaces. Insert bagels with the cut side facing inwards. Select your desired shade, then press the BAGEL botoia eta ondoren Toast/Cancel Button.
- DESGELATZEA: Use this function to defrost and toast frozen food. Select your desired shade, then press the DESGELATU botoia eta ondoren Toast/Cancel Button. The toaster will automatically adjust the toasting time.
- BERRIZTU: This function quickly reheats previously toasted food without further browning. Press the BERRITU botoia eta ondoren Toast/Cancel Button.
6. Garbiketa eta Mantentze-lanak
Garbiketa erregularrak errendimendu optimoa bermatzen du eta tostadorearen bizitza luzatzen du.
6.1 Mamia erretilua

Image 6.1: The removable crumb tray for easy cleaning.
- Deskonektatu beti tostagailua eta utzi guztiz hozten garbitu aurretik.
- Pull out the removable crumb tray located at the back of the toaster.
- Discard crumbs. The crumb tray can be washed in the top rack of a dishwasher or by hand with warm, soapy water. Rinse thoroughly and dry completely before reinserting.
- Never operate the toaster without the crumb tray properly inserted.
6.2 Kanpoaldea
- Garbitu iragarkiarekin txigorgailuaren kanpoaldeaamp zapi eta ondo lehortu.
- Ez erabili garbitzaile urratzailerik edo estropagailurik, gainazala urra dezaketelako.
- Inoiz ez sartu txigorgailua uretan edo beste likido batean.
7. Arazoak
If you experience issues with your toaster, refer to the following table for common problems and solutions:
| Arazoa | Kausa posiblea | Irtenbidea |
|---|---|---|
| Tostagailua ez da pizten. | Ez dago konektatuta; itzalita dagotage; zirkuitu-etengailua jauzi egin du. | Ziurtatu tostagailua ondo konektatuta dagoela funtzionatzen duen entxufe batera. Egiaztatu etxeko etengailua. |
| Bread does not lower or raise. | Toaster not powered; Toast/Cancel button not pressed; food jammed. | Ensure power is on. Press Toast/Cancel button. Unplug toaster and carefully remove any jammed food. |
| Txigortze irregularra. | Ogiaren lodiera ez-erregularra; apurren metaketa. | Ensure bread slices are of similar thickness. Clean crumb tray regularly. |
| Kea edo erre usaina. | Food jammed; crumb buildup; high shade setting. | Immediately press Cancel. Unplug and allow to cool. Remove jammed food or clean crumb tray. Reduce shade setting for next use. |
If the problem persists after attempting these solutions, please contact KitchenAid customer support.
8. Zehaztapenak
| Ezaugarri | Xehetasuna |
|---|---|
| Modelo zenbakia | 5KMT223GER |
| Wattage | 1100 Watt |
| liburukiatage | 220 Volt |
| Slot Count | 2 |
| Itzal ezarpenak | 7 |
| Funtzio bereziak | Keep Warm, Bagel, Defrost, Reheat, Cancel |
| Materiala | Metala |
| Produktuaren neurriak (L x W x H) | 25D x 34Z x 25.5A zentimetro |
| Elementuaren pisua | 2200 gramo |
| Dakarten osagaiak | Pop-up Toaster, Removable Crumb Tray |
9. Bermea eta Laguntza
Your KitchenAid 5KMT223GER 2-Slot Automatic Toaster is covered by a 2 urteko berme mugatua erosketa-datatik aurrera. Berme honek etxeko erabilera arruntean materialen eta fabrikazioaren akatsak estaltzen ditu.
For warranty service, technical support, or to order replacement parts, please contact KitchenAid customer service. Keep your purchase receipt as proof of purchase for warranty claims.