Goobay 45241
Goobay 45241 Soldering Aid with LED Lamp and Magnifying Glass User Manual
Eredua: 45241
1. Sarrera
The Goobay 45241 Soldering Aid is a versatile tool designed to assist with delicate soldering and assembly tasks. It features a magnifying glass with LED illumination, flexible gooseneck crocodile clips, and an integrated soldering iron holder, providing stability and enhanced visibility for precision work.

Image 1.1: The Goobay 45241 Soldering Aid unit, showcasing its main components including the magnifying glass, LED lamp, gooseneck arms, and base with accessories.
2. Segurtasun-argibideak
Produktu hau erabili aurretik, irakurri eta ulertu segurtasun-argibide guztiak. Argibide hauek ez jarraitzeak lesioak edo produktua kaltetu dezake.
- Always use the soldering aid on a stable, non-slip surface.
- Mantendu gailua uretatik eta beste likidoetatik urrun.
- Do not look directly into the LED light for extended periods to avoid eye strain.
- Ensure proper ventilation when soldering, as fumes can be harmful.
- Mantendu haurren eskura.
- Disconnect power when not in use or when cleaning.
- Use only the provided power adapter or recommended batteries.
3. Paketearen edukia
Egiaztatu behean zerrendatutako elementu guztiak zure paketean daudela:
- Goobay 45241 Soldering Aid main unit (base with magnifying glass, LED lamp, gooseneck arms, crocodile clips)
- Soldagailuaren euskarria
- Garbiketa belakia
- Cleaning wool (brass wire)
- Soldering resin (flux)
- AC Potentzia Egokitzailea

3.1. irudia: Amaituview of the soldering aid's features, including 16 LEDs, 3x magnification, soldering iron holder, sponge, cleaning wool, and flux.

3.2 irudia: Xehetasun zehatza view of the included accessories: brass tip cleaner, soldering resin (rosin), and cleaning sponge.
4. Muntaketa
The Goobay 45241 Soldering Aid comes largely pre-assembled. Follow these steps for final setup:
- Osagai guztiak ontzitik atera.
- Place the main unit on a stable, flat work surface. The robust metal base ensures stability.
- Ensure the gooseneck arms for the magnifying glass and crocodile clips are securely attached to the base. Adjust their positions as needed.
- Insert the soldering iron holder into its designated slot on the base.
- Place the cleaning sponge, cleaning wool, and soldering resin into their respective compartments on the base.
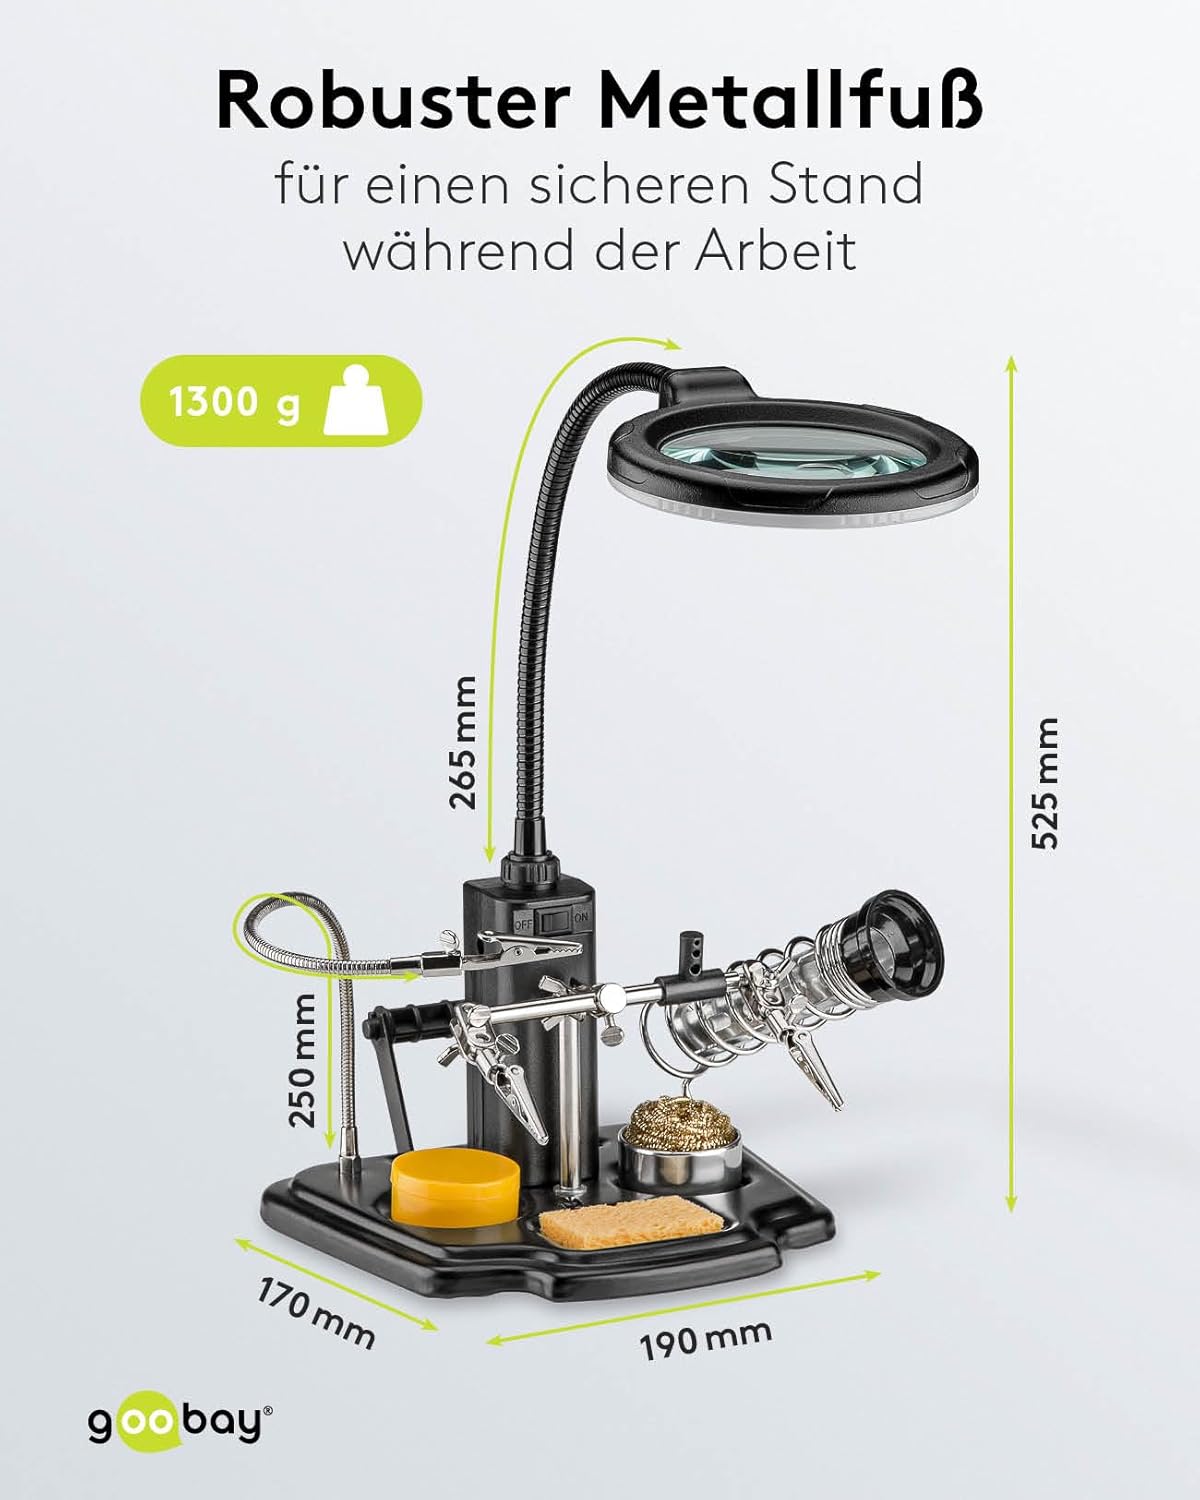
Image 4.1: The soldering aid with key dimensions, highlighting the robust metal base for secure positioning during work.
5. Power Aukerak
The LED illumination can be powered either by batteries or via the included AC power adapter.
5.1. Bateriaren funtzionamendua
For portable use, the LED light can be powered by 4x AA batteries (not included).
- Kokatu bateriaren konpartimendua unitate nagusian.
- Ireki bateriaren konpartimenduaren estalkia.
- Insert 4x AA batteries, ensuring correct polarity (+/-).
- Itxi bateriaren konpartimenduaren estalkia ondo.

Image 5.1: The removable battery compartment, designed for 4x AA batteries, allowing for flexible power options.
5.2. CA korronte egokitzailea
For continuous operation, use the included AC power adapter.
- Connect the DC plug of the power adapter to the power input port on the main unit.
- Plug the AC adapter into a suitable wall outlet.

Image 5.2: Details of the direct power supply via the included AC adapter, showing Europlug (Type C, CEE 7/16) and DC plug specifications.
6. Funtzionamendu-argibideak
This section details how to use the various features of your Goobay 45241 Soldering Aid.

Image 6.1: Labeled diagram identifying key components: Magnifying glass, LED ring light, flexible goosenecks, On/Off switch, soldering iron holder, crocodile clips, cleaning wool, soldering resin holder, flux, and cleaning sponge.
6.1. Using the Magnifying Glass and LED Light
- Position the magnifying glass gooseneck to bring the lens over your workpiece.
- Flip the ON/OFF switch located on the main unit to activate the LED ring light.
- Adjust the angle and distance of the magnifying glass for optimal viewing and illumination of your work area. The 3x magnification and 16 LEDs provide clear visibility for fine details.

6.2 irudia: Gertuko planoa view of the magnifying glass, detailing the LED ring light with 16 SMD LEDs, cold white light color (6500 K), 280 lm luminous flux, and the 90 mm diameter glass lens with 3x magnification (8 diopters).
6.2. Utilizing the Crocodile Clips
- Use the flexible gooseneck arms of the crocodile clips to securely hold small components or circuit boards in place.
- Adjust the angle and position of the clips to achieve the desired orientation for your workpiece. The strong clips prevent trembling or wobbling.

Image 6.3: The soldering aid in use, holding a circuit board, demonstrating its function as a practical helper for hands-free operation.

Image 6.4: The soldering aid providing a helping hand for intricate soldering and crafting tasks, shown with close-ups of fine component work and wire soldering.
6.3. Soldering Iron Holder and Cleaning
- Place your soldering iron in the integrated holder when not actively soldering to keep it secure and prevent accidental burns.
- Use the cleaning wool (brass wire) to effectively remove solder residue from the soldering tip.
- Dampen the cleaning sponge with water and use it to wipe the soldering tip clean.
- Apply a small amount of soldering resin (flux) to the soldering tip or workpiece to improve solder flow and joint quality.
7. Mantentzea
Regular maintenance ensures the longevity and optimal performance of your soldering aid.
- Lentea garbitzea: Gently wipe the magnifying glass lens with a soft, lint-free cloth. For stubborn smudges, use a lens cleaning solution. Avoid abrasive cleaners.
- Oinarria garbitzea: Wipe the base and plastic components with a damp oihal. Ez sartu unitatea uretan.
- Belakiaren zaintza: Keep the cleaning sponge damp during use. Replace it when it becomes worn or heavily soiled.
- Bateria ordezkatzea: If using batteries, replace all four AA batteries simultaneously when the LED light dims.
- Biltegiratzea: Store the soldering aid in a clean, dry environment when not in use.
8. Arazoak
If you encounter issues with your Goobay 45241 Soldering Aid, refer to the following common problems and solutions:
| Arazoa | Kausa posiblea | Irtenbidea |
|---|---|---|
| LED argia ez da pizten. | No power, batteries drained, or AC adapter not connected. | Check if the AC adapter is properly connected or replace batteries. Ensure the ON/OFF switch is in the 'ON' position. |
| LED argia ahula da. | Bateria baxua. | Replace batteries or use the AC power adapter. |
| Unit is unstable. | Not on a flat surface, or components not properly seated. | Ensure the unit is on a flat, stable surface. Check that all goosenecks and accessories are securely tightened. |
| Lupa view lausoa da. | Lens is dirty or not properly focused. | Clean the lens with a soft cloth. Adjust the distance of the lens from your workpiece. |
9. Zehaztapenak
| Eredua | Goobay 45241 |
| Elementuaren pisua | 1.2 kilogramo |
| Handitzearen indarra | 3 Diopters (3x) |
| Lentearen diametroa | 90 mm |
| Lentearen materiala | Plastikoa, akrilikoa |
| LEDak | 16 SMD LED |
| Argi Kolorea | Zuri Hotza |
| Kolore Tenperatura | 6500 K |
| Argi Fluxua | 280 lm |
| Goosleck Lamp Luzera | 265 mm |
| Gooseneck Crocodile Clamp Luzera | 250 mm |
| Oinarriaren neurriak (L x W) | 190 mm x 170 mm |
| Altuera osoa | 525 mm |
| Elikatze Hornidura | 4x AA Batteries (not included) or AC Adapter |
| AC egokigailuaren irteera | 5.9 V, 0.5 A, 2.95 W |
| Fabrikatzailea | Wentronic |
10. Bermea eta Laguntza
The Goobay 45241 Soldering Aid comes with a 2 urteko bermea erosketa-datatik aurrera. Berme honek erabilera normalaren ondoriozko fabrikazio-akatsak estaltzen ditu.
For technical support, warranty claims, or further assistance, please contact your retailer or the manufacturer directly. Keep your proof of purchase for warranty validation.
Ask a question about this manual
Ask about setup, troubleshooting, compatibility, parts, safety, or missing instructions. Manuals+ will review the question and use this page’s manual context to help answer it.