1. Sarrera
This manual provides detailed instructions for the installation, operation, and maintenance of your ASRock AB350M-HDV MicroATX Motherboard. The ASRock AB350M-HDV is designed to support AMD Socket AM4 A-Series APUs (Bristol Ridge) and Ryzen Series CPUs (Summit Ridge), featuring a Digi Power design and 7 Power Phase design for stable performance. It supports DDR4 memory and offers various connectivity options including SATA3, USB 3.0, and an Ultra M.2 slot.
2. Produktua amaitu daview
The ASRock AB350M-HDV motherboard is a MicroATX form factor board, ideal for compact PC builds. It features essential components for a modern computing system.

2.1. irudia: Angeludun view of the ASRock AB350M-HDV Motherboard, showcasing its compact MicroATX design and various components.
Ezaugarri nagusiak:
- Supports AMD Socket AM4 A-Series APUs (Bristol Ridge) and Ryzen Series CPUs (Summit Ridge).
- DDR4 memory support up to 3200+ (OC) for Ryzen CPUs and 2400 for A-series APUs.
- 1 PCIe 3.0 x16 slot and 1 PCIe 2.0 x1 slot for expansion cards.
- 4 SATA3 ports and 1 Ultra M.2 (PCIe Gen3 x4 & SATA3) slot for storage.
- 6 USB 3.0 ports (2 front, 4 rear) and 2 USB 2.0 ports for peripheral connectivity.
- Integrated Gigabit Ethernet for network connectivity.
- Video outputs: VGA, DVI, HDMI.

2.2. irudia: Goitik behera view of the ASRock AB350M-HDV Motherboard, highlighting the CPU socket, RAM slots, M.2 slot, and PCIe slots.
3. Konfigurazioa eta instalazioa
Follow these steps carefully to install your ASRock AB350M-HDV motherboard and its components.
3.1 PUZaren instalazioa
- Aurkitu AM4 CPUaren socket-a plaka basean.
- Altxatu entxufearen alboan dagoen kargatzeko palanka.
- Lerrokatu CPUko marka triangeluarra socket-eko dagokion markarekin. Sartu CPUa socket-ean kontu handiz, indarrik gabe.
- Jaitsi kargatzeko palanka CPUa bere lekuan finkatzeko.
- Instalatu CPU hozkailua fabrikatzailearen argibideen arabera.
3.2 RAM (Memoria) instalazioa
- Locate the DDR4 DIMM slots. This motherboard has 4 slots.
- Ireki DIMM zirrikituaren bi muturretan dauden klipak.
- Lerrokatu RAM moduluko koska DIMM zirrikituan dagoen giltzarekin.
- Insert the RAM module firmly into the slot until the clips snap into place. Ensure both clips are closed.
3.3 Storage Device Installation (SATA & M.2)
SATA unitateak:
- Connect one end of a SATA data cable to a SATA3 port on the motherboard.
- Connect the other end of the SATA data cable to your hard drive or SSD.
- Konektatu SATA kable bat elikatze-iturritik (PSU) biltegiratze-gailura.
M.2 SSD:
- Locate the Ultra M.2 slot on the motherboard.
- Remove the M.2 screw and standoff from the slot.
- Sartu M.2 SSDa zirrikituan 30 graduko angeluan.
- Push the M.2 SSD down and secure it with the screw and standoff.
3.4 Potentzia-konexioak
- Connect the 24-pin ATX power connector from your PSU to the 24-pin power socket on the motherboard.
- Connect the 8-pin (or 4-pin) ATX 12V power connector from your PSU to the corresponding socket near the CPU.
3.5 Aurrealdeko panelaren konexioak
Connect the cables from your PC case (Power Button, Reset Button, HDD LED, Power LED, USB, Audio) to the corresponding headers on the motherboard. Refer to the motherboard layout diagram in your physical manual for exact header locations.
3.6 Txartel grafikoaren instalazioa
- Locate the PCIe 3.0 x16 slot.
- Kendu dagokion hedapen-zirrikituaren estalkia zure ordenagailuaren kaxatik.
- Align the graphics card with the PCIe slot and press it down firmly until it clicks into place.
- Txartel grafikoa kaxari torloju batekin lotu.
- Connect any required PCIe power cables from your PSU to the graphics card.
4. Funtzionamendu-argibideak
4.1 Lehenengo abiaraztea eta BIOS/UEFI konfigurazioa
- Osagai guztiak muntatu ondoren, konektatu monitoreari, teklatuari eta saguari.
- Piztu zure sistema.
- Abiaraztean, behin eta berriz sakatu DEL or F2 BIOS/UEFI konfigurazio utilitatean sartzeko tekla.
- In the BIOS, you can configure boot order, system time, and other advanced settings. Save changes and exit to boot into your operating system installation media.
4.2 Gidariaren instalazioa
After installing your operating system, install the necessary drivers for the motherboard components. These typically include chipset drivers, audio drivers, LAN drivers, and any specific utility drivers. Drivers can be found on the ASRock official webzure plaka basearen modelo espezifikorako gunea.
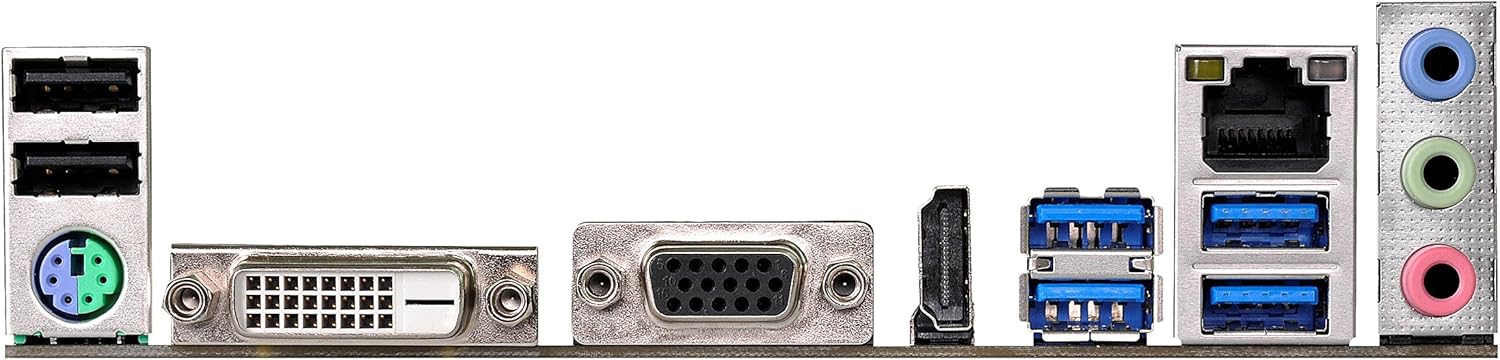
Figure 4.1: Rear I/O panel of the ASRock AB350M-HDV Motherboard, showing USB ports, video outputs (VGA, DVI, HDMI), LAN port, and audio jacks.
5. Mantentzea
Proper maintenance ensures the longevity and optimal performance of your motherboard.
5.1 Garbiketa
- Garbitu aldizka plakako eta osagaietako hautsa aire konprimitua erabiliz.
- Ziurtatu sistema itzalita eta deskonektatuta dagoela garbitu aurretik.
- Saihestu garbitzaile likidoak zuzenean osagaietan erabiltzea.
5.2 BIOS/UEFI eguneraketak
Aldian-aldian egiaztatu ASRock-a website for BIOS/UEFI updates. Updates can improve compatibility, stability, and performance. Follow the instructions provided by ASRock carefully when performing a BIOS update to avoid system damage.
6. Arazoak
Atal honek aurki ditzakezun arazo ohikoenei irtenbideak eskaintzen ditu.
6.1 Energiarik ez / POSTrik ez (Piztean auto-proba)
- Egiaztatu energia-konexioak: Ensure the 24-pin and 8-pin (or 4-pin) CPU power connectors are securely seated.
- Verify PSU: Test your power supply unit (PSU) to ensure it is functional and providing adequate power.
- Osagaiak berriro jarri: Remove and re-install the CPU, RAM, and graphics card to ensure they are properly seated.
- Garbitu CMOS: Refer to your physical manual for instructions on how to clear the CMOS (Complementary Metal-Oxide-Semiconductor) settings, which can resolve boot issues.
6.2 Ez dago pantaila-irteerarik
- Monitorearen konexioa: Ensure your monitor is correctly connected to the graphics card or motherboard (if using an APU with integrated graphics).
- Txartel grafikoa: If using a dedicated graphics card, ensure it is properly installed and has sufficient power. Test with another graphics card if possible.
- APU Compatibility: If using an AMD A-Series APU, ensure your monitor is connected to the motherboard's video outputs (VGA, DVI, HDMI). Ryzen CPUs without integrated graphics require a dedicated graphics card.
6.3 Operating System Not Booting
- Abiarazteko ordena: Check the BIOS/UEFI settings to ensure the correct boot device (e.g., SSD/HDD with OS) is prioritized.
- Biltegiratze gailua: Verify that your storage device is detected in the BIOS.
- Sistema eragilearen instalazioa: If the OS is newly installed, ensure the installation process completed successfully.
7. Zehaztapenak
| Marka | ASRock |
| Ereduaren izena | AB350M-HDV |
| CPU Socketa | AM4 entxufea |
| Txip mota | AMD Promontory B350 |
| Prozesadore bateragarriak | AMD A-Series APUs (Bristol Ridge), Ryzen Series CPUs (Summit Ridge) |
| RAM Memoria Teknologia | DDR4 |
| Memoria Erlojuaren Abiadura | 2133 MHz (Base), up to 3200+ (OC) for Ryzen CPU |
| Memoria zirrikituak eskuragarri | 4 |
| Txartel grafikoen interfazea | PCI Express (1x PCIe 3.0 x16, 1x PCIe 2.0 x1) |
| Total SATA Ports | 4 (SATA3) |
| M.2 zirrikitua | 1 (Ultra M.2, PCIe Gen3 x4 & SATA3) |
| USB portuak guztira | 8 (6x USB 3.0, 2x USB 2.0) |
| Bideo Irteerak | VGA, DVI, HDMI |
| Potentzia-konektore mota nagusia | 24-Pin ATX |
| Forma-faktorea | MikroATX |
| Elementuaren pisua | 1.3 kilo |
8. Bermearen informazioa
The ASRock AB350M-HDV Motherboard comes with a 1 Urteko Bermea. For specific terms and conditions, please refer to the warranty card included with your product or visit the official ASRock webgunea.
9. Laguntza
For further assistance, technical support, or driver downloads, please visit the official ASRock webgunea:
You can also find contact information for customer service and support resources on their webgunea.