
1. Sarrera
This manual provides detailed instructions for the installation, operation, maintenance, and troubleshooting of your FSP 400W Micro ATX Power Supply (Model FSP400-60GHS(85)-R1). This power supply unit is designed for compact small form factor PC systems, offering 400 watts of power output with 80 Plus Bronze certification for high efficiency. It is compatible with Intel and AMD CPU systems and standard PC configurations.
Please read this manual thoroughly before installation and operation to ensure proper usage and to prevent damage to the unit or other components.
2. Segurtasun informazioa
OHARRA: Power supplies contain high voltagosagaiak. Ez ireki elikatze-iturria casing. Ez dago erabiltzaileak konpondu beharreko piezarik barruan. C irekitzeaasing will void the warranty and poses a risk of electric shock.
- Ensure the power supply is disconnected from the AC power outlet before installation or maintenance.
- Install the power supply in a well-ventilated area.
- Do not operate the power supply in high humidity or extreme temperature environments.
- Use only the cables provided with the power supply.
- Ensure all cables are securely connected before powering on the system.
- This product is designed for use in personal computers. Do not use it for any other purpose.
3. Paketearen edukia
Egiaztatu behean zerrendatutako elementu guztiak zure paketean daudela:
- FSP 400W Micro ATX Power Supply (FSP400-60GHS(85)-R1)
- AC korronte kablea
- SFX to PS2 Bracket
- Erabiltzailearen eskuliburua
- Mounting Screws (typically included with PC cases, but sometimes with PSUs)

Figure 3.1: Package Contents. Shows the power supply unit, user manual, various power cables, an AC power cord, and an SFX to PS2 adapter bracket.
4. Produktua amaitu daview
The FSP400-60GHS(85)-R1 is a compact power supply designed for small form factor systems. Key features include an 80mm cooling fan with thermal sensing technology and an energy-saving 1-watt standby mode.
4.1 Physical Layout

4.1. irudia: Angeludun view of the FSP 400W Micro ATX Power Supply, highlighting the fan grille, power switch, and AC power input.

4.2. Irudia: Atzealdea view of the power supply, detailing the main power switch and the AC power input socket.

4.3. irudia: Goikoa view of the power supply, showing the protective grille over the 80mm cooling fan.
4.2 Irteerako konektoreak
The power supply includes various connectors to power your system components:
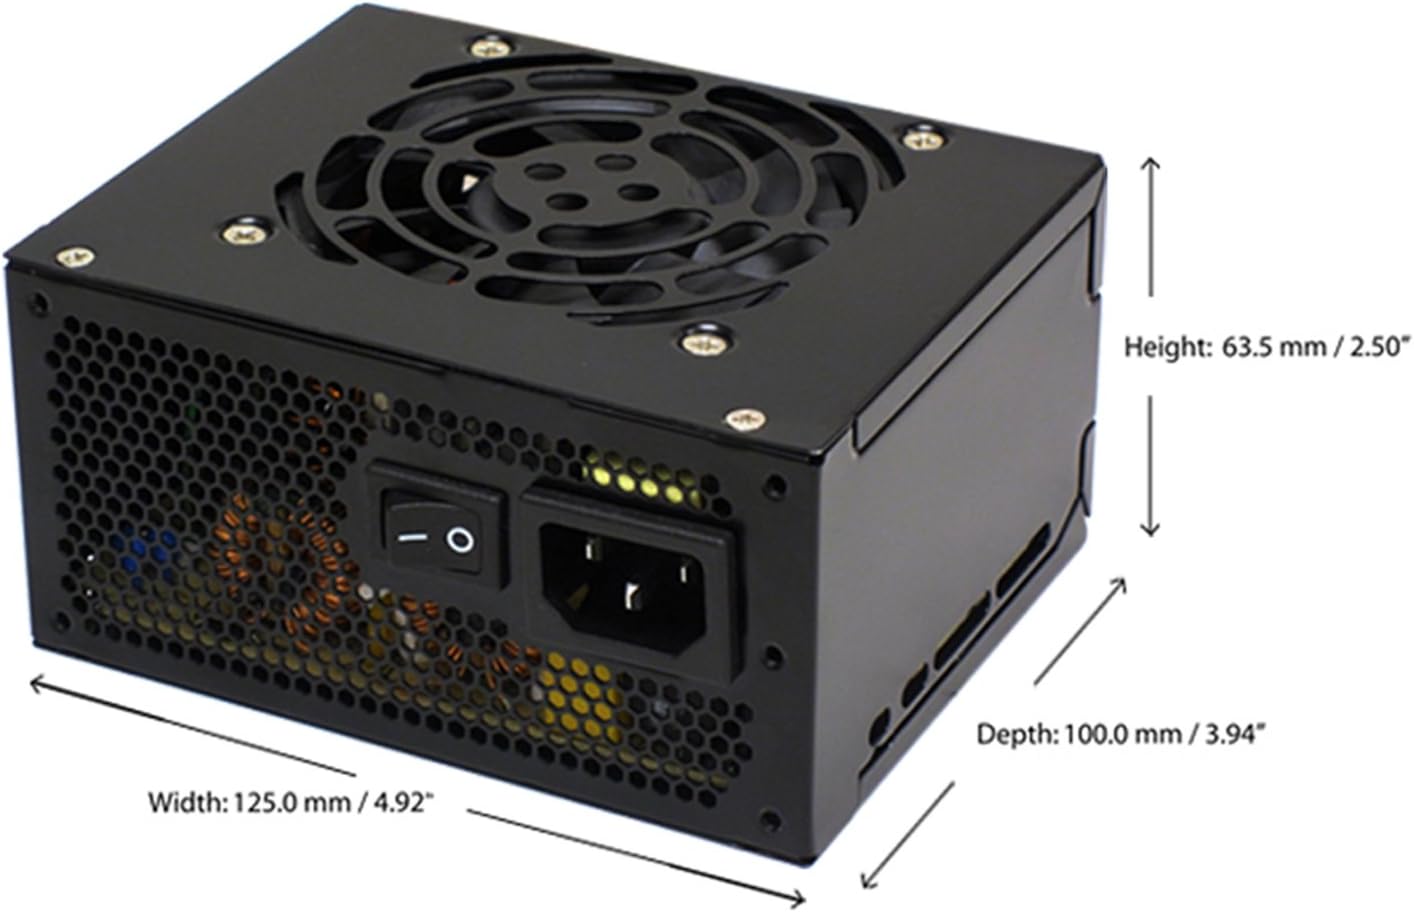
Figure 4.4: Diagram illustrating the types and quantities of output connectors available on the FSP400-60GHS(85)-R1 power supply.
- Main 24 Pin (1): For motherboard power.
- P4 | EPS 4+4 Pin (1): For CPU power.
- PCI-E 8 Pin (6+2) (1): For graphics cards.
- Molex 4 Pin (3): For older peripherals and fans.
- Serial ATA 15 Pin (3): For SATA hard drives and SSDs.
- FDD 4 Pin (1): For floppy disk drives or other legacy devices.
5. Konfigurazioa eta instalazioa
Before beginning installation, ensure your computer system is powered off and disconnected from the AC power outlet. It is recommended to wear an anti-static wrist strap to prevent electrostatic discharge (ESD) damage to components.
5.1 Elikatze-iturria instalatzea
- Prestatu kasua: Open your computer case. Identify the power supply mounting area.
- Mounting the PSU:
- For SFX cases: Insert the FSP400-60GHS(85)-R1 directly into the SFX power supply bay and secure it with screws.
- For standard ATX cases: Attach the included SFX to PS2 bracket to the power supply. Then, mount the power supply with the bracket into the ATX power supply bay and secure it with screws.

Figure 5.1: The FSP 400W Micro ATX Power Supply shown with the SFX to PS2 adapter bracket installed, ready for mounting in a standard ATX case.

Figure 5.2: Illustration demonstrating how the SFX power supply fits into a PS2 (ATX) case using the provided adapter bracket.
5.2 Konektatzeko kableak
Connect the appropriate cables to your motherboard and components. Refer to your motherboard and component manuals for specific connection points.
- Plaka basearen potentzia: Connect the 24-pin ATX connector to the corresponding socket on your motherboard.
- CPUaren potentzia: Connect the 4+4-pin EPS/ATX 12V connector to the CPU power socket on your motherboard.
- Graphics Card Power: If your graphics card requires external power, connect the 6+2-pin PCI-E connector(s) to the graphics card.
- Biltegiratze gailuak: Connect SATA power connectors to your SATA hard drives, SSDs, and optical drives.
- Periferikoak: Use Molex 4-pin connectors for case fans or other legacy peripherals as needed.
- Kableen kudeaketa: Route cables neatly to ensure proper airflow within the case.
Once all internal connections are made, close your computer case.
5.3 Kanpoko konexioa
- Connect the AC power cord to the power supply's AC inlet.
- Plug the other end of the AC power cord into a grounded wall outlet or surge protector.
- Ensure the power switch on the back of the power supply is in the "OFF" (O) position before plugging it in.
6. Funtzionamendu-argibideak
6.1 Powering On Your System
- After all connections are secure, flip the power switch on the back of the power supply to the "ON" (I) position.
- Sakatu ordenagailuaren kaxan dagoen pizteko botoia sistema abiarazteko.
6.2 Thermal Control System
The FSP400-60GHS(85)-R1 features an 80mm cooling fan with thermal sensing technology. This system automatically adjusts the fan speed based on the internal temperature of the power supply, optimizing cooling performance while minimizing noise.
6.3 Energy Saver Standby Mode
This power supply is designed with an energy-saving 1-watt standby mode, reducing power consumption when the system is in a low-power state or turned off but still connected to AC power.
7. Mantentzea
Mantentze egokiak zure energia-horniduraren iraupena eta errendimendu optimoa bermatzen ditu.
- Garbiketa: Periodically clean the exterior of the power supply and its fan grille to prevent dust buildup. Use a soft, dry cloth or compressed air. Ensure the power supply is disconnected from AC power before cleaning.
- Aireztapena: Ensure that the power supply's fan and ventilation openings are not obstructed. Good airflow is crucial for cooling.
- Kableen osotasuna: Regularly check all power cables for any signs of wear, fraying, or damage. Replace damaged cables immediately.
Do not attempt to open the power supply unit for internal cleaning or repair. This will void the warranty and can be dangerous.
8. Arazoak
Zure energia-iturriarekin arazoak badituzu, jo ezazu honako arazo eta irtenbide ohikoenei:
8.1 No Power to System
- Check AC Power: Ensure the AC power cord is securely plugged into both the power supply and a working wall outlet.
- Switch potentziala: Verify that the power switch on the back of the power supply is in the "ON" (I) position.
- Internal Connections: Confirm that the 24-pin ATX and 4+4-pin EPS/ATX 12V connectors are firmly seated in the motherboard.
- Zirkuitu laburra: Disconnect all peripheral power cables (SATA, Molex, PCI-E) and attempt to power on. If the system powers on, a short circuit may exist in one of the connected components or cables. Reconnect them one by one to identify the faulty component.
8.2 System Instability or Random Shutdowns
- Gainkarga: Ensure your system's power requirements do not exceed the 400W capacity of the power supply.
- Aireztapena: Check for proper airflow within the case and ensure the power supply's fan is not obstructed. Overheating can cause instability.
- Kable konexioak: Re-check all power connections to ensure they are secure. Loose connections can lead to intermittent power delivery.
8.3 Excessive Fan Noise
- Hauts-pilaketa: Clean the fan grille and fan blades with compressed air.
- Oztopoa: Ensure no cables or foreign objects are interfering with the fan's rotation.
- Ingurune operatiboa: High ambient temperatures can cause the thermal control system to increase fan speed. Ensure adequate room ventilation.
If troubleshooting steps do not resolve the issue, contact FSP customer support or your retailer for assistance.
9. Zehaztapenak
Detailed technical specifications for the FSP400-60GHS(85)-R1 power supply:
| Ereduaren izena | FSP 400W Micro ATX Power Supply |
| Modelo zenbakia | FSP400-60GHS(85)-R1 |
| Marka | FSP |
| Irteera Wattage | 400 Watt |
| 80 Plus Certification | 80 Plus Brontzea |
| Forma-faktorea | Micro ATX (SFX with PS2 bracket) |
| Hozteko metodoa | Air (80mm fan with thermal control) |
| Elikatze-horniduraren diseinua | Ez-Modularra |
| Sarrera boltage | 100 - 265 Volts (AC) |
| Neurriak (L x W x H) | 4.9 x 3.9 x 2.5 hazbete (125.0 x 100.0 x 63.5 mm) |
| Elementuaren pisua | 2.31 kilo |
| Gailu bateragarriak | Personal Computer (AMD/Intel CPU systems) |
| Konektoreak | Main 24 Pin (1), P4 | EPS 4+4 Pin (1), PCI-E 8 Pin (6+2) (1), Molex 4 Pin (3), Serial ATA 15 Pin (3), FDD 4 Pin (1) |
| Ingurumena Betetzea | RoHS, Berunik Gabekoa, Produktu Berdea (GP) |

Figure 9.1: Physical dimensions of the FSP 400W Micro ATX Power Supply.

Figure 9.2: Illustrative diagram showing typical cable lengths for the power supply connectors.
10. Bermearen informazioa
The FSP 400W Micro ATX Power Supply (FSP400-60GHS(85)-R1) is covered by a 3 urteko fabrikatzailearen bermea. This warranty guarantees the quality and performance of the product for the specified period from the date of purchase.
The warranty covers defects in materials and workmanship under normal use. It does not cover damage resulting from improper installation, accidents, misuse, abuse, natural disasters, or unauthorized modifications or repairs. Opening the power supply casing-k bermea baliogabetuko du.
For warranty claims or service, please retain your proof of purchase and contact FSP customer support.
11. Bezeroarentzako arreta
If you require further assistance, have questions, or need to report an issue that cannot be resolved using the troubleshooting guide, please contact FSP customer support.
- FSP Webgunea: Visit the official FSP website for product information, FAQs, and support resources.
- Harremanetarako informazioa: Refer to the FSP website or your product packaging for the most current customer service contact details (phone, email, or support portal).
When contacting support, please have your product model number (FSP400-60GHS(85)-R1) and proof of purchase readily available.