1. Sarrera
This manual provides detailed instructions for the installation, operation, and maintenance of your Vibe Powerbox Micro Mono Amplifier, model POWERBOX400.1M-V7. Please read this manual thoroughly before attempting installation or operation to ensure proper use and to prevent damage to the unit or your vehicle's audio system.
The Vibe Powerbox Micro Mono Amplifier is a compact, high-performance Class D amplifier designed for car audio systems. It delivers up to 400W RMS, making it suitable for powering subwoofers. Its small footprint allows for flexible installation options.
2. Segurtasun informazioa
- Deskonektatu beti ibilgailuaren bateriaren terminal negatiboa edozein lan elektriko hasi aurretik.
- Ensure all wiring is correctly routed and secured to prevent damage from moving parts or sharp edges.
- Use appropriate gauge wiring for power and speaker connections as specified in this manual to prevent overheating and potential fire hazards.
- Ez muntatu ampLikidorea eguzki-argiaren, bero gehiegiaren, hezetasunaren edo hautsaren eraginpean dauden lekuetan.
- Instalazio prozesuaren edozein atalen inguruan ziur ez bazaude, kontsultatu autoko audio instalatzaile profesional bati.
- Funtzionamendua amplifier at excessively high volumes for prolonged periods can cause hearing damage.
3. Paketearen edukia
Instalazioarekin jarraitu aurretik, egiaztatu elementu guztiak paketean daudela:
- Vibre Powerbox Mikro Monoa Amplifier (POWERBOX400.1M-V7)
- Remote Gain Control Unit
- RCA Audio kableak
- Mounting Hardware (screws, connectors)
- Erabiltzailearen eskuliburua

4. Produktuaren ezaugarriak
- Class D Micro Amplifier design for high efficiency and compact size.
- Ultra-compact footprint for easy and discreet installation.
- Output: 1 x 400W RMS at 1 ohm, with a maximum output of 800W.
- Dimensions: 37 x 157 x 82mm (approximately 1.46 x 6.18 x 3.23 inches).
- Compatible with Critical Link Rapid kits for simplified integration.
- Features Deltabox™ Connectivity auto turn-on.
- VIBE Sound Studio™ Active crossovers.
- 1 Ohm Stable operation.
5. Osagaien identifikazioa
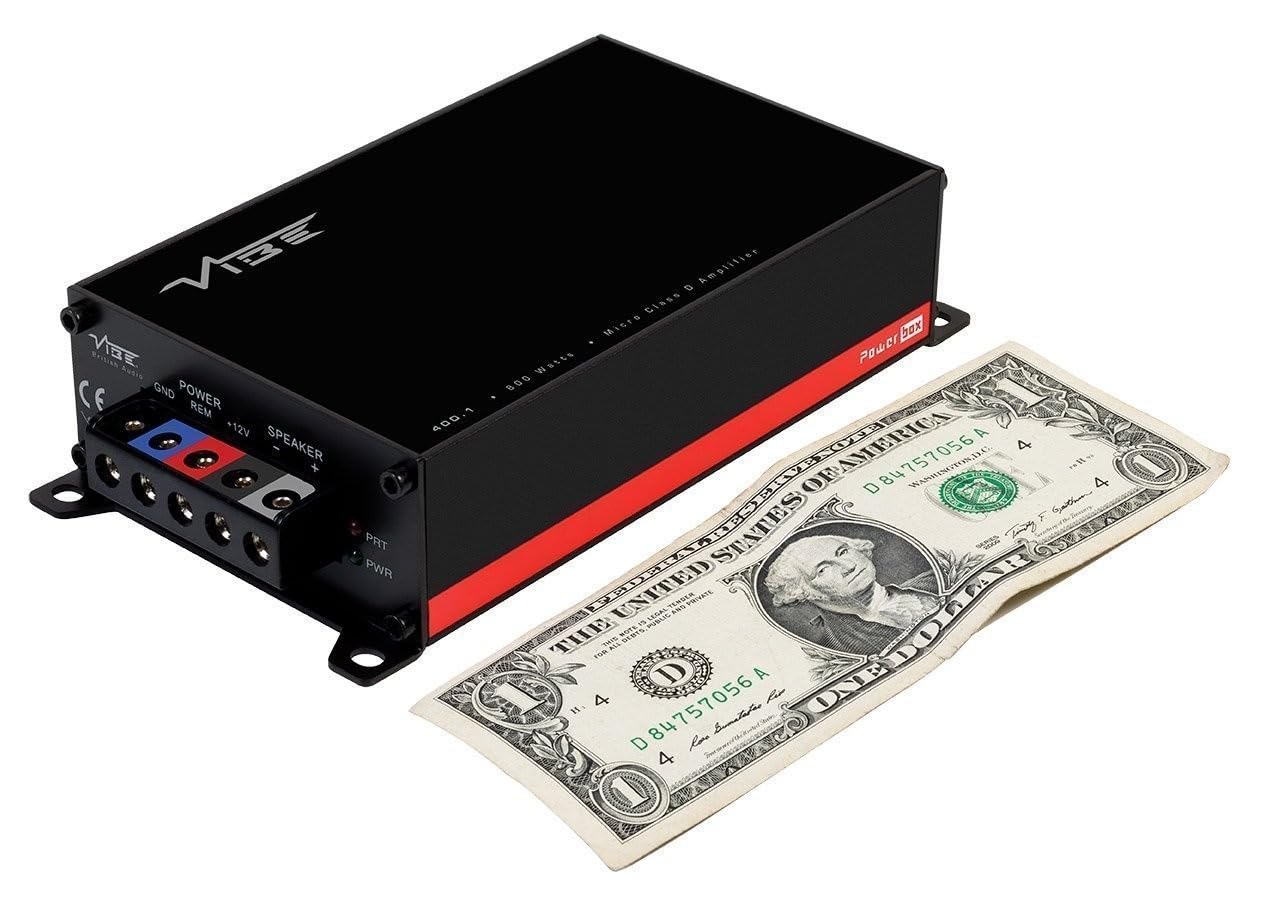
5.1 Power and Speaker Terminals

The power input section includes terminals for Ground (GND), Remote Turn-On (REM), and +12V power. The speaker output section provides terminals for connecting your subwoofer.
5.2 Input and Control Panel
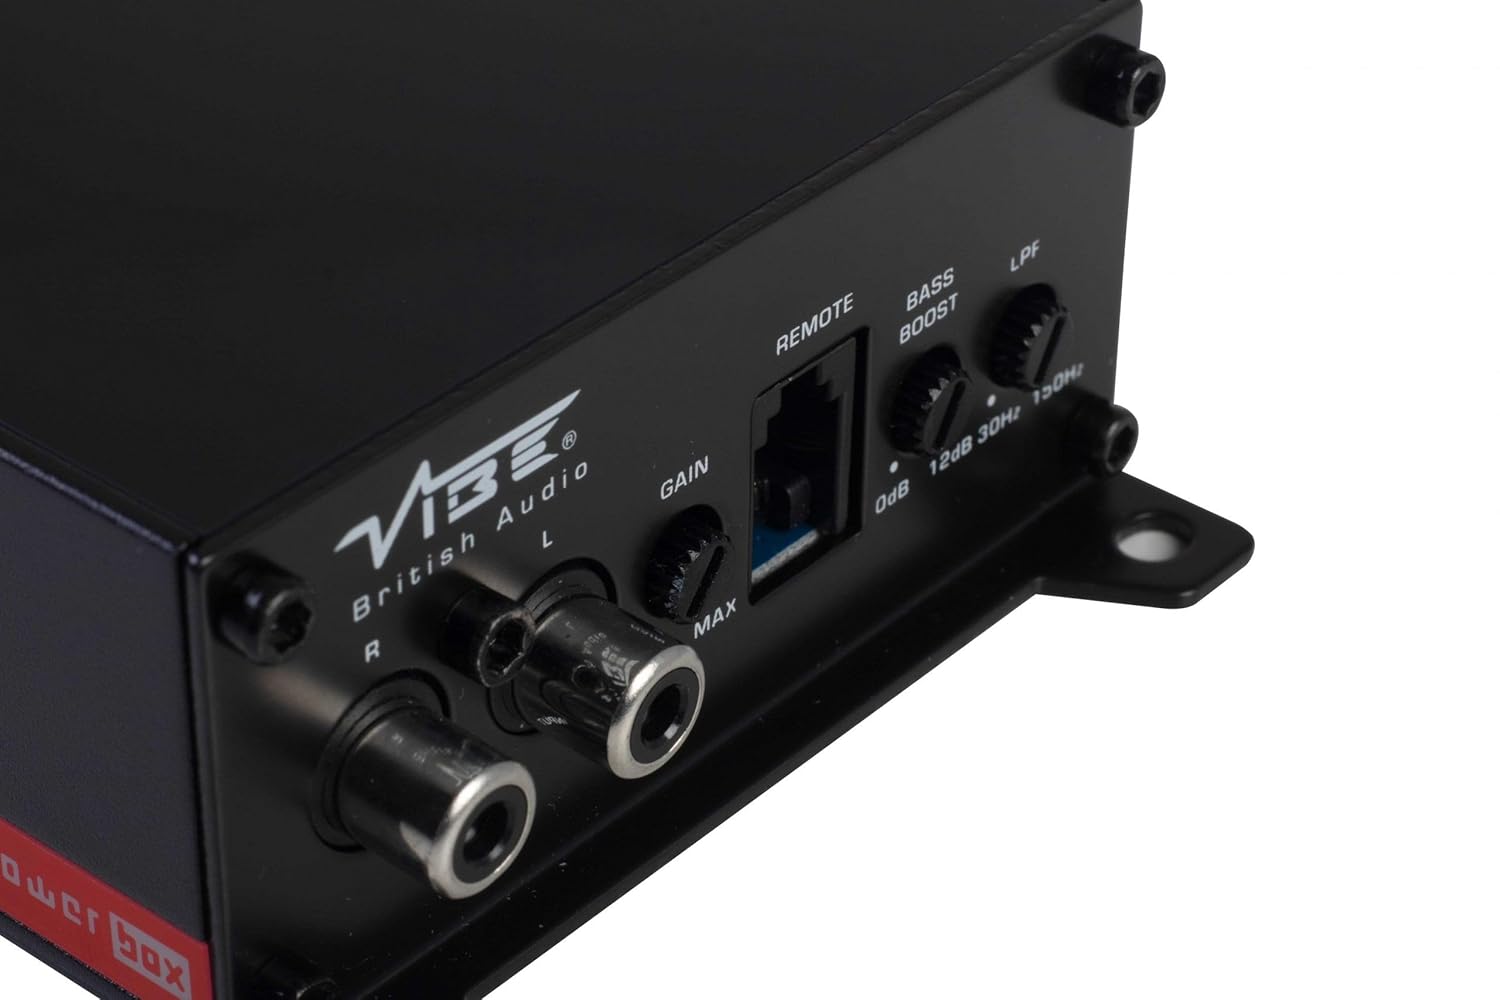
This panel features the RCA input jacks for audio signal, a Gain control knob to match the amplifier's input sensitivity to your head unit's output, a dedicated port for the remote gain control, a Bass Boost switch for enhancing low frequencies, and an LPF (Low Pass Filter) control to adjust the upper frequency limit for the subwoofer.
5.3 Remote Gain Control

The remote gain control unit connects to the amplifier via the 'REMOTE' port and allows for convenient adjustment of the subwoofer's output level from the vehicle's cabin.
6. Konfigurazioa eta instalazioa
Instalazio egokia ezinbestekoa da errendimendu eta segurtasun optimoa lortzeko. Zure gaitasunean konfiantzarik ez baduzu, ampbizitzailea, bilatu laguntza profesionala.
6.1 Muntatzeko kokapena
Choose a mounting location that is dry, well-ventilated, and away from direct heat sources. The compact size of the Powerbox Micro allows for installation under seats, behind trim panels, or in other discreet locations. Ensure there is sufficient airflow around the amphozteko berogailua.
6.2 Kableatutako konexioak
Potentzia kableatua:
- Konektatu +12V terminal to the vehicle's positive battery terminal using a suitable gauge power cable (e.g., 8 AWG or 10 AWG). Install an in-line fuse holder within 18 inches (45 cm) of the battery.
- Konektatu GND terminal to a clean, unpainted metal surface on the vehicle's chassis. Ensure a good electrical connection. The ground cable should be of the same gauge as the power cable and as short as possible.
- Konektatu ERREM (Remote Turn-On) terminal to the remote output of your head unit. This wire signals the amplifier to turn on and off with your stereo. If your head unit lacks a remote output, you can use an accessory wire that turns on with the ignition, or utilize the amplifier's auto-sense feature if applicable.
Bozgorailuaren kableatzea:
- Konektatu zure subwooferra Bozgorailuaren irteera terminals (+ and -). Ensure correct polarity. This amplifier is 1 Ohm stable, allowing flexibility in subwoofer impedance configurations. Refer to your subwoofer's specifications for optimal impedance matching.
Seinalearen sarrera (RCA):
- Connect the RCA output from your head unit or signal processor to the SARRERA (L/R) RCA jacks on the ampbiziagoa.
Urruneko irabazien kontrola:
- Plug the remote gain control unit into the dedicated URRUNTZA portuan amplifier. Route the cable to a convenient location for adjustment.
ISO T Harness / ISOAWK Kit:
- For simplified installation with existing stereo looms, an optional ISOAWK kit (available separately) can be used to make the amplifier compatible with an ISO T harness. This allows for plug-and-play integration for audio signal, power, and ground, potentially eliminating the need for separate battery connections.
7. Funtzionamendua
7.1 Hasierako piztea
After all connections are made and verified, reconnect the vehicle's battery. Turn on your head unit. The amplifier's power indicator (PWR) should illuminate green. If the protection indicator (PRT) illuminates red, refer to the troubleshooting section.
7.2 Irabaziaren doikuntza
Irabaziaren kontrola bat dator ampLikidatzailearen sarrera-sentsibilitatea irteerako bolumenarekikotage of your head unit. To set the gain:
- Biratu amplifier's Gain control to its minimum (MIN) setting.
- Ezarri unitate nagusiaren bolumena gehienezkoaren % 75-80ra.
- Musika pieza dinamiko bat jo.
- Pixkanaka handitu amplifier's Gain control until you hear distortion, then back it off slightly until the sound is clear.
The remote gain control unit allows for real-time adjustment of the subwoofer level without affecting the main system volume.
7.3 Pase baxuko iragazkia (LPF)
The LPF control sets the upper frequency limit for the amplifier's output. This is essential for subwoofers, ensuring they only reproduce low frequencies. Adjust the LPF knob (typically 30Hz to 150Hz) to blend the subwoofer's output seamlessly with your main speakers. A common starting point is around 80-100Hz.
7.4 Baxu-igoera
The Bass Boost switch provides an adjustable low-frequency enhancement. Use this feature sparingly, as excessive bass boost can lead to distortion and potential damage to your subwoofer. Adjust the boost level (0dB to 12dB) to your preference.
8. Mantentzea
- Garbiketa: Aldian-aldian garbitu ampGarbitu garbigailuaren kanpoaldea oihal leun eta lehor batekin. Ez erabili produktu kimiko gogorrik edo garbitzaile urratzailerik.
- Konexioak: Regularly check all power, ground, and speaker connections to ensure they are secure and free from corrosion. Loose connections can cause performance issues or damage.
- Aireztapena: Ziurtatu hori amplifier's cooling fins are not obstructed to maintain proper heat dissipation.
9. Arazoak
| Arazoa | Kausa posiblea | Irtenbidea |
|---|---|---|
| Argindarrik ez (PWR LED itzalita) | Fusible erreta, elikadura/lurrerako konexioa askatuta, urrutiko seinalerik ez. | Check in-line fuse, verify +12V, GND, and REM connections. |
| Babes modua (PRT LED piztuta) | Gehiegi berotzea, zirkuitulaburra bozgorailuen kableatuan, inpedantzia baxuegia. | Ensure proper ventilation, check speaker wiring for shorts, verify speaker impedance. |
| Ez dago soinu-irteerarik | Sarrera seinalerik ez, irabazia baxuegia, bozgorailu kableak deskonektatuta. | Check RCA input connections, adjust gain, verify speaker wiring. |
| Soinu distortsionatua | Gain set too high, LPF incorrectly set, poor ground connection. | Reduce gain, adjust LPF, check ground connection. |
10. Zehaztapenak
- Modelo zenbakia: POWERBOX400.1M-V7
- AmpLider mota: D klasea Mono Ampbiziagoa
- RMS potentzia irteera: 1 x 400W RMS @ 1 Ohm
- Gehienezko potentzia irteera: 800W
- Produktuaren neurriak (L x W x H): Gutxi gorabehera 157 x 82 x 37 mm (6.18 x 3.23 x 1.46 hazbete)
- Pisua: Gutxi gorabehera 1.54 kilo
- liburukiatage: 12 Volt (Nominala)
- Gehienezko hornidura boltage: 12 Volt
- Muntatze mota: Gainazaleko muntaia
- Fabrikatzailea: Vibe Audio
- Lehen eskuragarri dagoen data: 21ko uztailaren 2018a
11. Bermea eta Laguntza
Vibe Audio products are designed and manufactured to the highest standards. For warranty information and technical support, please refer to the warranty card included with your product or visit the official Vibe Audio webgunea. Gorde erosketaren egiaztagiria bermearen erreklamazioetarako.