
1. Sarrera
This manual provides instructions for the proper setup, operation, and maintenance of your Acer B247Y 23.8-inch LED LCD Monitor. Please read this manual thoroughly before using your monitor to ensure optimal performance and to prevent damage.
The Acer B247Y is a 23.8-inch Full HD (1920 x 1080) monitor featuring an IPS panel for wide viewing angles, an anti-glare display, and a frameless design on three sides. It includes multiple connectivity options and an ergonomic stand for comfortable viewing.
2. Paketearen edukia
Verify that all items are present in your package. If any items are missing or damaged, contact your retailer.
- Acer B247Y 23.8-inch LED LCD Monitor
- Monitorearen euskarria (oinarria eta lepoa)
- Power Adapter (Internal) and Power Cable
- VGA kablea
- DisplayPort 1.2 kablea
- HDMI kablea
- Audio-in Cable (if included)
- Audio-out Cable (if included)
- Erabiltzailearen eskuliburua (dokumentu hau)
3. Konfigurazioa
3.1 Monitorearen euskarria muntatzea
The monitor comes with a detachable foot stand. Follow these steps to assemble:
- Kontu handiz atera monitorearen eta euskarriaren osagaiak paketetik.
- Lotu euskarriaren lepoa monitorearen panelera. Ziurtatu ondo sartzen dela klik eginez.
- Lotu euskarriaren oinarria euskarriaren lepoari. Estutu torlojuak baldin badaude, normalean oinarriaren azpialdean egoten baitira.
- Jarri muntatutako monitorea gainazal egonkor eta lau batean.
Oharra: The monitor also supports VESA mount (100 x 100 mm) for wall or arm mounting. Refer to your VESA mount kit instructions for installation.
3.2 Monitorea konektatzea
Konektatu monitorea zure ordenagailura edo beste gailu batzuetara kable egokiak erabiliz.
- Bideo-konexioa:
- Connect one end of the DisplayPort cable to the DisplayPort output on your computer and the other end to the DisplayPort input on the monitor.
- Alternatively, connect an HDMI cable from your computer's HDMI output to the monitor's HDMI input.
- For older systems, connect a VGA cable from your computer's VGA output to the monitor's VGA input.
- Audio konexioa:
- If using VGA or DisplayPort without audio, connect an audio cable from your computer's audio output to the monitor's audio-in port for integrated speakers.
- To connect external speakers or headphones, use the monitor's audio-out port.
- Potentzia-konexioa:
- Connect the power cable to the monitor's power input, then plug the other end into a grounded electrical outlet.

Figure 3.2.1: Acer B247Y Monitor with Stand. This image illustrates the overall appearance of the monitor when fully assembled on its stand.
4. Funtzionamendu-argibideak
4.1 Piztu/Itzaltzea
Press the power button, usually located on the bottom right or rear of the monitor, to turn the monitor on or off. The power indicator light will illuminate when the monitor is on.
4.2 Adjusting Monitor Settings (OSD)
The monitor features an On-Screen Display (OSD) menu for adjusting various settings. Use the control buttons (typically located near the power button) to navigate and select options within the OSD menu.
Common OSD settings include:
- Irudia: Brightness, Contrast, Color Temperature, Gamma, Acer eColor Management modes (e.g., Dark Room, Eco).
- Audioa: Volume control for integrated speakers or audio-out.
- Sarrera: Select the active video input source (VGA, DisplayPort, HDMI).
- OSD: OSD timeout, language.
- Kudeaketa: Berrezarri fabrikako lehenespenetara.
4.3 Doikuntza ergonomikoak
The Acer B247Y monitor stand offers several ergonomic adjustments to optimize your viewesperientzia:
- okertu: Adjust the screen angle from -5 degrees to 25 degrees (forward/backward).
- Birakaria: Rotate the monitor horizontally up to +/- 45 degrees.
- Altuera doitzea: Adjust the screen height by up to 120mm.
- Pibota: Biratu pantaila 90 gradu erretratu moduan erabiltzeko viewing.
5. Mantentzea
Mantentze egokiak zure monitorearen iraupena eta errendimendu optimoa bermatzen ditu.
- Pantaila garbitzea: Garbitu pantaila astiro-astiro zapi leun eta pelusik gabeko batekin. Orba egoskorrak kentzeko, garbituampen the cloth with a small amount of water or a non-abrasive screen cleaner. Do not spray liquid directly onto the screen.
- C garbiketaasing: Erabili zapi leun eta lehor bat monitorearen garbiketa egiteko.asing. Saihestu detergente indartsuak edo garbitzaile urratzaileak erabiltzea.
- Aireztapena: Ziurtatu monitorearen aireztapen-irekidurak ez daudela blokeatuta gehiegi berotzea saihesteko.
- Itzali: Always turn off the monitor and unplug it from the power outlet before cleaning or when not in use for extended periods.
6. Arazoak
Monitorearekin arazoak badituzu, jarraitu arazoak konpontzeko ohiko urrats hauek:
- No Power / Monitor Does Not Turn On:
- Ziurtatu elikatze-kablea monitoreari eta funtzionatzen duen entxufe elektriko bati ondo konektatuta dagoela.
- Egiaztatu entxufea funtzionatzen duela beste gailu bat konektatuz.
- Sakatu irmo pizteko botoia.
- No Image / "No Signal" Message:
- Check that the video cable (DisplayPort, HDMI, or VGA) is securely connected to both the monitor and your computer.
- Ziurtatu ordenagailua piztuta dagoela eta ez dagoela lo moduan.
- Erabili OSD menua sarrera-iturri zuzena eskuz hautatzeko.
- Saiatu beste bideo-kable edo ataka bat eskuragarri badago.
- Image is Distorted or Unclear:
- Ziurtatu ordenagailuaren pantailaren bereizmena monitorearen jatorrizko bereizmenera ezarrita dagoela (1920 x 1080).
- Adjust brightness, contrast, and other picture settings via the OSD menu.
- Check for any physical damage to the screen or cables.
- Ez dago soinurik bozgorailuetatik:
- Increase the volume using the OSD menu or your computer's sound settings.
- Ziurtatu audio kablea (erabiltzen bada) behar bezala konektatuta dagoela.
- Egiaztatu ordenagailuaren soinu ezarpenetan audio irteerako gailu zuzena hautatuta dagoela.
7. Zehaztapenak
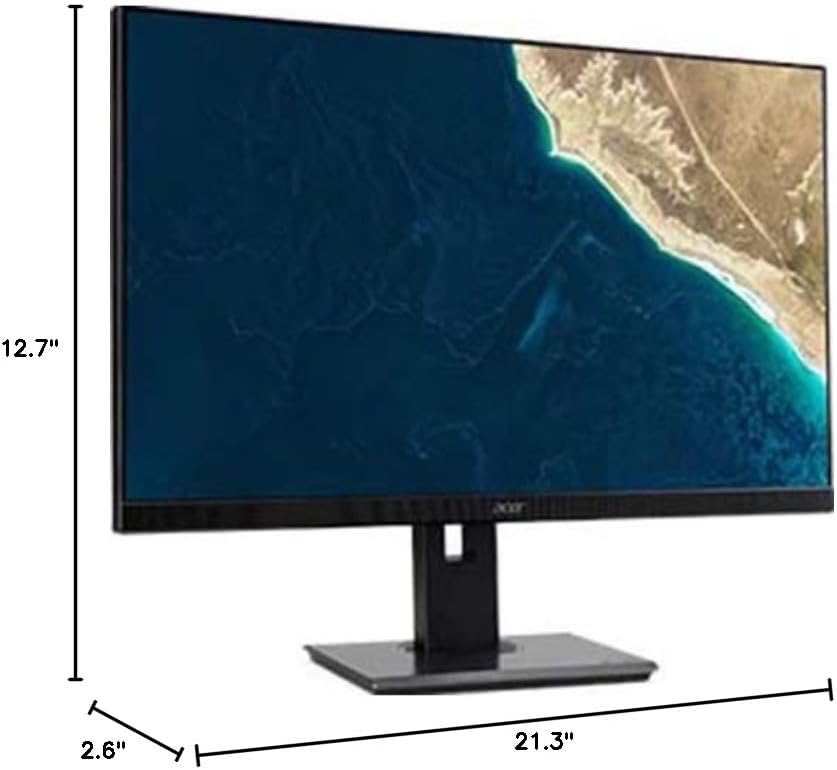
Figure 7.1.1: Acer B247Y Monitor Dimensions. This image shows the approximate height (12.7"), width (21.3"), and depth (2.6") of the monitor without the stand.
| Ezaugarri | Zehaztapena |
|---|---|
| Modelo zenbakia | B247Y |
| Pantailaren tamaina | 23.8 hazbete (60.5 cm) |
| Bistaratzeko mota | LED LCD, IPS Panel, Anti-glare (AG) |
| Gehieneko Ebazpena | 1920 x 1080 (HD osoa) |
| Aspektu-erlazioa | 16:9 |
| Freskatze tasa | 75 Hz |
| Erantzun Denbora | 4ms (gray-to-gray) |
| Distira (ohikoa) | 250 cd/m² |
| Kontraste-ratioa | 1,000:1 |
| Kontraste-erlazio dinamikoa | 100,000,000:1 |
| Viewangeluak (H/V) | 178° / 178° |
| Konektibitatea | VGA, DisplayPort 1.2, HDMI, Audio-in, Audio-out |
| Bozgorailu Integratuak | 2 x 2.0W |
| Doikuntza ergonomikoak | Tilt (-5° to 25°), Swivel (+/- 45°), Height Adjustment (120mm), Pivot (90°) |
| VESA Mount Support | 100 x 100 mm |
| Neurriak euskarriarekin (W x H x D) | 21.3" x 14.9"~19.6" x 7.6" (54.0cm x 37.9cm~49.9cm x 19.3cm) |
| Pisua Standarekin | 12.3 lb (5.6 kg) |
| Elikatze-moldagailua | Barnekoa |
| Kolorea | Beltza |
8. Bermea eta Laguntza
Your Acer B247Y monitor comes with a Limited Three-Year Warranty. Please retain your proof of purchase for warranty claims.
For technical support, service, or warranty inquiries, please refer to the official Acer support website or contact their customer service department. Contact information can typically be found on the Acer webgunean edo produktuarekin batera datorren berme-txartelean.
Kensington blokeoa: The monitor supports a Kensington lock for security. Attach a compatible Kensington lock (sold separately) to the security slot on the monitor to deter theft.