
ASUS PRIME H310M-A R2.0/CSM
ASUS PRIME H310M-A R2.0/CSM plaka basearen erabiltzailearen eskuliburua
Model: PRIME H310M-A R2.0/CSM
1. Sarrera
The ASUS PRIME H310M-A R2.0/CSM is a Micro-ATX motherboard designed to support 8th and 9th generation Intel Core processors. It offers a robust platform for building a reliable and efficient desktop system, featuring ASUS 5X Protection III for hardware safeguards and FanXpert for advanced cooling control. This manual provides essential information for the proper installation, operation, and maintenance of your motherboard.

Figure 1.1: The ASUS PRIME H310M-A R2.0/CSM Motherboard alongside its retail packaging.
Ezaugarri nagusiak:
- Designed for 8th and 9th generation Intel Core processors (LGA 1151 socket).
- ASUS 5X Protection III for hardware-level safeguards and component longevity.
- FanXpert for dynamic system cooling control.
- Integrated M.2 slot with Intel Optane Memory compatibility for fast storage.
- ASUS Optic-MEM technology for improved memory stability and performance.
- On-board 8-channel HD audio for immersive sound.
- SafeSlot Core fortified PCIe slot for enhanced durability.
2. Paketearen edukia
Before proceeding with the installation, please verify that all items listed below are present in your motherboard package. If any item is missing or damaged, contact your retailer.
- ASUS PRIME H310M-A R2.0/CSM motherboard
- Serial ATA 6.0Gb/s cables (2)
- I / O ezkutukoa
- Onartzen DVDa
- M.2 Anchor
- Erabiltzailearen eskuliburua (dokumentu hau)

Figure 2.1: All components included in the ASUS PRIME H310M-A R2.0/CSM motherboard package.
3. Motherboard Layout and Components
Familiarize yourself with the various components and connectors on your motherboard before installation.

3.1. irudia: Goitik behera view of the motherboard, highlighting key component locations such as the CPU socket, DIMM slots, and PCIe slots.

3.2. irudia: Angeludun view erakutsiasing the CPU socket, RAM slots, and various headers.
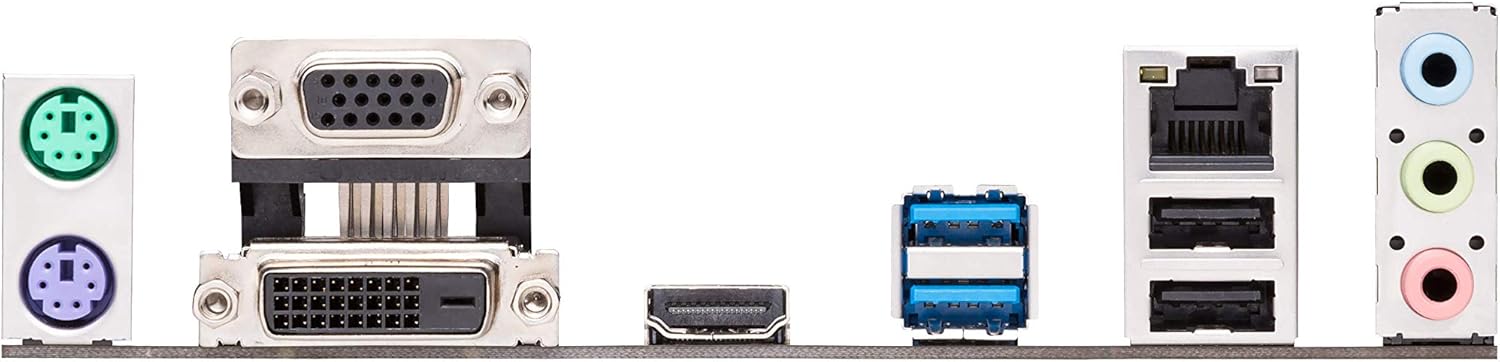
Figure 3.3: The rear input/output (I/O) panel, showing ports for USB, audio, video (VGA, DVI-D, HDMI), Ethernet, and PS/2.
Key Connectors:
- LGA 1151 CPU Socket: For Intel 8th/9th Gen Core, Pentium Gold, and Celeron processors.
- DDR4 DIMM zirrikituak: Two slots supporting up to 32GB of DDR4 memory (2666/2400/2133 MHz).
- PCIe 3.0 x16 Slot: For graphics cards.
- PCIe 2.0 x1 Slots: Two slots for expansion cards.
- M.2 Socket 3: Supports M.2 SSDs (SATA & PCIe x2 mode).
- SATA 6Gb/s atakak: Four ports for SATA devices.
- USB 3.1 1. belaunaldiko atakak: Rear panel and internal header.
- USB 2.0 portuak: Rear panel and internal headers.
- Aurrealdeko paneleko goiburuak: For power button, reset button, HDD LED, and front panel audio.
- ATX elikatze konektoreak: 24-pin EATX Power and 8-pin EATX 12V Power.
4. Konfigurazioa eta instalazioa
Follow these steps carefully to install your motherboard and its components.
4.1. Zure sistema prestatzea
- Elektrizitate estatikoko neurriak: Always wear an anti-static wrist strap or frequently touch a grounded metal object (like your computer case) to discharge static electricity before handling components.
- Laneko eremua: Ensure you have a clean, well-lit, and spacious workspace.
- Itzali: Deskonektatu korronte-kablea hormako entxufetik edozein osagai instalatu edo kendu aurretik.
4.2. CPUaren instalazioa
- Bilatu LGA 1151 CPU socket-a plaka basean.
- Push the load lever down and away from the socket to open the load plate.
- Carefully align the triangular mark on the CPU with the mark on the socket. Gently place the CPU into the socket. Do not force it.
- Itxi karga-plaka eta bultzatu karga-palanka berriro bere lekuan klik egin arte.
- Instalatu CPU hozkailua fabrikatzailearen argibideen arabera.
4.3. Memoriaren (RAM) instalazioa
- Ireki DIMM zirrikituen bi muturretan dauden klipak.
- Lerrokatu DDR4 memoria-moduluko koska DIMM zirrikituan dagoen giltzarekin.
- Sartu memoria-modulua zirrikituan ondo, klipak bere lekuan sartu arte. Ziurtatu bi klipak itxita daudela.
4.4. M.2 SSD instalazioa
- Kokatu M.2 zirrikitua plakan.
- Remove the M.2 anchor screw from the standoff.
- Sartu M.2 SSDa zirrikituan 30 graduko angeluan.
- Gently push the SSD down and secure it with the M.2 anchor screw.
4.5. Motherboard Installation into Chassis
- Install the I/O shield into the chassis's rear I/O opening.
- Align the motherboard with the standoffs in your chassis.
- Lotu plaka nagusia torlojuekin. Ez estutu gehiegi.
4.6. Energia-iturria konektatzea
- Connect the 24-pin ATX power cable from your power supply to the 24-pin EATX Power connector on the motherboard.
- Connect the 8-pin ATX 12V power cable to the 8-pin EATX 12V Power connector.
4.7. Connecting Peripherals and Front Panel
- Connect SATA data cables from your storage drives to the SATA 6Gb/s ports on the motherboard.
- Connect your graphics card to the PCIe 3.0 x16 slot (if applicable) and secure it.
- Connect front panel cables (Power SW, Reset SW, HDD LED, Power LED) to the corresponding headers on the motherboard. Refer to the motherboard diagram for exact pinouts.
- Connect USB and audio cables from your chassis front panel to the respective headers.
5. Zure sistemaren funtzionamendua
5.1. Hasierako abiaraztea
After all components are installed and connected, connect your monitor, keyboard, and mouse. Plug in the power cord and press the power button on your chassis.
5.2. Accessing BIOS/UEFI
BIOS/UEFI konfigurazio utilitatea sartzeko, sakatu DEL tekla edo F2 tekla pizteko autoproba (POST) prozesuan. BIOSak sistemaren ezarpenak, abioko ordena eta hardwarearen egoera kontrolatzeko aukera ematen dizu.
5.3. Gidariaren instalazioa
After installing your operating system, install the necessary drivers for your motherboard's components. You can find these drivers on the included Support DVD or download the latest versions from the official ASUS support webgunea. Kontrolatzaile egokiak instalatzeak errendimendu eta egonkortasun optimoak bermatzen ditu.
5.4. Sistema eragilearen instalazioa
Insert your operating system installation media (USB drive or DVD) and configure the boot order in the BIOS/UEFI to boot from it. Follow the on-screen instructions to install your preferred operating system.
6. Mantentzea
6.1. Garbiketa
Regularly clean your computer's interior to prevent dust buildup, which can lead to overheating and component failure. Use compressed air to remove dust from fans, heatsinks, and other components. Ensure the system is powered off and unplugged before cleaning.
6.2. BIOS eguneraketak
ASUS periodically releases BIOS updates to improve system stability, add support for new hardware, or fix bugs. You can download the latest BIOS from the ASUS support website. Refer to the motherboard's product page or the BIOS utility for instructions on how to update the BIOS safely. It is recommended to update the BIOS before installing Windows, especially if using a 9th generation Intel CPU.
6.3. Gidarien eguneraketak
Keep your drivers updated to ensure optimal performance and compatibility. You can check the ASUS support website for the latest chipset, audio, LAN, and other drivers for your motherboard.
7. Arazoak
Atal honek aurki ditzakezun arazo ohikoenei irtenbideak eskaintzen ditu.
- Argindarrik ez/Abiorik ez:
- Ensure all power cables (24-pin ATX, 8-pin 12V CPU) are securely connected to the motherboard and power supply.
- Verify the power supply is switched on and connected to a working power outlet.
- Egiaztatu aurrealdeko paneleko etengailuaren konexioak plaka basearekin.
- Ez dago pantailarik:
- Ensure your monitor is connected to the correct video output (either motherboard's integrated graphics ports or discrete graphics card).
- Berriro jarri grafiko-txartela eta memoria-moduluak.
- If using a discrete graphics card, ensure it has adequate power from the PSU.
- Sistemaren ezegonkortasuna/matxurak:
- Check CPU and GPU temperatures. Ensure cooling solutions are properly installed.
- Exekutatu memoriaren diagnostiko tresnak RAM akastuna egiaztatzeko.
- Ziurtatu gidari guztiak eguneratuta daudela.
- Egiaztatu energia-iturriatage nahikoa da osagai guztientzat.
- Periferikoa ez da detektatu:
- Saiatu periferikoa beste portu batera konektatzen.
- Instalatu edo eguneratu dagokion kontrolatzailea.
- Check BIOS settings to ensure the port is enabled.
Arazoak konpontzeko xehetasun gehiago lortzeko edo hemen azaltzen ez direnak lortzeko, jo ASUSen laguntzara. webgunea edo jarri harremanetan laguntza teknikoarekin.
8. Zehaztapenak
Below are the technical specifications for the ASUS PRIME H310M-A R2.0/CSM Motherboard.
| Ezaugarri | Zehaztapena |
|---|---|
| Marka | ASUS |
| Ereduaren izena | PRIME H310M-A R2.0/CSM |
| CPU Socketa | LGA 1151 |
| Prozesadore bateragarriak | 8th and 9th Generation Intel Core, Pentium Gold, Celeron |
| Txip mota | Intel H310 |
| RAM Memoria Teknologia | DDR4 |
| Memoria zirrikituak | 2 x DIMM, Max. 32GB, DDR4 2666/2400/2133 MHz Non-ECC, Un-buffered Memory |
| Memoria Erlojuaren Abiadura | 2666 MHz |
| Grafikoen irteera | VGA, DVI-D, HDMI |
| Zabaltzeko Slots | PCIe 3.0/2.0 x16 1, PCIe 2.0 x1 2 |
| Biltegiratzea | 1 x M.2 Socket 3, 4 x SATA 6Gb/s port(s) |
| USB atakak | USB 3.1 Gen 1 (Type-A), USB 2.0/1.1 |
| Audioa | Realtek ALC887 8 kanaleko definizio handiko audio kodeka |
| LAN | Realtek RTL8111H Gigabit LAN kontrolagailua |
| Forma-faktorea | mATX (8.9 hazbete x 7.3 hazbete) |
| Produktuaren neurriak | 8.9 x 1 x 7.3 hazbete |
| Elementuaren pisua | 1.2 kilo |
| Eskuragarri dagoen lehen data | 12ko abenduaren 2018a |
9. Bermea eta Laguntza
9.1. Produktuen bermea
This ASUS motherboard comes with a limited warranty. The duration and terms of the warranty may vary by region and retailer. Please retain your proof of purchase for warranty claims. For detailed warranty information, refer to the warranty card included in your package or visit the official ASUS webgunea.
9.2. Laguntza Teknikoa
For technical assistance, driver downloads, BIOS updates, or further information regarding your ASUS PRIME H310M-A R2.0/CSM motherboard, please visit the official ASUS support webgunea:
You may also find helpful resources, FAQs, and contact information for regional support centers on the webgunea.
Ask a question about this manual
Ask about setup, troubleshooting, compatibility, parts, safety, or missing instructions. Manuals+ will review the question and use this page’s manual context to help answer it.