
1. Sarrera
The Samson AirLine 99m AH9 Headset Wireless System is a compact and versatile wireless microphone solution designed for active performers, presenters, and educators. This system provides high-definition audio transmission without the need for cables or belt packs, offering freedom of movement and ease of use. It operates on a frequency-agile UHF band, ensuring reliable performance across 100 selectable channels.
The system comprises three main components:
- AH9 Micro Transmitter: A lightweight, rechargeable transmitter integrated into the headset.
- AR99m Micro Receiver: A compact receiver with multiple output options for versatile connectivity.
- DE10x Headset Microphone: Proba baxuafile, comfortable headset microphone designed for clear vocal reproduction.
2. Sistemaren osagaiakview

2.1. irudia: The complete Samson AirLine 99m AH9 Headset Wireless System, showing the AR99m receiver, AH9 micro transmitter, and DE10x headset microphone.

2.2. irudia: Gertutik view of the AH9 micro transmitter integrated with the DE10x headset microphone. The green light indicates power status.

2.3. irudia: Goiena view of the AR99m micro receiver, showing the volume knob, SET button, channel display, and status indicators (READY, IR, PEAK).
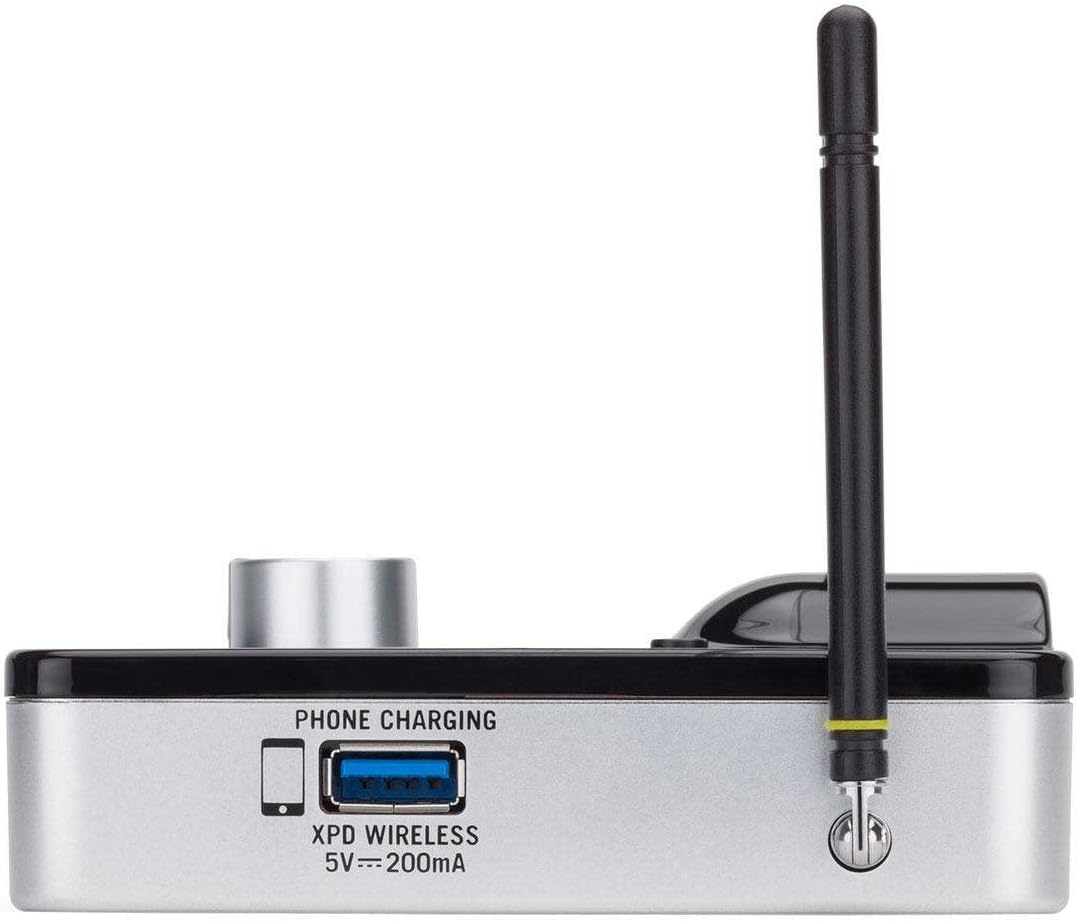
2.4. irudia: Aldea view of the AR99m micro receiver, highlighting the 'PHONE CHARGING' USB port (5V --- 200mA) and antenna connection.

2.5. irudia: Angelukoa view of the AR99m micro receiver, showing the DC IN port, 1/8" unbalanced output, and XLR balanced output.

2.6. irudia: Atzekoa view of the AH9 micro transmitter, showing the charging contacts and the integrated headset cable connection.

2.7. irudia: Atzekoa view of the AR99m micro receiver, detailing the DC IN (15V === 600mA), 1/4" unbalanced output, and XLR balanced output ports.

2.8. irudia: The DE10x headset microphone, showing its lightweight design and adjustable ear hooks.
3. Konfiguratzeko argibideak
3.1. Charging the AH9 Micro Transmitter
- Connect the supplied USB charging cable to the AH9 micro transmitter.
- Plug the other end of the USB cable into a standard USB power adapter (not included) or a powered USB port.
- The LED indicator on the AH9 will show charging status. A full charge provides up to 8 hours of operation.
3.2. Connecting the AR99m Micro Receiver
- Connect the included power adapter to the DC IN port (15V === 600mA) on the AR99m receiver.
- Entxufatu korronte egokitzailea AC entxufe batera.
- Connect the AR99m receiver to your audio mixer, PA system, or recording device using one of the following outputs:
- XLR irteera orekatua: For professional audio equipment.
- Unbalanced 1/4" Output: For standard instrument inputs or line-level inputs.
- Unbalanced 1/8" Output: For consumer-grade audio devices or computer inputs.
- Extend the antennas on the AR99m receiver for optimal signal reception.
3.3. Wearing the DE10x Headset Microphone
- Carefully place the headset over your ears, ensuring a comfortable and secure fit.
- Position the microphone element approximately 1-2 inches from the corner of your mouth for best sound quality.
- Use the included windscreens to reduce plosives and wind noise, if necessary.
4. Funtzionamendu-argibideak
4.1. Piztu/Itzaltzea
- AH9 Micro Transmitter: Press and hold the power button on the transmitter until the LED illuminates. Press and hold again to power off.
- AR99m Micro Receiver: Turn the VOLUME knob clockwise to power on. Turn counter-clockwise until it clicks to power off.
4.2. Channel Selection and Pairing
The AirLine 99m system features 100 operating channels across a 24MHz bandwidth.
- Turn on the AR99m receiver. The channel display will show the current channel.
- Sakatu EZARTU button on the AR99m receiver to cycle through available channels. Select a clear channel with no interference.
- Once a channel is selected on the receiver, turn on the AH9 transmitter.
- The AH9 transmitter will automatically scan and pair with the receiver on the selected channel. The 'READY' indicator on the receiver will illuminate when a successful connection is established.
4.3. Bolumena doitzea
Erabili BOLUMENA knob on the AR99m receiver to adjust the output level of the wireless system. Start with a low volume and gradually increase it to avoid sudden loud audio.
4.4. Monitoring Signal Status
- READY Indicator: Illuminates when the transmitter and receiver are successfully paired and receiving a signal.
- PEAK adierazlea: Illuminates when the audio input from the transmitter is too high, indicating potential clipping. Reduce the input gain on your mixer or adjust the microphone position if this occurs.
- IR adierazlea: Used during initial setup for infrared pairing (if applicable, though this model typically auto-pairs).
5. Mantentzea
- Garbiketa: Use a soft, dry cloth to clean the surfaces of the transmitter and receiver. Avoid using abrasive cleaners or solvents.
- Bateria zaintzea: Recharge the AH9 transmitter regularly. For long-term storage, ensure the battery is partially charged (around 50%) to prolong its lifespan.
- Biltegiratzea: Gorde sistema leku fresko eta lehor batean, eguzki-argitik eta muturreko tenperaturetatik babestuta.
- Haizetakoak: Replace windscreens on the DE10x headset microphone as needed to maintain hygiene and acoustic performance.
6. Arazoak
| Arazoa | Kausa posiblea | Irtenbidea |
|---|---|---|
| Ez dago soinurik hargailutik |
|
|
| Interference or dropouts |
|
|
| Audio distortsionatua |
|
|
| Bateriaren iraupen laburra |
|
|
7. Zehaztapenak
| Ezaugarri | Xehetasuna |
|---|---|
| Modelo zenbakia | SW9A9SDE10-K |
| Eragiketa-kanalak | 100 (across 24MHz bandwidth) |
| Eragiketa-eremua | Gehienez 300 oin (ikusmen-lerroa) |
| AH9 Transmitter Battery Life | Up to 8 hours (Lithium-Ion, rechargeable) |
| AR99m Receiver Outputs | Balanced XLR, Unbalanced 1/4", Unbalanced 1/8" |
| Mikrofono Mota | DE10x Headset Microphone |
| Osagarriak barne | 4 Windscreens, USB charging cable, Power adapter |
| Elementuaren pisua | 1 libra |
| Produktuaren neurriak | 3 x 3 x 3 hazbete |
| Material Mota | Plastikoa |
| Energia iturria | Bateriaren bidez |
| Gailu bateragarriak | Mixers, Audio Interfaces, PA Systems, Computers, Recording Devices |
8. Bermea eta Laguntza
Bermeari buruzko informazioa eta laguntza teknikoa lortzeko, jo Samson Technologies-en webgune ofizialera. webwebgunera edo jarri harremanetan bezeroarentzako arreta-zerbitzura zuzenean. Gorde erosketa-agiria erosketaren frogagiri gisa berme-erreklamazioetarako.
Sareko baliabideak: Bisitatu Samson Brand Store on Amazon produktuari buruzko informazio eta laguntza gehigarria lortzeko.