1. Sarrera
This manual provides detailed instructions for the installation, operation, and maintenance of your ASRock B365 PRO4 ATX Motherboard. Please read this manual thoroughly before proceeding with installation to ensure correct setup and to prevent damage to the components.
The ASRock B365 PRO4 motherboard supports 9th and 8th Generation Intel Core Processors, offering a robust platform for personal computing. It features a Digi Power Design with an 8 Power Phase Design, ensuring stable power delivery to the CPU.
2. Segurtasun informazioa
- Always disconnect the power supply before installing or removing any components.
- Erabili eskumuturreko uhal antiestatiko bat deskarga elektrostatikoek (ESD) eragindako kalteak saihesteko osagai sentikorrei.
- Osagai sentikorrak ez ukitzeko, heldu plaka nagusiari ertzetik.
- Ziurtatu ordenagailuaren karkasa behar bezala aireztatuta dagoela gehiegi berotzea saihesteko.
- Mantendu plaka nagusia hezetasunetik eta muturreko tenperaturetatik urrun.
3. Konfigurazioa eta instalazioa
3.1 Paketearen edukia
Egiaztatu elementu guztiak paketean daudela:
- ASRock B365 PRO4 Motherboard
- Instalazio azkarraren gida
- Laguntza CDa
- I / O ezkutukoa
- 2 x SATA datu-kableak
- 3 x Screws for M.2 Sockets
- 1 x Standoff for M.2 Socket

Image: ASRock B365 PRO4 Motherboard and its included accessories, including the quick installation guide, support CD, I/O shield, SATA cables, and M.2 screws/standoff.
3.2 Plaka amaierako diseinua
Familiarize yourself with the key components and connectors on the motherboard.

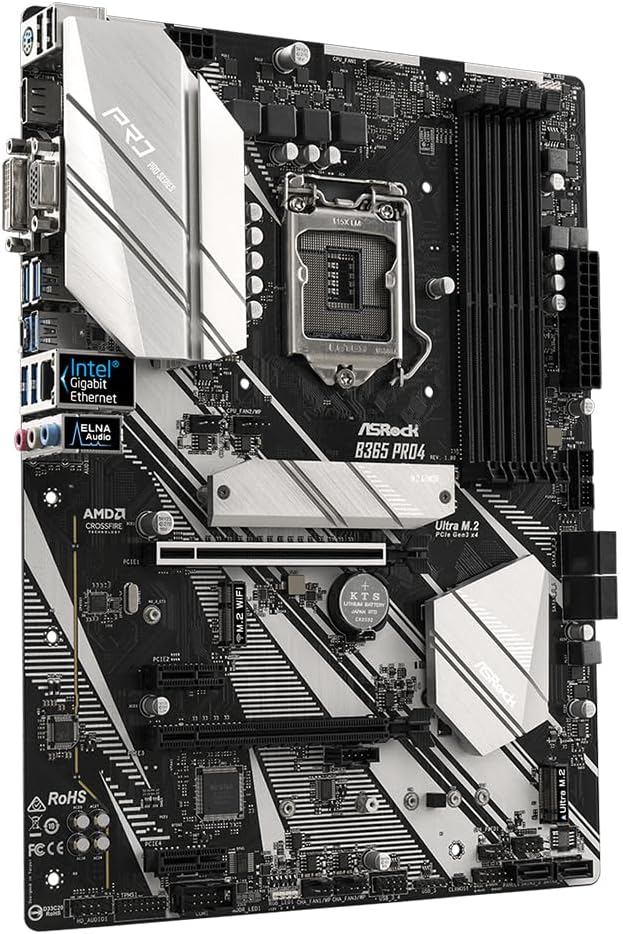
Irudia: Goitik behera view of the ASRock B365 PRO4 Motherboard, highlighting the CPU socket, RAM slots, PCIe slots, and M.2 slots.

Irudia: Angelua view of the ASRock B365 PRO4 Motherboard, showing the heatsinks and various connectors.
3.3 CPU Installation (LGA1151)
- Ireki CPUaren socket-aren palanka eta altxa karga-plaka.
- Carefully align the CPU with the socket, ensuring the golden triangle on the CPU matches the triangle on the socket.
- Jarri CPUa astiro-astiro socketean, indarrik eman gabe.
- Itxi karga-plaka eta finkatu palankarekin.
3.4 Memoriaren (RAM) instalazioa
The motherboard features 4 DDR4 DIMM slots, supporting dual-channel memory up to 64GB.
- Ireki DIMM zirrikituaren bi muturretan dauden klipak.
- Lerrokatu RAM moduluko koska DIMM zirrikituan dagoen giltzarekin.
- Insert the RAM module firmly until the clips snap into place.
3.5 Biltegiratze-gailuaren instalazioa
The motherboard supports 6 SATA3 ports and 2 Ultra M.2 ports.
- SATA unitateak: Connect SATA data cables to the SATA ports on the motherboard and to your storage devices (HDDs/SSDs). Connect power cables from your power supply to the devices.
- M.2 SSDak: Locate the M.2 slots. Insert the M.2 SSD into the slot at an angle, then gently push it down and secure it with the provided screw and standoff.
3.6 Hedapen Txartelaren Instalazioa (PCIe)
The motherboard has 2 PCI-Express 3.0 x16 slots and 2 PCI-Express 3.0 x1 slots.
- Select an appropriate PCIe slot for your expansion card (e.g., graphics card).
- Remove the corresponding metal bracket from your PC case.
- Align the card with the slot and press firmly until it is seated correctly.
- Txartela torloju batekin ordenagailuaren karkasari lotu.
3.7 Connecting Peripherals to the I/O Panel
Atzeko S/I panelak kanpoko gailuak konektatzeko hainbat ataka eskaintzen ditu.
Irudia: Gertuko planoa view of the ASRock B365 PRO4 Motherboard's rear I/O panel, showing ports for PS/2, USB 2.0, USB 3.1 Gen 1, VGA, DVI-D, HDMI, LAN, and audio jacks.
- USB atakak: Connect USB devices (keyboard, mouse, external drives) to the available USB 2.0 (5 ports) and USB 3.1 Gen 1 (8 ports, including 1 Type-C rear) ports.
- Bideo irteerak: Connect your monitor to the VGA, DVI-D, or HDMI port.
- LAN ataka: Konektatu Ethernet kable bat sarera sartzeko.
- Audio-konektoreak: Connect speakers, headphones, or microphones to the audio jacks.
- PS/2 ataka: Connect a PS/2 keyboard or mouse.
4. Funtzionamendu-argibideak
4.1 Lehenengo abiaraztea eta BIOS konfigurazioa
- After assembling all components, connect the power supply and monitor.
- Piztu sistema. Sakatu Del or F2 abiaraztean BIOS/UEFI konfigurazio utilitatea sartzeko.
- Konfiguratu abio-ordena, sistemaren ordua eta beharrezko beste ezarpen batzuk. Gorde aldaketak eta irten.
- Install your operating system from a bootable USB drive or optical media.
4.2 Gidariaren instalazioa
After installing the operating system, install the necessary drivers from the provided Support CD or download the latest versions from the ASRock webgunea. Bultzatzaile nagusien artean daude:
- Txip-multzoaren kontrolatzaileak
- Audio kontrolatzaileak (Realtek ALC892)
- LAN Drivers (Intel I219V Gigabit Ethernet)
- Grafikoen kontrolatzaileak (grafiko integratuetarako edo GPU diskretuetarako)
5. Mantentzea
- Hautsa kentzea: Regularly clean dust from the motherboard and case fans using compressed air. Ensure the system is powered off and unplugged before cleaning.
- BIOS eguneraketak: Egiaztatu ASRock-a website periodically for BIOS updates. Updates can improve system stability and compatibility. Follow the instructions carefully when updating the BIOS.
- Kableen kudeaketa: Ziurtatu kableak ondo bideratuta daudela aire-fluxua hobetzeko eta interferentziak saihesteko.
6. Arazoak
- Potentziarik gabe:
- Check all power connections, including the 24-pin ATX and 8-pin 12V CPU power connectors.
- Ziurtatu energia-iturri etengailua ON posizioan dagoela.
- Ez dago pantailarik:
- Verify that the monitor is connected to the correct video output (either integrated graphics or discrete GPU).
- Berriro jarri grafiko-txartela eta RAM moduluak.
- Sistemaren ezegonkortasuna/matxurak:
- Egiaztatu RAM moduluak behar bezala kokatuta daudela.
- Ziurtatu CPU hozkailua behar bezala instalatuta dagoela eta kontaktu ona egiten duela.
- Eguneratu gidariak eta BIOSa azken bertsioetara.
- M.2 SSDa ez da detektatu:
- Ensure the M.2 SSD is correctly seated and secured.
- Check BIOS settings to ensure M.2 slots are enabled and configured correctly (SATA vs. PCIe mode).
7. Zehaztapenak
| Ezaugarri | Xehetasuna |
|---|---|
| CPU Socketa | LGA 1151 |
| Prozesadore bateragarriak | 9th/8th Generation Intel Core Processors (up to 95W) |
| Chipset | Intel B365 |
| Memoria | 4 x DDR4 DIMM slots, Dual Channel, Non-ECC, Buffered, Max 64GB (2666/2400/2133 MHz) |
| Zabaltzeko Slots | PCIe 3.0 x16 2, PCIe 3.0 x1 2 |
| Grafiko anitzeko euskarria | AMD Quad CrossFireX and CrossFire Technology |
| Biltegiratzea | 6 x SATA3 ports (RAID 0, 1, 5, 10), 2 x Ultra M.2 ports (PCIe Gen3 x4 & SATA3) |
| Audioa | Realtek ALC892 7.1-Channel HD Audioa |
| LAN | Intel I219V Gigabit Ethernet |
| USB atakak | 8 x USB 3.1 Gen1 (1 Type-C rear, 5 rear, 2 via header), 5 x USB 2.0 (2 rear, 3 via header) |
| Bideo Irteerak | 1 x VGA, 1 x DVI-D, 1 x HDMI |
| Forma-faktorea | ATX (12.0 x 9.0 inch / 30.5 x 22.9 cm) |
8. Bermea eta Laguntza
8.1 Bermearen informazioa
The ASRock B365 PRO4 Motherboard comes with a 1 urteko berme mugatua. This warranty covers defects in materials and workmanship under normal use. For specific terms and conditions, please refer to the warranty card included with your product or visit the official ASRock webgunea.
Note: Damage caused by improper installation, misuse, unauthorized modifications, or natural disasters is not covered under warranty.
8.2 Laguntza Teknikoa
For technical assistance, driver downloads, BIOS updates, or further troubleshooting, please visit the official ASRock support webgunea:
You may also contact ASRock customer service directly through their weblaguntza pertsonalizatua jasotzeko gunea.