Sarrera
This manual provides essential information for the safe and efficient operation, maintenance, and troubleshooting of your Sealey SAC5020A 50L Direct Drive Air Compressor. The compressor features an aluminium cylinder head with a cast iron cylinder for enhanced wear resistance, making it suitable for general-purpose workshop applications. Its pump head is directly coupled to a heavy-duty induction motor, ensuring reliable and quiet operation. The precision-welded receiver tank complies with the Pressure Vessel Directive. It is equipped with a fully automatic pressure cut-out switch and twin gauges to display both tank and working pressures. The unit is supplied with a 3-pin plug.
Segurtasun Informazioa
Beti bete segurtasun neurri hauek lesio pertsonalak edo ekipamenduari kalteak saihesteko:
- Irakurri eta ulertu argibide guztiak konpresorea martxan jarri aurretik.
- Ensure the compressor is placed on a level, stable surface in a well-ventilated area.
- Erabili babes pertsonaleko ekipamendu (EPI) egokia, begien babesa eta entzumenaren babesa barne.
- Ez erabili konpresorea d-namp edo baldintza hezeetan, edo likido edo gas sukoien aurrean.
- Always disconnect the compressor from the power supply before performing any maintenance or adjustments.
- Never direct compressed air at people or animals.
- Regularly inspect the air tank for signs of corrosion or damage. Do not use a damaged tank.
- Ziurtatu konexio guztiak ondo finkoak eta ihesik gabe daudela erabili aurretik.
- Do not modify the compressor or its safety devices.
Despaketatzea eta konfiguratzea
Carefully remove the compressor from its packaging. Inspect the unit for any signs of shipping damage. If damage is found, contact your supplier immediately.
Component Identification and Dimensions

1. irudia: Overall dimensions of the Sealey SAC5020A 50L Direct Drive Air Compressor. The image shows the compressor with its tank, motor, handle, wheels, and control panel, indicating a width of 705mm, a height of 600mm, and a depth of 300mm.
Familiarize yourself with the main components of your compressor. Refer to Figure 1 for an overview of the unit's dimensions and general layout.
Batzarra
- Gurpilak erantsi: Securely attach the wheels to the compressor base using the provided hardware.
- Erantsi heldulekua: Mount the transport handle to the designated points on the compressor body.
- Kokalekua: Place the compressor on a firm, level surface. Ensure there is adequate space around the unit for ventilation.
Konexio elektrikoa
Connect the compressor to a suitable grounded power outlet. Ensure the power supply matches the voltage and frequency specifications of the compressor (typically 230V, 50Hz for this model). The unit is fitted with a 3-pin plug.
Initial Run-in Procedure
Before first use, or after extended storage, perform a brief run-in:
- Open the air outlet valve completely to allow air to escape freely.
- Switch on the compressor and let it run for approximately 15-20 minutes without building pressure. This helps to lubricate internal components.
- Switch off the compressor and close the air outlet valve.
Funtzionamendu-argibideak
Controls and Gauges

2. irudia: Gertutik view of the twin pressure gauges. One gauge displays the tank pressure, and the other displays the regulated working pressure.
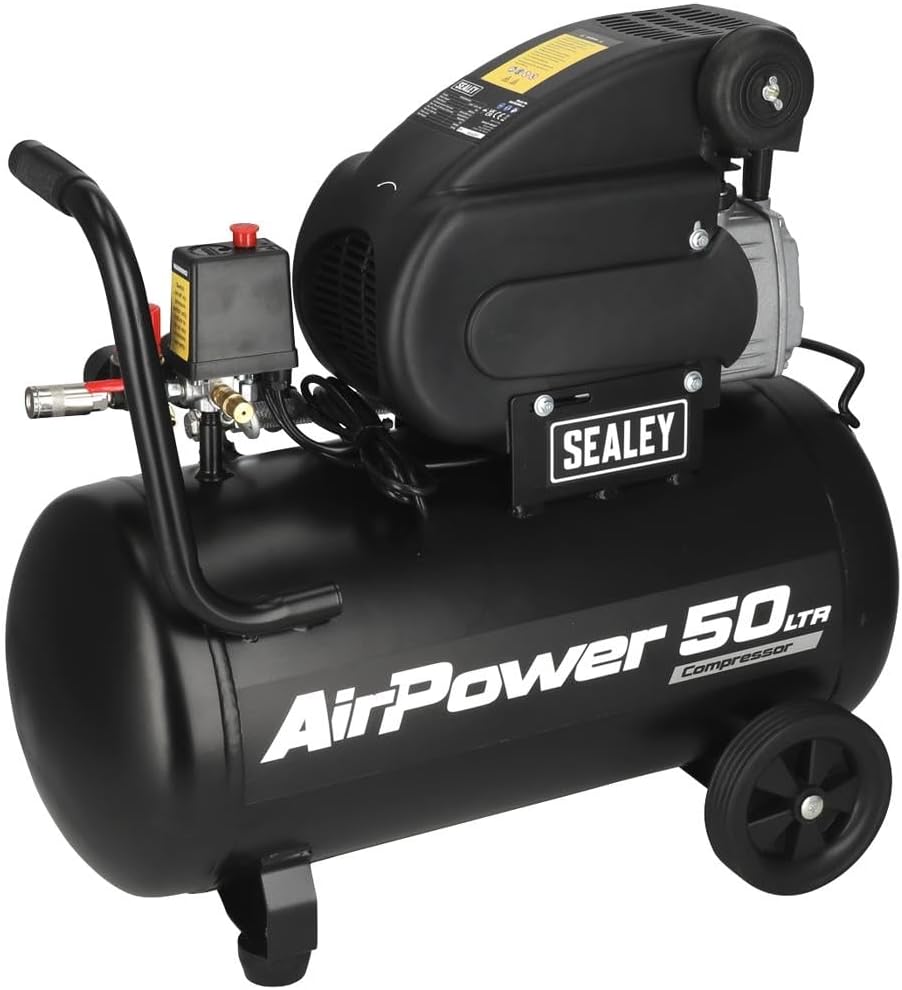
3. irudia: The pressure cut-out switch (black box with yellow warning label) and the red pressure regulator knob, along with the quick-connect air outlet.
- Presio-interruptorea: The black box (Figure 3) automatically turns the compressor on and off to maintain tank pressure.
- Tankearen manometroa: Displays the current pressure inside the air tank (Figure 2).
- Working Pressure Gauge: Displays the pressure of the air being supplied to your tools, adjustable via the regulator (Figure 2).
- Presio erregulatzailea: The red knob (Figure 3) allows you to adjust the working pressure. Turn clockwise to increase pressure, counter-clockwise to decrease.
- Quick-Connect Air Outlet: For attaching air hoses and tools (Figure 3).
Konpresorea martxan jartzea
- Ziurtatu deposituaren behealdean dagoen hustubide-balbula itxita dagoela.
- Plug the compressor into a suitable power outlet.
- Turn the main power switch to the "ON" position. The compressor will start to build pressure.
- Once the tank reaches its maximum pressure, the compressor will automatically shut off.
Connecting and Using Air Tools
- Connect your air hose to the quick-connect air outlet.
- Attach your air tool to the other end of the hose.
- Adjust the working pressure using the red regulator knob to suit the requirements of your air tool. Monitor the working pressure gauge.
- Begin using your air tool. The compressor will cycle on and off automatically to maintain pressure as needed.
Itzaltzea
- Turn the main power switch to the "OFF" position.
- Deskonektatu aire-hodia eta tresnak.
- Ireki poliki-poliki deposituaren beheko hustubide-balbula kondentsatutako hezetasuna eta hondar-aire-presioa askatzeko. Itxi balbula depositua hustu ondoren.
Mantentzea
Mantentze-lan erregularrak zure aire-konpresorearen iraupena eta funtzionamendu segurua bermatzen ditu.
Egunero / Erabilera bakoitzaren ondoren
- Kondentsatua hustu: After each use, or daily if used frequently, open the drain valve at the bottom of the air tank to release accumulated moisture. This prevents rust and corrosion inside the tank.
Weekly/Monthly
- Aire-iragazkia ikuskatu: Check the air filter for dirt and debris. Clean or replace if necessary to ensure proper airflow to the pump.
- Egiaztatu ihesak: Listen for any air leaks around fittings, hoses, and valves. Tighten connections as needed. A soapy water solution can help identify small leaks.
- Mahuka eta konexioak ikuskatu: Examine air hoses for cracks, cuts, or wear. Replace damaged hoses immediately. Ensure all quick-connect fittings are functioning correctly.
- Ikuskatu elikatze-kablea: Check the power cord for any damage, fraying, or exposed wires.
Urtero
- Tankearen ikuskapena: Visually inspect the air tank for any signs of external corrosion, dents, or damage. If any damage is found, do not use the compressor and seek professional inspection.
- Segurtasun-balbularen egiaztapena: Briefly pull the ring on the safety relief valve to ensure it operates freely and reseats properly.
For any maintenance beyond these basic steps, it is recommended to consult a qualified service technician.
Arazoak konpontzea
This section provides solutions to common issues you may encounter with your air compressor.
| Arazoa | Kausa posiblea | Irtenbidea |
|---|---|---|
| Konpresorea ez da martxan jartzen. |
|
|
| Konpresorea etengabe dabil edo maizregi zikloak egiten ditu. |
|
|
| Aire-presio baxua irteeran. |
|
|
| Gehiegizko zarata edo bibrazioa. |
|
|
Zehaztapenak
| Ezaugarri | Xehetasuna |
|---|---|
| Marka | Sealey |
| Modelo zenbakia | SAC5020A |
| Energia iturria | AC |
| Gehienezko potentzia | 2 zaldi potentzia |
| Motor Zaldia | 2 zaldi potentzia |
| Tankaren bolumena | 50 litro |
| Aire Fluxuaren Ahalmena | 6.8 oin kubiko minutuko (CFM) |
| Elementuaren pisua | 32980 Grams (approx. 33 kg) |
| Ezaugarri Berezia | Funtzionamendu Isila |
| Dakarten osagaiak | 50ltr Direct Drive Compressor 2hp |
| Gomendatutako Erabilerak | Bolting, Drilling, Spraying, Sanding, Grinding, Tire Inflation |
Bermearen informazioa
This Sealey product is covered by a manufacturer's warranty against defects in materials and workmanship. The specific terms and duration of the warranty may vary by region and purchase date. Please retain your proof of purchase for warranty claims.
For detailed warranty information, please refer to the warranty card included with your product or visit the official Sealey webgunea.
Laguntza eta Harremana
Should you require technical assistance, spare parts, or have any questions regarding your Sealey SAC5020A air compressor, please contact Sealey customer support or your authorized dealer.
Sealey Ofiziala Webgunea: www.sealey.co.uk
Please have your model number (SAC5020A) and serial number (if applicable) ready when contacting support.