1. Sarrera
Eskerrik asko erosketagatik.asing the A-ZONE Solar Sensor Light Dummy Camera. This device combines the functionality of a solar-powered motion sensor light with the appearance of a security camera, offering both illumination and a visual deterrent. This manual provides detailed instructions for proper installation, operation, and maintenance to ensure optimal performance and longevity of your product.

Figure 1: A-ZONE Solar Sensor Light Dummy Camera. This image shows the main unit with its solar panel and LED lights, designed to resemble a security camera.
2. Ezaugarri nagusiak
- Eguzki-energia: Equipped with a solar panel for automatic charging during the day, eliminating the need for external power or wiring.
- Mugimendu-sentsorea: Integrated PIR motion sensor detects movement within its range, activating bright illumination.
- Dummy Camera Design: Designed to resemble a security camera, providing a visual deterrent against intruders. Includes a red LED that stays on at dusk.
- Distira handiko LEDak: Features 8 high-brightness LEDs for effective illumination up to 10 meters.
- IP66 Iragazgaitza eta hautsaren aurkakoa: Durable construction ensures resistance to harsh weather conditions.
- Angelu erregulagarria: The light's illumination angle can be adjusted up to 90 degrees, and the solar panel can move 120 degrees vertically, with 360-degree rotation possible via a screw.
- Three Intelligent Modes: Operates with different lighting behaviors based on motion detection and ambient light.

2 Irudia: Gainetikview of key features including solar power, 8 high-brightness LEDs, motion sensor, 120-degree adjustable angle, easy installation, energy saving, 50-hour continuous illumination, and IP66 waterproof rating.
3. Konfigurazioa eta instalazioa
3.1 Instalazio-kokapen bat aukeratzea
Select a location that receives direct sunlight for as long as possible throughout the day to ensure optimal charging. Avoid areas with obstructions that might block sunlight from reaching the solar panel. The device is designed for outdoor use.
3.2 Initial Activation and Charging
- Sakatu pizteko botoia unitatea pizteko.
- To confirm the LED lights are working, cover the solar panel with your hand or paper in a dark environment. The LEDs should illuminate.
- Place the unit in direct sunlight for at least 2 days to allow the internal battery to fully charge before initial use.
3.3 Muntatzeko jarraibideak
The device is designed for wall mounting. Follow these steps for installation:
- Mark the desired mounting points on the wall using the bracket as a template.
- Egin zuloak markatutako puntuetan eta sartu emandako hormako takoak.
- Lotu euskarria horman emandako torlojuak erabiliz.
- Attach the main unit to the bracket.
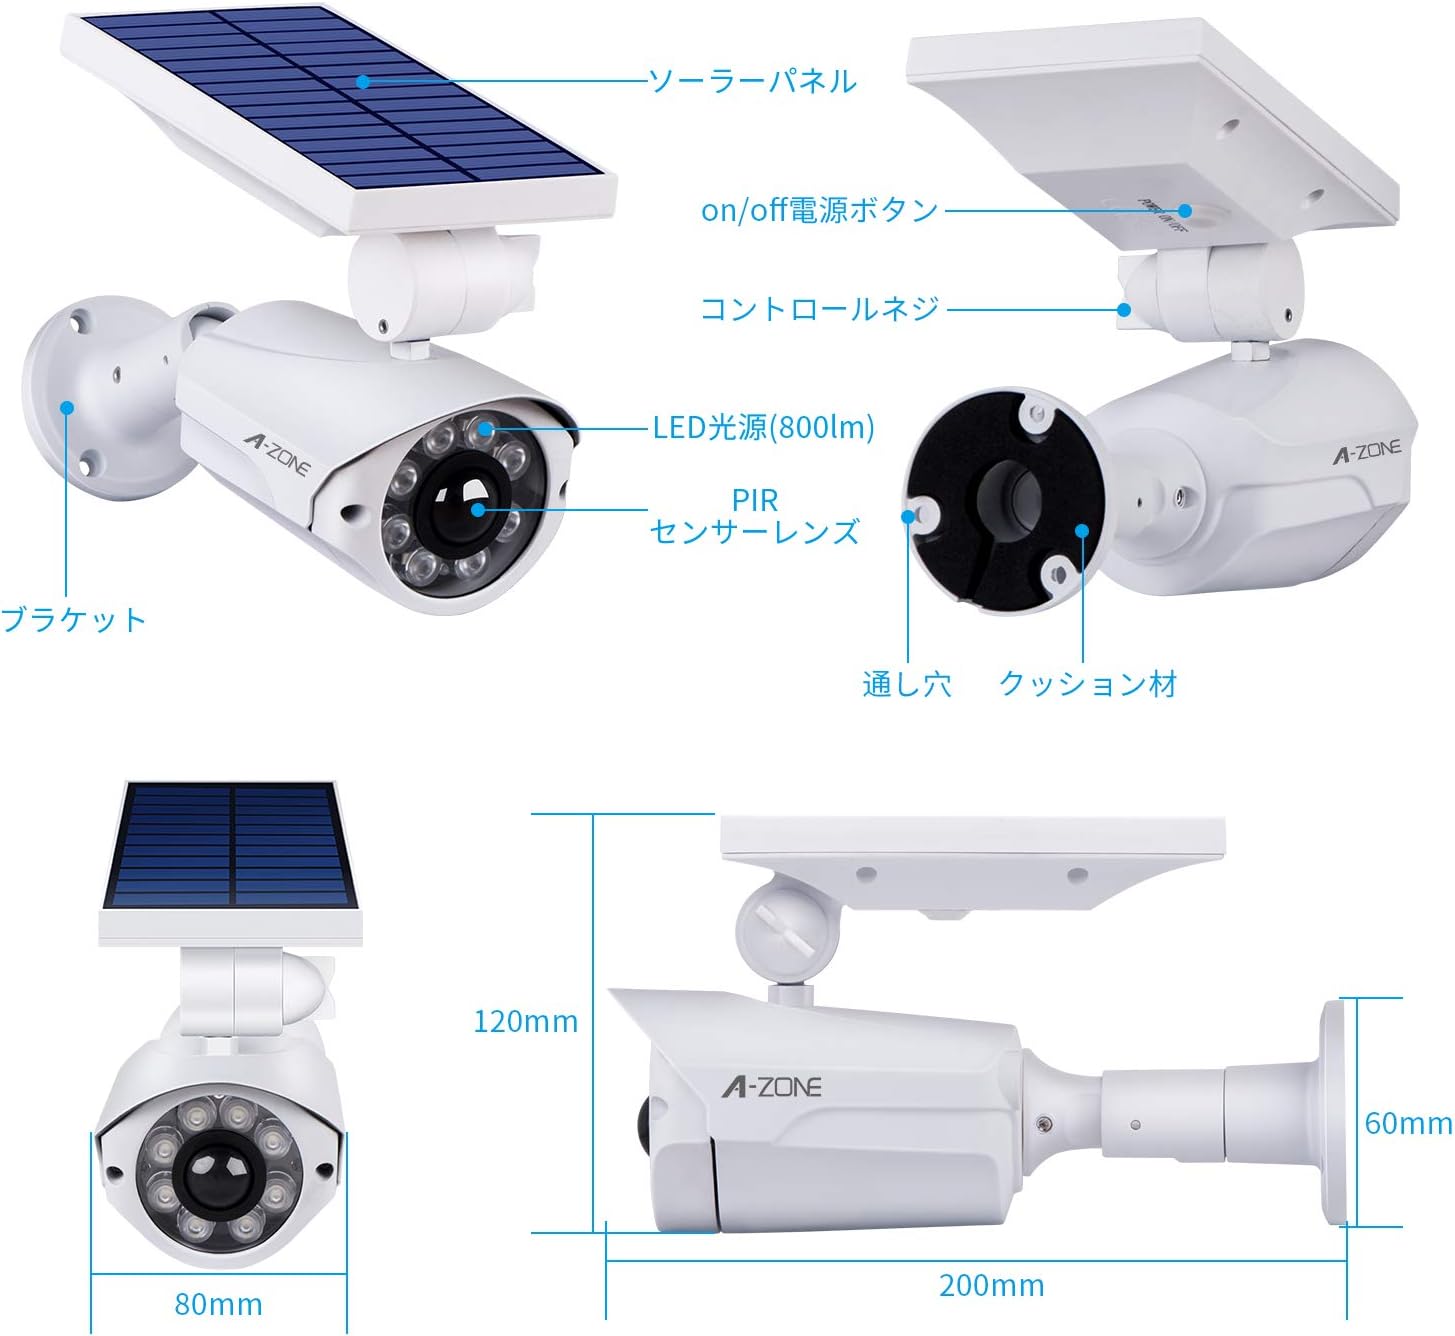
Figure 3: Visual guide for mounting the solar sensor light. It shows marking points, attaching the bracket, and securing the light.
3.4 Angeluaren doikuntza
The light's illumination angle can be adjusted up to 90 degrees. The solar panel portion can move 120 degrees vertically. With an additional 180-degree rotating screw, a full 360-degree adjustment is possible for optimal sunlight exposure and light coverage.
- To adjust the angle, loosen the corresponding screws.
- Kontuz: Do not forcefully pull or repeatedly rotate the solar panel without loosening the screws, as this may damage the connection points.
- It is recommended to use appropriate tools for adjustment. Using improper tools or excessive force can enlarge screw holes. If suitable tools are unavailable, consider changing the installation location.
- For enhanced weather resistance, it is advisable to protect the adjusted connection points with waterproof tape.

Figure 4: Illustration of the adjustable solar panel and light head, allowing for precise positioning.
4. Funtzionamendu-argibideak
The A-ZONE Solar Sensor Light Dummy Camera features three intelligent operating modes, controlled by its PIR motion sensor and ambient light sensor:
- Dusk Mode (No Motion): At dusk, if no motion is detected, a red LED light will remain constantly on. This serves as a visual deterrent, mimicking a functioning security camera.
- High Brightness Mode (Motion Detected): When a person approaches within 3-6 meters, the device automatically switches to a high-brightness mode, illuminating the area with its 8 LEDs. This mode can provide illumination for up to 8 hours on a full charge.
- Return to Dusk Mode: Approximately 20 seconds after motion is no longer detected, the light will switch back to the red LED dusk mode.

Figure 5: Diagram illustrating the light's behavior during the day (charging) and night (red LED on, bright light with motion, then red LED again).

Figure 6: Visual representation of the PIR sensor's operation: red light when no motion, bright light when motion is detected, and off when motion ceases.
5. Mantentzea
- Eguzki panelen garbiketa: Regularly clean the solar panel surface to remove dust, dirt, or debris. A clean panel ensures efficient charging.
- Optimal Sunlight Exposure: Periodically check if the solar panel's orientation is still optimal for direct sunlight exposure. Adjust if necessary.
- Bateria zaintzea: If the battery level is consistently low, or if the light stops illuminating, ensure the unit is placed in a location with ample direct sunlight for at least 2 full days to allow for a complete recharge. Frequent triggering of the high-brightness mode on a low battery can lead to faster power depletion.
6. Arazoak
6.1 Light Does Not Turn On or Charge
- Egiaztatu pizteko botoia: Ziurtatu pizteko botoia ON posizioan dagoela.
- Eguzki-panelen esposizioa: Verify that the solar panel is receiving sufficient direct sunlight. Obstructions like trees, buildings, or shadows can prevent proper charging. Relocate the unit if necessary.
- Giro-argiaren sentsorea: The light/dark sensor is integrated into the solar panel. If the unit is installed in a bright area (e.g., near other light sources at night, or in a well-lit area during the day), the light may not activate. Ensure the installation location is dark enough for the sensor to trigger.
- Hasierako karga: If it's a new installation or after prolonged storage, allow 2 full days of direct sunlight charging.
6.2 Light Stays Dim or Turns Off Quickly
- Karga nahikoa ez: The battery may not be fully charged due to inadequate sunlight. Ensure the solar panel is clean and positioned for maximum sun exposure.
- Frequent Activation: If the motion sensor is triggered too frequently, especially in high-traffic areas, the battery may drain faster than it can recharge. Consider adjusting the placement to reduce unnecessary activations.
- Battery Degradation: Over time, rechargeable batteries can degrade. If the unit is several years old and exhibits significantly reduced performance despite proper charging, the battery may need replacement (if user-replaceable) or the unit may have reached the end of its lifespan.
7. Zehaztapenak
| Marka | A-ZONA |
| Modelo zenbakia | B07S3SNWYC |
| Materiala | Metala |
| Bonbilla mota | LED |
| Energia iturria | Eguzkia, Bateria |
| Ezaugarriak | Mugimendu-sentsorea |
| Barruan/Kanpoan erabilera | Kanpoko Erabilera |
| Konektibitate Teknologia | Haririk gabekoa |
| Haririk gabeko Komunikazio Teknologia | Wi-Fi (Note: This refers to general wireless capability, not necessarily internet connectivity for this specific model) |
| Instalazio mota | Muntaketa erdi-hutsean |
| Gaueko Ikusmenaren barrutia | 10 metro |
| Paketearen neurriak | 23.4 x 15.2 x 10 cm |
| Paketearen pisua | 0.59 kg |
8. Bermea eta Laguntza
Your A-ZONE Solar Sensor Light Dummy Camera comes with a 1 urteko bermea and free technical support. We offer a 30-day exchange policy from the date of purchase.
If you have any questions, concerns, or require technical assistance, please do not hesitate to contact us:
- Posta elektronikoa: zmiyi@outlook.com
- LERRO IDA: azone1234
We are committed to 100% customer satisfaction.