1. Sarrera
The MASTECH MS8260E is a versatile 2000-count digital multimeter designed for a wide range of electrical and electronic measurements. It features a large LCD display, non-contact voltage (NCV) detection, and capabilities for measuring AC/DC voltage, AC/DC current, resistance, capacitance, and inductance. This manual provides essential information for the safe and effective operation, maintenance, and troubleshooting of your device.
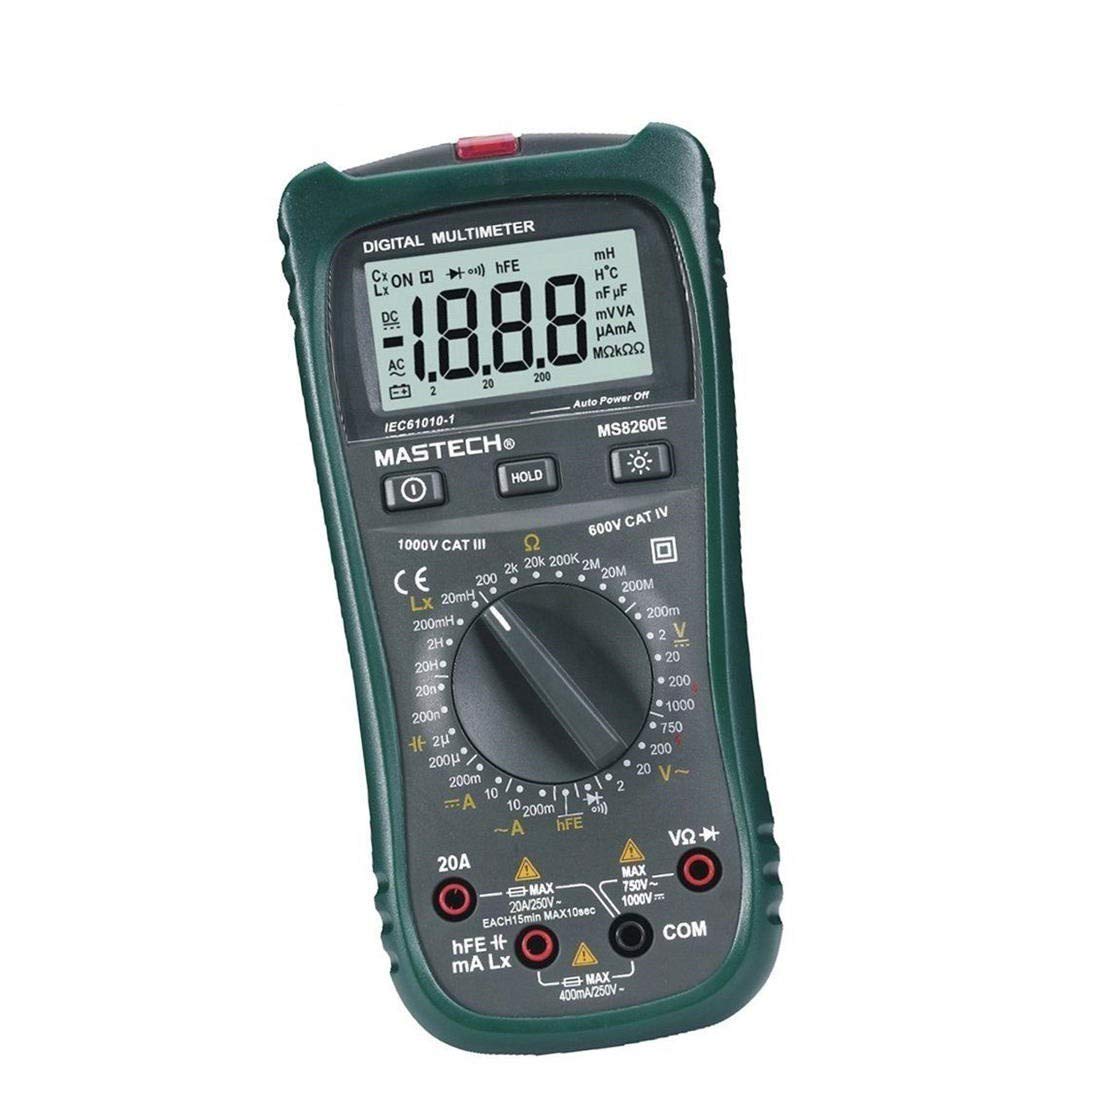
1. irudia: Aurrealdea view of the MASTECH MS8260E Digital Multimeter, showing the LCD display, function rotary switch, and input jacks.
2. Segurtasun informazioa
To ensure safe operation and service of the meter, follow these safety guidelines:
- Read and understand all instructions in this manual before using the meter.
- Errespetatu beti tokiko eta nazioko segurtasun-kodeak.
- Ez erabili neurgailua hondatuta dagoela dirudienez edo proba-kableen isolamendua hondatuta badago.
- Observe the input limits for each measurement range to prevent electrical shock or damage to the meter. This meter is rated for CAT.IV 600V.
- Kontuz ibili voltag30V AC RMS, 42V peak edo 60V DC-tik gorakoak. Bolumen hauektagshock arriskua dakar.
- Deskonektatu beti zirkuituaren korrontea eta deskargatu bolumen handiko karga guztiak.tage capacitors before making resistance, continuity, diode, or capacitance measurements.
- Irakurketa zehatzak bermatzeko, ordezkatu bateria berehala bateria baxuaren adierazlea agertzen denean.
- Ez erabili neurgailua gas, lurrun edo hauts lehergarriak dauden inguruneetan.
3. Produktua amaitu daview
The MS8260E multimeter is equipped with several features to facilitate accurate and convenient measurements:
- Large 2000 Counts LCD Display: Provides clear digital readings.
- Harremanik gabeko Voltage (NCV) detektagailua: AC vol. detektatzen dutage greater than 110V without physical contact, indicated by a flash warning.
- Datuak gordetzeko funtzioa: Bistaratutako irakurketa izozten du erraz grabatzeko.
- Pantailaren atzeko argia: Improves visibility in dimly lit conditions.
- Itzali automatikoa: Conserves battery life by automatically turning off the meter after a period of inactivity.
- Bateria baxuaren adierazlea: Alerts the user when the battery needs replacement.
- Polaritatearen adierazlea: Automatically displays negative polarity.
- 30-Range Rotary Switch: Selects various measurement functions including AC/DC voltage, AC/DC current, resistance, capacitance, inductance, diode check, continuity test, and transistor (hFE) check.
4. Konfigurazioa
4.1 Bateriaren instalazioa
The MS8260E requires one 9V battery (NEDA 1604/6F22). To install or replace the battery:
- Ensure the meter is turned off and disconnect all test leads from the input terminals.
- Bilatu bateriaren konpartimentuaren estalkia neurgailuaren atzealdean.
- Kendu euskarri-torlojua(k) eta kendu estalkia.
- Insert the 9V battery, observing the correct polarity.
- Jarri berriro bateriaren konpartimentuaren estalkia eta finkatu torloju(ekin) erabiliz.
4.2 Proba-kableak konektatzea
Always connect the black test lead to the "COM" (common) input jack. Connect the red test lead to the appropriate input jack based on the desired measurement:
- Voltage, Resistance, Capacitance, Inductance, Diode, Continuity, and hFE measurements: Connect the red lead to the "VΩCAPHz" jack.
- For Current measurements up to 200mA: Connect the red lead to the "mA" jack.
- For Current measurements up to 10A: Connect the red lead to the "10A" jack.
Ensure test leads are fully inserted into the jacks before taking measurements.
5. Funtzionamendu-argibideak
Turn the rotary switch to the desired function. The meter will display "OL" (Overload) if no input is present or if the input exceeds the range.
5.1 DC Voltage Neurketa (DCV)
- Set the rotary switch to the desired DCV range (200mV, 2V, 20V, 200V, 1000V).
- Connect the black test lead to the "COM" jack and the red test lead to the "VΩCAPHz" jack.
- Konektatu proba-kableak neurtu beharreko osagai edo zirkuituan, polaritatea errespetatuz.
- Irakurri liburukiatage balioa LCD pantailan.
5.2 AC Voltage Neurketa (ACV)
- Set the rotary switch to the desired ACV range (2V, 20V, 200V, 750V).
- Connect the black test lead to the "COM" jack and the red test lead to the "VΩCAPHz" jack.
- Konektatu proba-kableak AC bolumenaren artean.tage iturria.
- Irakurri liburukiatage balioa LCD pantailan.
5.3 DC Current Measurement (DCA)
- Set the rotary switch to the desired DCA range (200mA, 10A).
- For measurements up to 200mA, connect the red lead to the "mA" jack. For measurements up to 10A, connect the red lead to the "10A" jack. The black lead connects to "COM".
- Ireki korrontea neurtu behar den zirkuitua eta konektatu neurgailua kargarekin seriean.
- Irakurri uneko balioa LCD pantailan.
5.4 AC Current Measurement (ACA)
- Set the rotary switch to the desired ACA range (200mA, 10A).
- For measurements up to 200mA, connect the red lead to the "mA" jack. For measurements up to 10A, connect the red lead to the "10A" jack. The black lead connects to "COM".
- Ireki korrontea neurtu behar den zirkuitua eta konektatu neurgailua kargarekin seriean.
- Irakurri uneko balioa LCD pantailan.
5.5 Erresistentziaren neurketa (Ω)
- Set the rotary switch to the desired Ω range (200Ω, 2kΩ, 20kΩ, 200kΩ, 2MΩ, 20MΩ, 200MΩ).
- Connect the black test lead to "COM" and the red test lead to "VΩCAPHz".
- Ziurtatu zirkuitua deskonektatuta dagoela eta kondentsadore guztiak deskargatuta daudela.
- Connect the test leads across the resistor or component.
- Irakurri erresistentziaren balioa LCD pantailan.
5.6 Capacitance Measurement (CAP)
- Set the rotary switch to the desired CAP range (20nF, 200nF, 2uF, 200uF).
- Connect the black test lead to "COM" and the red test lead to "VΩCAPHz".
- Ziurtatu kondentsadorea guztiz deskargatuta dagoela proba-kableak konektatu aurretik.
- Konektatu proba-kableak kondentsadorearen artean.
- Irakurri kapazitate-balioa LCD pantailan.
5.7 Inductance Measurement (L)
- Set the rotary switch to the desired Inductance range (20mH, 200mH, 2H, 20H).
- Connect the black test lead to "COM" and the red test lead to "VΩCAPHz".
- Connect the test leads across the inductor.
- Irakurri induktantziaren balioa LCD pantailan.
5.8 Diodoaren proba
- Ezarri biraketa-etengailua Diodoaren ikurrera.
- Connect the black test lead to "COM" and the red test lead to "VΩCAPHz".
- Konektatu kable gorria diodoaren anodora eta kable beltza katodora. Aurrerako bolumen battage drop (typically 0.5V to 0.8V for silicon diodes) will be displayed.
- Reverse the leads. The display should show "OL" for a good diode.
5.9 Jarraitasun proba
- Ezarri biraketa-etengailua Jarraitutasun sinboloan.
- Connect the black test lead to "COM" and the red test lead to "VΩCAPHz".
- Konektatu proba-kableak zirkuituan edo osagaian zehar.
- Erresistentzia 30Ω gutxi gorabehera baino txikiagoa bada, txisteak joko du jarraitutasuna adieraziz.
5.10 Transistorearen (hFE) proba
- Jarri etengailu birakaria hFE posizioan.
- Identify the type (NPN or PNP) and pinout (Emitter, Base, Collector) of the transistor.
- Insert the transistor leads into the corresponding sockets in the hFE test socket on the meter.
- Read the hFE (DC current gain) value on the LCD display.
5.11 Harremanik gabeko Voltage (NCV) Detekzioa
- Ezarri biraketa-etengailua NCV posizioan.
- Hold the top front part of the meter near the AC voltage source (e.g., an electrical outlet or insulated wire).
- AC boltage greater than 110V is detected, the NCV indicator light will flash, and the buzzer may sound.
6. Mantentzea
6.1 Garbiketa
Garbitu neurgailua iragarkiarekinamp cloth and a mild detergent. Do not use abrasives or solvents. Ensure the meter is dry before use.
6.2 Bateria ordezkatzea
When the "BAT" symbol appears on the display, the battery needs to be replaced. Refer to Section 4.1 for battery installation instructions.
6.3 Fusiblearen ordezkapena
If the current measurement function fails, the fuse may need replacement. This operation should only be performed by qualified personnel. Refer to the service manual or contact customer support for fuse specifications and replacement procedures.
6.4 Biltegiratzea
If the meter is not to be used for an extended period, remove the battery to prevent leakage and damage to the meter. Store the meter in a cool, dry place away from direct sunlight.
7. Arazoak
| Arazoa | Kausa posiblea | Irtenbidea |
|---|---|---|
| Pantailarik ez edo pantaila ahula | Low battery; Meter off | Replace battery; Turn on meter |
| "OL" bistaratzen da | Input exceeds range; Open circuit (for resistance/continuity) | Select higher range; Check circuit connection |
| Irakurketa okerrak | Low battery; Incorrect range selected; Poor test lead contact | Replace battery; Select appropriate range; Ensure good contact |
| Korrontearen neurketa ez dabil | Fusionatua | Replace fuse (by qualified personnel) |
8. Zehaztapenak
| Neurketa-funtzioa | Barrutia | Zehaztasuna |
|---|---|---|
| DC bolumenatage (DCV) | 200mV, 2V, 20V, 200V, 1000V | ±0.5% (200mV-200V), ±0.8% (1000V) |
| AC Boltage (ACV) | 2V, 20V, 200V, 750V | ±0.8% (2V-200V), ±1.2% (750V) |
| Korronte DC (DCA) | 200mA, 10A | ±1.5% (200mA), ±2.0% (10A) |
| Korronte AC (ACA) | 200mA, 10A | ±1.8% (200mA), ±3.0% (10A) |
| Erresistentzia (Ω) | 200Ω, 2kΩ, 20kΩ, 200kΩ, 2MΩ, 20MΩ, 200MΩ | ±0.8% (200Ω-2MΩ), ±1.0% (20MΩ), ±5.0% (200MΩ) |
| Kapazitatea (CAP) | 20nF, 200nF, 2uF, 200uF | ±4.0% (20nF-2uF), ±5.0% (200uF) |
| Induktantzia (L) | 20mH, 200mH, 2H, 20H | ±% 3.0 |
| Entzunezko jarraitutasuna | Buzzer sounds at <30Ω | N/A |
| Diodo proba | 1 mA, 2.8 V | N/A |
| Transistorea (hFE) | 0 - 1,000 | N/A |
Zehaztapen orokorrak:
- Pantaila: 2000 zenbakiko LCD
- Segurtasunaren balorazioa: CAT.IV 600V
- Potentzia: 9V battery (NEDA 1604/6F22)
- Pisua: Approximately 1 kg (including battery)
9. Bermea eta Laguntza
For warranty information, technical support, or service inquiries, please refer to the warranty card included with your product or visit the official Mastech website. Do not attempt to repair the meter yourself, as this may void the warranty and pose safety risks.


