
Sarrera
Welcome to the brim 15 Bar Espresso Machine user manual. This guide provides detailed instructions for the safe and efficient operation, maintenance, and troubleshooting of your new espresso machine. Please read this manual thoroughly before first use and retain it for future reference.
Segurtasun informazio garrantzitsua
Etxetresna elektrikoak erabiltzean, oinarrizko segurtasun-neurriak jarraitu behar dira beti sute, deskarga elektriko eta/edo pertsonentzako lesio arriskua murrizteko, besteak beste:
- Irakurri argibide guztiak.
- Ez ukitu gainazal beroak. Erabili heldulekuak edo eskutokiak.
- Suaren, deskarga elektrikoaren eta pertsonen lesioen aurka babesteko, ez murgildu kablea, entxufeak edo aparatua uretan edo beste likido batzuetan.
- Gainbegiratzea beharrezkoa da aparaturen bat umeek edo umeen ondoan erabiltzen dutenean.
- Deskonektatu entxufetik erabiltzen ez duzunean eta garbitu aurretik. Utzi hozten piezak jarri edo kendu aurretik, eta aparatua garbitu aurretik.
- Ez erabili aparaturik kablea edo entxufea hondatuta dagoenean, edo gailuak gaizki funtzionatzen duenean, edo nolabait hondatu bada.
- Gailuaren fabrikatzaileak gomendatzen ez dituen osagarri osagarriak erabiltzeak sua, deskarga elektrikoa edo pertsonetan zauriak eragin ditzake.
- Ez erabili kanpoan.
- Ez utzi kablea mahaiaren edo erakusmahaiaren ertzetik zintzilik zintzilik, ezta gainazal beroak ukitu ere.
- Ez jarri gas edo erregailu elektriko bero baten gainean edo inguruan, edo berotutako labe batean.
- Beti konektatu entxufea lehenik etxetresna elektrikora, eta gero konektatu kablea hormako entxufean. Deskonektatzeko, jarri edozein kontrol "itzali" posizioan, eta gero atera entxufea hormako entxufetik.
- Ez erabili aparatua aurreikusitako erabilera ez den beste baterako.
- Kontuz ibili behar da likido beroak dituen aparatua mugitzean.
Produktua amaituview
The brim 15 Bar Espresso Machine is designed to provide a high-quality coffee experience at home. It features a high-pressure Italian pump and a powerful thermocoil heating system for consistent results.
Osagaiak
- Kontrol-panela: Features Power, Single Shot, Double Shot, and Steam buttons, along with a pressure gauge.
- Porta-iragazkia: Kafea prestatzeko ehoa gordetzen du.
- Lurrun-makila: Esnea lurrundu eta aparra egiteko.
- Ur depositua: Erraz betetzeko kendu daiteke.
- Tantaketarako erretilua: Gehiegizko likidoa biltzen du eta garbitzeko kendu daiteke.
- Saskiak iragazi: Pressurized single and double cup filter baskets.
- Tamper/Scoop: 2-in-1 tool for measuring and tampkafe-lurra jatea.
- Frothing Pitcher: Stainless steel pitcher for milk frothing.
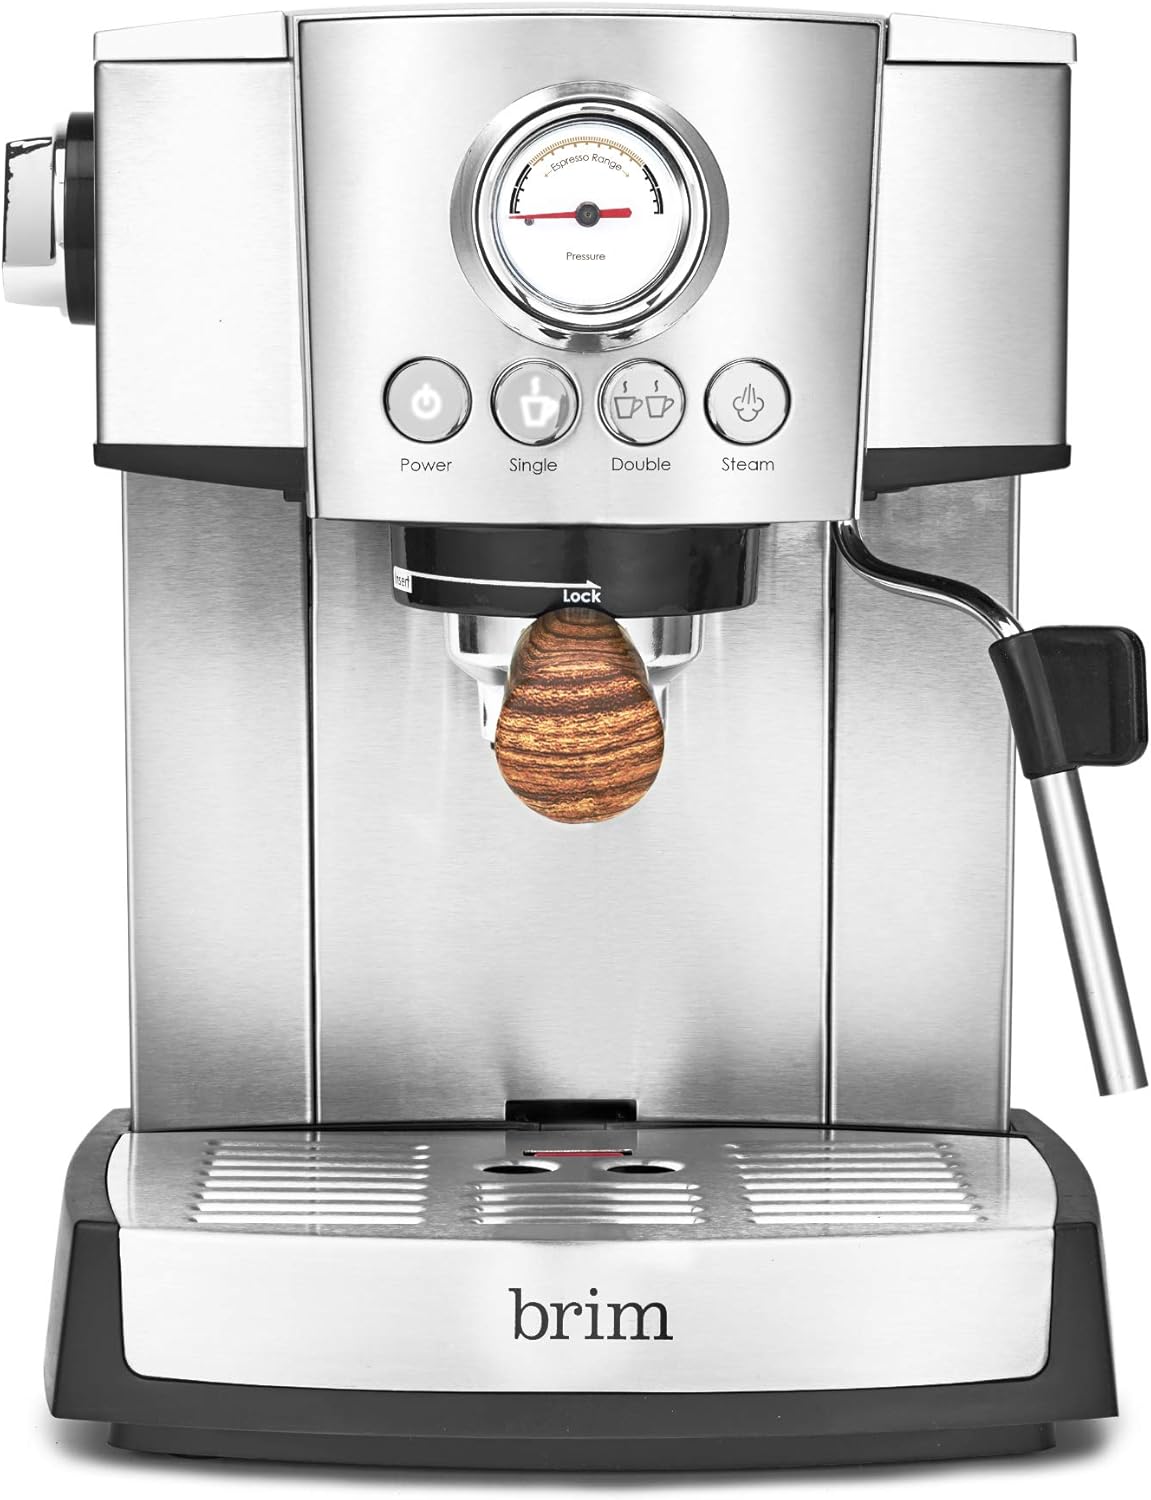
1. irudia: Aurrealdea view of the brim 15 Bar Espresso Machine, showing the control panel with pressure gauge, power, single, double, and steam buttons, the portafilter, and the drip tray.

2. irudia: Angelukoa view of the brim 15 Bar Espresso Machine, highlighting the removable water tank on the side, the portafilter with its wooden handle, and the steam wand.
Konfigurazioa
1. Deskargatzea
- Carefully remove all packaging materials and the espresso machine from the box.
- Ziurtatu "Produktua amaitutakoan" zerrendatutako osagai guztiakview" atala daude.
- Kendu babes-film edo itsasgarri guztiak gailutik.
2. Hasierako Garbiketa
- Wash the water tank, portafilter, filter baskets, frothing pitcher, and drip tray in warm, soapy water. Rinse thoroughly and dry.
- Garbitu makinaren kanpoaldea iragarkiarekinamp oihal. Ez sartu unitate nagusia uretan.
3. Ur depositua betetzea
- Kendu ur depositua makinaren atzeko aldetik.
- Fill the tank with fresh, cold filtered water up to the MAX line.
- Jarri ur-depositua ondo finkatuta bere lekuan.
4. Makina prestatzea (lehen erabilera)
- Entxufatu makina lurreko hartune elektriko batean.
- Sakatu Boterea button. The indicator light will flash as the machine heats up.
- Once the light stops flashing and remains solid, the machine is ready.
- Place a large cup under the portafilter (without coffee grounds).
- Sakatu Jaurtiketa Bikoitza button to run water through the system. This primes the pump and flushes any manufacturing residue.
- Repeat this process for the steam wand by turning the steam knob to release steam until water flows consistently.
- Turn off the steam and discard the water. Your machine is now ready for use.
Funtzionamendu-argibideak
1. Espressoa egitea
- Prestatu Portafiltroa: Sartu nahi duzun iragazki-saskira (bakarra edo bikoitza) iragazki-portagailuan.
- Kafea ehotzeko: Ehotu kafe ale freskoak espressorako egokia den trinkotasun fin bat lortu arte.
- Dosi eta Tamp: Use the scoop to add ground coffee to the filter basket. For a single shot, use one scoop (approx. 7g). For a double shot, use two scoops (approx. 14g). Tamp the coffee firmly and evenly with the tamper. Ensure the coffee bed is level.
- Erantsi iragazki-portagailua: Insert the portafilter into the brew head and twist firmly to the right until it is securely locked.
- Kopa jarri: Jarri espresso kikara bat edo bi tanta-iragazkiaren erretiluan, zuzenean iragazki-euskarriaren tutuen azpian.
- Espressoa prestatu: Once the machine is heated (solid indicator light), press the Jaurtiketa Bakarra or Jaurtiketa Bikoitza button. The machine will automatically dispense the correct amount of espresso.
- Monitorearen presioa: Observe the pressure gauge during extraction. The needle should ideally be in the "Espresso Range" for optimal flavor.
- Kendu iragazki-portagailua: After brewing, carefully remove the portafilter by twisting it to the left. Be cautious as it will be hot. Discard the used coffee grounds.

3. irudia: Gertutik view of espresso being extracted from the portafilter into a white cup, demonstrating the brewing process.
2. Steaming and Frothing Milk
- Esnea prestatu: Fill the stainless steel frothing pitcher with cold milk (dairy or non-dairy) up to just below the spout.
- Aktibatu Steam: Sakatu Lurruna button. The indicator light will flash as the machine heats up to steaming temperature. Once solid, it's ready.
- Lurrun-haga garbitzeko: Jarri lurrun-haga tanta-erretiluaren gainean eta ireki lurrun-botoia laburki kondentsatutako ura askatzeko. Itxi botoia.
- Esnea lurruna: Immerse the tip of the steam wand just below the surface of the milk in the pitcher. Open the steam knob fully.
- Esne apartsua: For frothing, keep the wand tip near the surface to incorporate air, creating foam. For steaming (heating), immerse the wand deeper. Move the pitcher in a circular motion to create a vortex.
- Monitorearen tenperatura: Continue steaming until the milk reaches the desired temperature (around 140-150°F / 60-65°C) and texture. The pitcher will become hot to the touch.
- Utzi lurruntzeari: Close the steam knob, then remove the pitcher.
- Lurrun-haga garbia: Berehala garbitu lurrun-hagatxoa sprayarekinamp cloth to prevent milk residue from drying. Briefly open the steam knob again to purge any milk from inside the wand.

4. irudia: A person's hands holding a stainless steel frothing pitcher under the steam wand, actively steaming milk to create foam for coffee beverages.
3. Making Cappuccinos and Lattes
Once you have brewed your espresso and frothed your milk, combine them to create your desired beverage.
- Kaputxinoa: Pour the frothed milk over the espresso, aiming for equal parts espresso, steamed milk, and a generous layer of foam.
- Lattea: Pour the steamed milk over the espresso, holding back the foam initially, then topping with a thin layer of microfoam. Lattes typically have more steamed milk and less foam than cappuccinos.

5. irudia: Two ceramic cups containing coffee beverages with intricate latte art, showcasing the potential results of proper milk frothing.
Mantentzea eta Garbiketa
Regular cleaning and maintenance will ensure the longevity and optimal performance of your espresso machine. Always unplug the machine and allow it to cool before cleaning.
1. Eguneko garbiketa
- Portafiltroa eta iragazki-saskiak: Erabilera bakoitzaren ondoren, kendu iragazki-euskarria, bota kafe-hondarra eta garbitu iragazki-euskarria eta iragazki-saskia ur beroaren azpian. Erabili eskuila bat kafe-hondakin egoskorrak kentzeko.
- Lurrun-makila: Esnea aparra egin ondoren, garbitu lurrun-hagaxka urarekin.amp cloth. Purge steam briefly to clear any internal milk residue.
- Tantaketarako erretilua: Empty and rinse the drip tray daily or when the "Full" indicator appears. Wash with warm, soapy water.
- Garagardo-burua: Wipe the brew head screen with a damp oihal bat kafe-hondarra kentzeko.
- Kanpoaldea: Garbitu makinaren kanpoaldea leun batekin, damp oihal. Ez erabili garbitzaile urratzaileak edo zurgatzaileak.
2. Deskalifikazioa
Mineral deposits (limescale) can build up in the machine over time, affecting performance and taste. Descale your machine every 2-3 months, or more frequently if you have hard water.
- Kaltziogabetzeko disoluzioa prestatu: Mix a descaling solution according to the manufacturer's instructions (e.g., white vinegar and water, or a commercial descaler). Fill the water tank with this solution.
- Run Solution Through Brew Head: Place a large container under the brew head. Turn on the machine and press the Jaurtiketa Bikoitza button to run half of the solution through the brew head.
- Run Solution Through Steam Wand: Place another container under the steam wand. Open the steam knob and run the remaining solution through the steam wand until the tank is empty.
- Garbitu: Fill the water tank with fresh, clean water. Repeat steps 2 and 3 to thoroughly rinse the machine and remove any descaling solution residue.
Arazoak konpontzea
Ikusi beheko taula arazo ohikoenak eta haien irtenbide posibleak ikusteko. Arazoak jarraitzen badu, jarri harremanetan bezeroarentzako arreta-zerbitzuarekin.
| Arazoa | Kausa posiblea | Irtenbidea |
|---|---|---|
| No water flows from the brew head. | Water tank empty or not properly seated; machine not primed; pump airlocked. | Fill water tank and ensure it's seated correctly. Prime the machine as per "Setup" instructions. |
| Espressoa polikiegi isurtzen da edo batere ez da isurtzen. | Coffee grounds too fine; too much coffee in filter; coffee tamped too hard; brew head clogged. | Erabili ehotze lodiagoa; murriztu kafe kantitatea; tamp lighter; clean brew head. |
| Espresso flows too quickly or is watery. | Coffee grounds too coarse; too little coffee in filter; coffee tamparinegi ed. | Erabili ehotze finagoa; handitu kafe kantitatea; tamp irmoago. |
| Lurrun-hagaxkak ez du lurrunik sortzen edo lurrun ahula da. | Machine not at steaming temperature; steam wand clogged; water tank empty. | Wait for steam indicator light to be solid. Clean steam wand. Fill water tank. |
| Makinak ura isurtzen du. | Ur-depositua ez dago ondo kokatuta; tanta-biltzeko erretilua beteta; junturak gastatuta. | Ensure water tank is secure. Empty drip tray. Contact support if seals are suspected. |
Zehaztapenak
| Ezaugarri | Xehetasuna |
|---|---|
| Marka | lepoa |
| Ereduaren izena | Espresso Maketa |
| Elementuaren eredu-zenbakia | 50030 |
| ASIN | B07YN8JRP6 |
| Kafe-makina mota | Espresso Makina |
| Ezaugarri Berezia | Programagarria |
| Eragiketa modua | Eskuliburua |
| Giza Interfazearen Sarrera | Botoiak |
| Kolorea | Zilarrezkoa |
| Produktuaren neurriak | 11.81 x 10.47 x 14.09 hazbete |
| Elementuaren pisua | 12.56 kilo |
| Fabrikatzailea | lepoa |
| UPC | 829486500305 |
Bermea eta Laguntza
For warranty information, please refer to the documentation included with your product at the time of purchase. For technical support, replacement parts, or general inquiries, please visit the official brim webwebgunean edo jarri harremanetan bere bezeroarentzako arreta zerbitzuarekin.
Lineako laguntza: Visit the brim Store on Amazon