1. Sarrera eta Segurtasun Informazioa
Thank you for choosing the ANENG V8 Digital Multimeter. This device is designed for safe and accurate measurement of AC/DC voltage, AC/DC current, resistance, capacitance, frequency, temperature, diode, continuity, and battery testing. Please read this manual thoroughly before use to ensure proper operation and to prevent potential hazards.
1.1 Segurtasun-neurriak
- Always ensure the multimeter is in good working condition before use. Inspect test leads for damage.
- Ez aplikatu voltage edo multimetroarentzat gehienezko balio baloratutakoak gainditzen dituen korrontea.
- Oso kontuz ibili voltages above 36V DC or 25V AC RMS, as these can pose a shock hazard.
- Deskonektatu beti zirkuituaren korrontea eta deskargatu bolumen handiko karga guztiak.tage kondentsadoreak erresistentzia, jarraitutasuna, diodoak edo kapazitantzia neurtu aurretik.
- Ziurtatu biraketa-etengailua nahi den neurketarako posizio egokian dagoela proba-kableak zirkuitura konektatu aurretik.
- Ez erabili multimetroa gas, lurrun edo hautsez betetako ingurune lehergarrietan.
- Irakurketa zehatzak bermatzeko, aldatu bateriak berehala bateria baxuaren adierazlea agertzen denean.
2. Produktua amaitu daview
2.1 Paketearen edukia
The ANENG V8 Digital Multimeter package typically includes the following items:
- ANENG V8 Digital Multimeter
- Proba-kableak (gorria eta beltza)
- Tenperatura-zunda
- Eramateko zorroa
- Erabiltzailearen eskuliburua

Image: ANENG V8 Digital Multimeter with its standard accessories, including test leads, a temperature probe, and a protective carrying case.
2.2 Kontrolak eta pantaila
The multimeter features an 8000-count LCD backlight display for clear readings in various lighting conditions. Key controls include a rotary switch for function selection and buttons for range, data hold, and other features.

Irudia: Xehetasun handikoa view of the multimeter's front panel, highlighting the LCD screen, the central rotary selector, and various control buttons.
3. Konfigurazioa
3.1 Bateriaren instalazioa
The ANENG V8 Digital Multimeter is powered by batteries. To install or replace batteries:
- Ziurtatu multimetroa itzalita dagoela eta deskonektatu proba-kable guztiak.
- Bilatu bateriaren konpartimentuaren estalkia gailuaren atzealdean.
- Erabili bihurkin bat bateriaren estalkia lotzen duten torlojua(k) askatzeko.
- Kendu estalkia.
- Insert new batteries, observing the correct polarity (+ and -) as indicated inside the compartment. The device typically uses AA batteries.
- Jarri bateriaren estalkia berriro eta finkatu torloju(ekin).
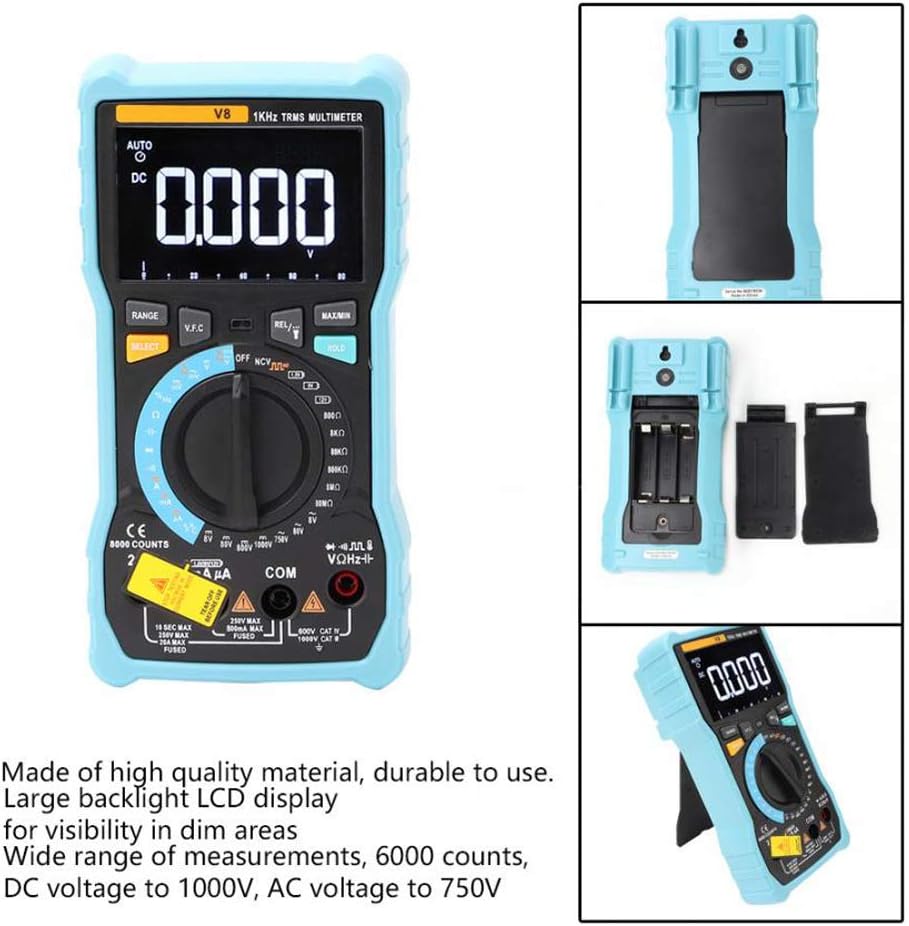
Irudia: Atzealdea view of the multimeter with the battery compartment open, illustrating the correct placement for three AA batteries.
4. Funtzionamendu-argibideak
Before any measurement, ensure the test leads are correctly inserted into the input jacks and the rotary switch is set to the appropriate function.
4.1 DC/AC bolumena neurtzeatage
- Set the rotary switch to the 'V–' (DC Voltage) or 'V~' (AC Voltage) posizioa.
- Konektatu proba-kable gorria 'VΩmA' konektorera eta proba-kable beltza 'COM' konektorera.
- Konektatu proba-kableak paraleloan neurtu nahi duzun zirkuituarekin edo osagaiarekin.
- Irakurri liburukiatagPantailako balioa.
4.2 Measuring DC/AC Current
- Set the rotary switch to the 'A–' (DC Current) or 'A~' (AC Current) position. For milliampere (mA) or microampere (µA) measurements, select the corresponding range.
- For current up to 800mA, connect the red test lead to the 'VΩmA' jack. For current up to 20A, connect the red test lead to the '20A' jack. Connect the black test lead to the 'COM' jack.
- Disconnect power to the circuit. Open the circuit where you want to measure current. Connect the multimeter in series with the circuit.
- Jarri korrontea zirkuituan eta irakurri uneko balioa pantailan.
4.3 Erresistentzia neurtzea
- Set the rotary switch to the 'Ω' (Resistance) position.
- Konektatu proba-kable gorria 'VΩmA' konektorera eta proba-kable beltza 'COM' konektorera.
- Ensure the circuit is de-energized and all capacitors are discharged. Connect the test leads across the component to be measured.
- Irakurri erresistentziaren balioa pantailan.
4.4 NCV (Kontakturik Gabeko Bolumena)tage) Detekzioa
- Ezarri biraketa-etengailua 'NCV' posizioan.
- Move the top end of the multimeter near the conductor or outlet.
- The multimeter will emit an audible beep and the NCV indicator light will flash if AC voltage is detected, indicating the presence of live voltage kontaktu fisikorik gabe.
4.5 Tenperaturaren Neurketa
- Set the rotary switch to the '°C/°F' (Temperature) position.
- Connect the temperature probe to the 'VΩmA' and 'COM' jacks, observing polarity if applicable.
- Place the tip of the temperature probe on or near the object whose temperature you wish to measure.
- Irakurri tenperaturaren balioa pantailan.
4.6 Beste funtzio batzuk
- Kapazitatea: Set the rotary switch to the 'F' position. Connect leads across the discharged capacitor.
- Maiztasuna/Zaintza-zikloa: Set the rotary switch to the 'Hz/%' position. Connect leads to the signal source.
- Diodo proba: Set the rotary switch to the 'Diode' position. Connect leads across the diode.
- Jarraitasun proba: Set the rotary switch to the 'Continuity' position. Connect leads across the circuit. An audible beep indicates continuity.
- Bateria proba: Set the rotary switch to the 'Battery' position. Connect leads to the battery terminals (1.5V, 9V, or 12V).
- Datuak gordetzea: Sakatu 'HOLD' botoia pantailan uneko irakurketa izozteko. Sakatu berriro askatzeko.
- Atzeko argia/Linterna: Press the backlight button to turn on/off the display backlight or flashlight.
- Itzali automatikoa: Multimetroa automatikoki itzaliko da denbora batez inaktibo egon ondoren, bateriaren iraupena aurrezteko.
5. Mantentzea
5.1 Garbiketa
Garbitu kasua iragarkiarekinamp oihal eta detergente leun batekin. Ez erabili urratzailerik edo disolbatzailerik. Mantendu sarrera terminalak zikinkeriarik eta hezetasunik gabe.
5.2 Fusiblearen ordezkapena
Korrontearen neurketa funtzioak huts egiten badu, baliteke fusiblea ordezkatu behar izatea. Kontsultatu zehaztapenak fusible mota eta balorazio zuzena jakiteko. Fusibleen ordezkapena langile kualifikatuek bakarrik egin behar dute.
5.3 Biltegiratzea
When not in use for extended periods, remove the batteries to prevent leakage and store the multimeter in a dry, cool place.
6. Arazoak
- Ez dago pantailarik: Egiaztatu bateriaren instalazioa eta karga. Ordeztu bateriak beharrezkoa bada.
- Irakurketa okerrak: Ensure the rotary switch is set to the correct function and range. Check test lead connections. Verify battery charge.
- Uneko neurketak ez du funtzionatzen: Check the fuse. Replace if blown (refer to fuse replacement section).
- NCV-k ez du detektatzen: Ensure the NCV function is selected and the multimeter is close enough to the AC voltage iturria.
7. Zehaztapenak
| Parametroa | Balioa |
|---|---|
| Bistaratzea | 8000 Counts LCD with Backlight |
| DC bolumenatage (V) | 8.000V / 80.00V / 800.0V / 1000V |
| DC bolumenatage (mV) | 800mV |
| AC Boltage (V) | 8.000V / 80.00V / 750V |
| AC Boltage (mV) | 800mV |
| Korronte DC (A) | 8.000A / 20.00A |
| DC korrontea (mA) | 8.000mA / 80.00mA / 800.0mA |
| DC Current (µA) | 800µA / 8000µA |
| AC Korrontea (A) | 8.000A / 20.00A |
| AC korrontea (mA) | 8.000mA / 80.00mA / 800.0mA |
| AC Current (µA) | 800µA / 8000µA |
| Erresistentzia | 800.0Ω / 8.000kΩ / 80.00kΩ / 800.0kΩ / 8.000MΩ / 80.00MΩ |
| Kapazitatea | 9.999nF / 99.99nF / 999.9nF / 9.999µF / 99.99µF / 999.9µF / 9.999mF / 99.99mF |
| Maiztasuna | 9.999Hz / 99.99Hz / 999.9Hz / 9.999kHz / 99.99kHz / 999.9kHz / 9.999MHz |
| Betebehar Zikloa | % 1 ~ % 99 |
| Tenperatura tartea | -20 °C ~ 1000 °C (-4 °F ~ 1832 °F) |
| Bateria proba | 1.5V / 9V / 12V |
| Sortzen | Auto / Eskuliburua |
| Eguneratzeko tasa | 3 aldiz / segundo |
| Egiazko RMS | Bai |
| Datuak gordetzea | Bai |
| Atzeko argia/Linterna | Bai |
| Bateria baxuaren alerta | Bai |
| Itzali automatikoa | Bai |
| Materiala | ABS / PVC |
| Energia iturria | Bateriaren bidez |
8. Bermea eta Laguntza
This product is covered by a standard manufacturer's warranty against defects in materials and workmanship. Please refer to the warranty card included with your purchase for specific terms and conditions. For technical support or service inquiries, please contact your retailer or the manufacturer's customer service department.
9. Produktu Ofizialen Bideoak
Ez dago saltzailearen produktuen bideo ofizialik txertatzeko une honetan.