VLAND AA-66
VLAND LED Headlight Assembly Instruction Manual
For Scion FR-S (2012-2016), Toyota 86 (2012-2021), and Subaru BRZ (2013-2021)
1. Sarrera
This manual provides essential information for the installation, operation, and maintenance of your VLAND LED Headlight Assembly. Please read these instructions thoroughly before proceeding with installation or use.
1.1 Produktua gainditzeaview
The VLAND LED Headlight Assembly is designed to enhance vehicle visibility and aesthetics. It features integrated LED Daytime Running Lights (DRL) and sequential turn signals.

Image 1.1: VLAND LED Headlight Assembly, showing both the DRL and sequential turn signal functions.
1.2 Ibilgailuen bateragarritasuna
- 2012-2016 Scion FR-S
- 2012-2021 Toyota 86
- 2013-2021 Subaru BRZ
2. Paketearen edukia
Paketea irekitzean, egiaztatu osagai guztiak daudela eta kalterik gabe daudela.
- One (1) VLAND LED Headlight Assembly (Left Side)
- One (1) VLAND LED Headlight Assembly (Right Side)
Note: D2H Xenon Bulbs for high and low beams are NOT included and must be purchased separately.
3. Produktuaren zehaztapenak
| Ezaugarri | Zehaztapena |
|---|---|
| Marka | VLAND |
| Modelo zenbakia | AA-66 |
| Ibilgailuen Zerbitzu Mota | 2012-2016 Scion FR-S, 2012-2021 Toyota 86, 2013-2021 Subaru BRZ |
| Produkturako erabilera espezifikoak | Buruko Argiak |
| Wattage | 35 watt |
| Auto Pieza Postua | Aurrealdea Barruan |
| Lentearen kolorea | Garbi |
| Lentearen materiala | Polikarbonatoa |
| Recommended Bulb Type (Not Included) | D2H/H7 for High Beam, D2H/H7 for Low Beam |
| Segurtasun Balorazioa | DOT Ziurtagiria |
| Elementuaren pisua | 16.76 kilo |
| Paketearen neurriak | 24.3 x 23 x 12 hazbete |
| UPC | 704078257907 |
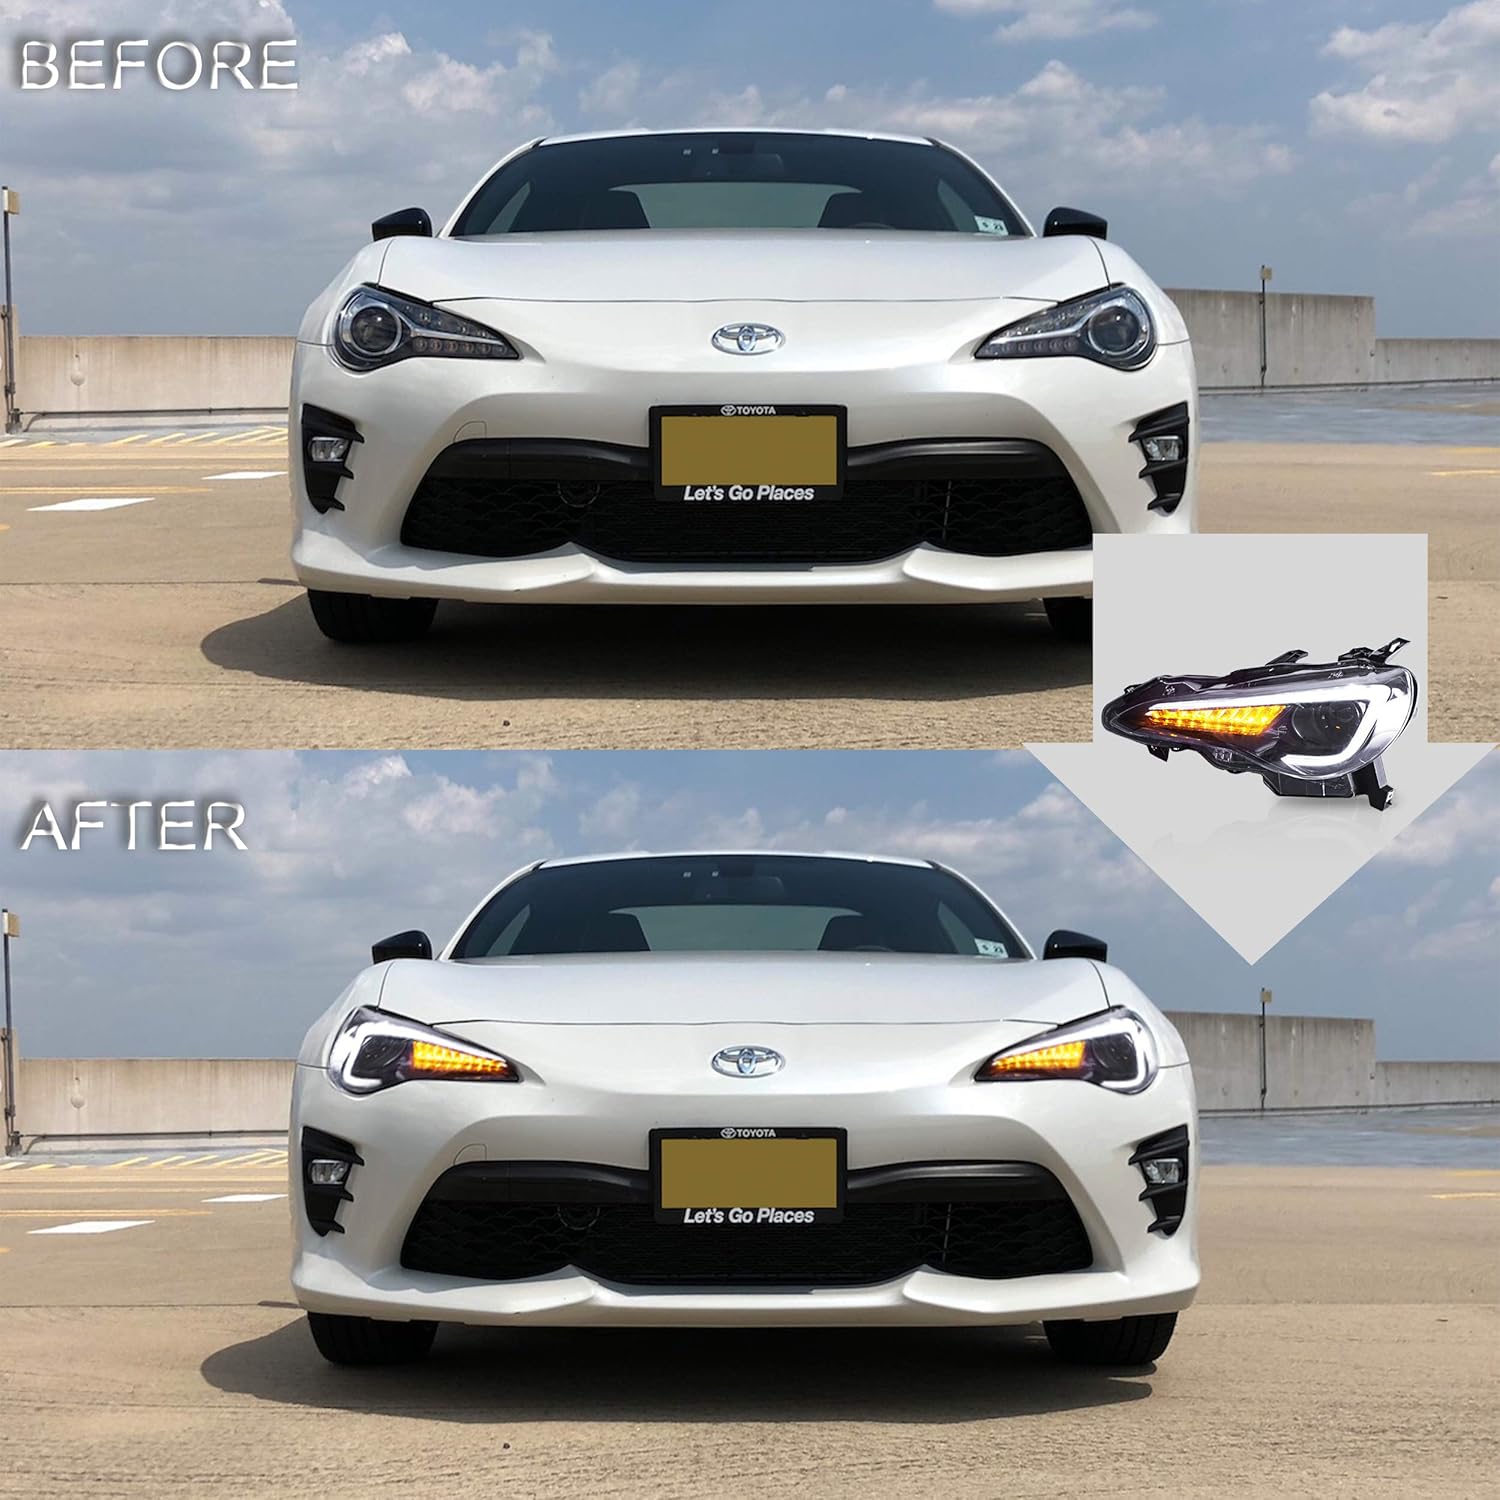
Image 3.1: DOT/SAE Certification details, confirming compliance with safety standards.
4. Instalatzeko jarraibideak
Professional installation is highly recommended due to the complexity of automotive electrical systems and body panel removal. This product is designed for direct bolt-on OE fitment or replacement.
4.1 Instalazio aurreko urratsak
- Bildu tresnak: Ensure you have the necessary tools for bumper removal and electrical connections.
- Instalatu bonbillak: Insert the D2H Xenon bulbs (not included) into the high and low beam sockets of the new headlight assemblies.
- Deskonektatu bateria: For safety, disconnect the vehicle's negative battery terminal before beginning any electrical work.
- Bumper kentzea: The front bumper will likely need to be partially or fully removed to access the factory headlight mounting points. Refer to your vehicle's service manual or online resources for specific bumper removal procedures.
4.2 Headlight Replacement
- Remove Old Headlights: Disconnect the wiring harnesses and unbolt the factory headlight assemblies. Carefully remove them from the vehicle.
- Connect New Headlights: Connect the wiring harnesses of the VLAND headlight assemblies to your vehicle's electrical system. Ensure all connections are secure.
- Address Wiring Discrepancies (If Applicable): For some North American models, the turn signal and brake light wires may need to be swapped for correct functionality. This typically involves switching the yellow and green wires within the harness connectors. Consult online forums or a professional if you encounter this issue.
- Mount New Headlights: Position the new headlight assemblies and secure them using the factory mounting points and bolts.

4.1. irudia: Atzekoa view of the headlight assembly, highlighting the H/L adjusting screw, harness connection, and up/down adjusting motor socket.
4.3 Instalazio ostekoa
- Proba funtzionaltasuna: Reconnect the battery and test all lighting functions: low beam, high beam, DRL, and turn signals.
- Adjust Beam Aim: Use the H/L (High/Low) adjusting screws on the back of the headlight assembly to properly aim the beams. Refer to local regulations for correct headlight aiming procedures.
- Egiaztatu ihesak: After installation, it is advisable to test for water ingress by gently spraying water on the headlight area. Ensure there are no gaps between the headlight unit and the car body. Tighten mounting bolts in a criss-cross pattern to ensure even pressure, but do not overtighten.
- Berriro instalatu Bumper: Once satisfied with the installation and functionality, reinstall the front bumper.

Image 4.2: Visual comparison of a vehicle before and after the installation of VLAND LED Headlight Assemblies.
5. Funtzionamendu-argibideak
The VLAND LED Headlight Assembly integrates several lighting functions for optimal road illumination and signaling.
5.1 Daytime Running Lights (DRL)
The integrated LED DRLs illuminate automatically when the vehicle is running, enhancing daytime visibility.
5.2 Sequential Turn Signals
When the turn signal is activated, the amber LEDs illuminate in a sequential pattern, providing a clear and modern indication of your intended turn.
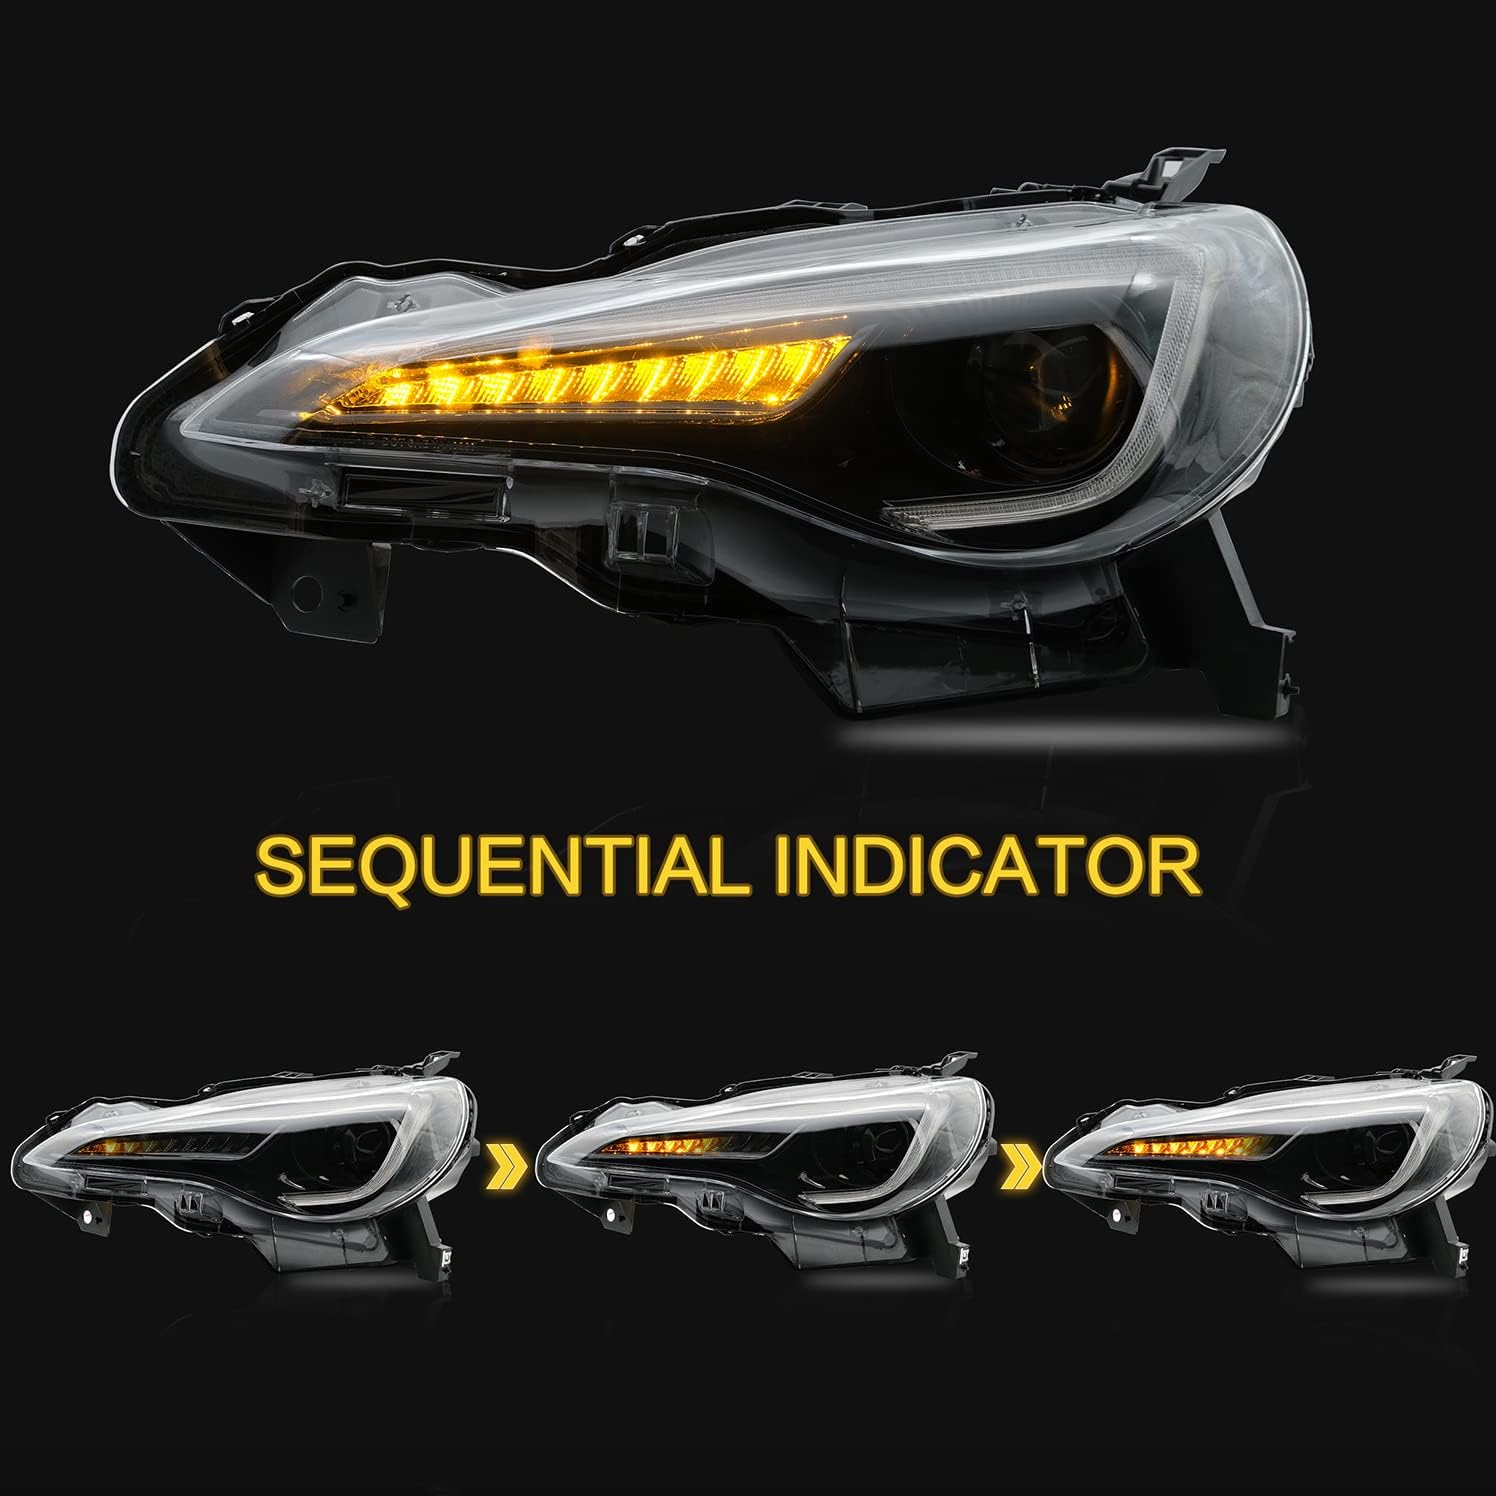
Image 5.1: Illustration of the sequential illumination pattern of the turn signal indicator.
5.3 High Beam and Low Beam
The headlight assembly utilizes a single D2H Xenon bulb (not included) for both high and low beam functions. A motorized mirror mechanism inside the headlight adjusts to provide the appropriate beam pattern when switching between low and high beams.

5.2 irudia: Xehetasun zehatza view of the headlight, labeling the turn signal, dual beam lens, and daytime running light components.

Image 5.3: Comparison of the headlight's appearance and illumination during daytime (DRL) and nighttime operation.
6. Zainketa eta Mantentzea
Proper care ensures the longevity and optimal performance of your VLAND headlight assemblies.
- Garbiketa: Clean the lens with a soft cloth, mild soap, and water. Avoid abrasive cleaners or harsh chemicals that can damage the polycarbonate lens or its protective coating.
- Ikuskapena: Periodically inspect the headlight assemblies for any signs of damage, cracks, or condensation. Address any issues promptly to prevent further damage.
- Babes-estaldura: The headlights feature a triple-layered coating designed to combat debris, UV rays, and harsh weather conditions, preventing hazing and fading.

6.1 irudia: Gertuko planoa view illustrating the triple-layered protection of the headlight lens.
7. Arazoak
Refer to the following common issues and their potential solutions.
- Issue: Turn signals or brake lights not functioning correctly (e.g., signal light acts as brake light, or vice versa).
Irtenbidea: This is a common issue for some models. It may require swapping the yellow and green wires in the harness. Refer to online resources or a professional for specific guidance on your vehicle's wiring. - Issue: Condensation inside the headlight assembly.
Irtenbidea: Ensure the headlight unit is properly sealed and all bolts are tightened correctly during installation. If condensation persists, inspect for cracks or improper sealing. - Issue: Headlights not turning on.
Irtenbidea: Verify that the correct D2H Xenon bulbs are installed and properly connected. Check the vehicle's fuse box for blown fuses related to headlights.
8. Bermea eta Laguntza
8.1 Bermearen informazioa
VLAND provides a 1 urteko mantentze-lanen bermea from the date of delivery for this product. Additionally, products can be returned or exchanged for free within one month of purchase. For quality issues arising within one year, VLAND offers replacement parts or product services.
8.2 Bezeroarentzako laguntza
For any installation questions or quality concerns after receiving your product, please contact VLAND customer service. We provide 7x24 hour online service to assist you.
For further assistance, please visit the official VLAND store on Amazon: VLAND Official Store
Ask a question about this manual
Ask about setup, troubleshooting, compatibility, parts, safety, or missing instructions. Manuals+ will review the question and use this page’s manual context to help answer it.