1. Sarrera
Eskerrik asko erosketagatik.asing the PRIMO PR501SV Cordless 3-in-1 Stick Vacuum Cleaner. This manual provides essential information for the safe and efficient use, maintenance, and troubleshooting of your appliance. Please read it thoroughly before first use and keep it for future reference.
2. Segurtasun-argibideak
Sute, deskarga elektriko edo lesio arriskua murrizteko, jarraitu beti oinarrizko segurtasun neurriak etxetresna elektriko bat erabiltzean.
- Irakurri argibide guztiak aparatua erabili aurretik.
- Ez erabili kanpoan edo gainazal hezeetan.
- Ez utzi jostailu gisa erabiltzea. Arreta handia behar da umeek edo umeek gertu erabiltzen dutenean.
- Erabili eskuliburu honetan deskribatzen den moduan soilik. Erabili fabrikatzaileak gomendatutako eranskinak soilik.
- Ez erabili kablea edo entxufea hondatuta badago. Gailua behar bezala ez badabil, erori bada, hondatu bada, kanpoan utzi bada edo uretan erori bada, itzuli zerbitzu-zentro batera.
- Ez tiratu edo eraman kabletik, ez erabili kablea helduleku gisa, ez itxi ate bat kabletik, edo ez tiratu kablea ertz edo ertz zorrotzetatik. Ez jarri aparatua kablearen gainean. Mantendu kablea gainazal beroetatik urrun.
- Ez deskonektatu kableari tiraka. Deskonektatzeko, heldu entxufeari, ez kableari.
- Ez maneiatu entxufea edo aparatua esku bustiekin.
- Ez sartu objekturik irekiduran. Ez erabili irekiera blokeatuta dagoela; mantendu hauts, litxar, ile eta aire-fluxua murrizten duen ezer.
- Mantendu ilea, arropa solteak, atzamarrak eta gorputz-atal guztiak irekiguneetatik eta atal mugikorretatik urrun.
- Ez hartu erretzen edo erretzen ari den ezer, hala nola zigarroak, pospoloak edo errauts beroak.
- Ez erabili likido sukoiak edo erregarriak jasotzeko, hala nola gasolina, edo erabili egon daitezkeen tokietan.
- Ez jaso material toxikorik (adibidez, klorozko lixiba, amoniako garbitzailea, hustubide-garbitzailea).
- Ez erabili hauts-ontzia eta/edo iragazkiak lekurik gabe.
- Deskonektatu aurretik, itzali kontrol guztiak.
- Kontuz ibili eskaileretan garbitzean.
- Ez erabili beira, iltzeak, torlojuak, txanponak eta abar bezalako objektu gogorrak edo zorrotzak jasotzeko.
- Saihestu nahi gabeko abiarazteak. Ziurtatu etengailua itzalita dagoela bateria batera konektatu, aparatua jaso edo eraman aurretik.
- Kargatu fabrikatzaileak zehaztutako kargagailuarekin soilik. Bateria mota baterako egokia den kargagailu batek sute-arriskua sor dezake beste bateria batekin erabiltzen denean.
- Baldintza abusuetan, likidoa atera daiteke bateriatik; kontaktua saihestu. Ustekabean kontaktua gertatzen bada, garbitu urarekin. Likidoak begiekin kontaktuan jartzen badu, eskatu laguntza medikoa. Bateriatik botatako likidoak narritadura edo erredurak sor ditzake.
3. Paketearen edukia
Carefully unpack your PRIMO PR501SV and ensure all components are present and in good condition. Refer to the image below for identification.

3.1. irudia: barne dauden osagaiak
This image displays the main components of the PRIMO PR501SV vacuum cleaner: the motor unit with integrated dust reservoir, the long lightweight metallic tube, the motorized floor brush, a crevice tool for narrow spaces, a dusting brush for delicate surfaces, the power adapter for charging, and a wall mount for convenient storage.
- Motor Unit with Dust Reservoir (0.6 L capacity)
- Lightweight Metallic Tube
- Zoruko eskuila motorizatua
- Zirrikitu tresna
- Hautsak botatzeko eskuila
- Elikatze-moldagailua
- Hormako euskarria torlojuekin
4. Produktua amaitu daview
The PRIMO PR501SV is a versatile 3-in-1 cordless vacuum cleaner designed for various cleaning tasks. It can be configured as a stick vacuum, a handheld vacuum, or a crumb collector.

Figure 4.1: 3-in-1 Configurations
This image illustrates the three primary modes of the PR501SV: as a complete stick vacuum for floor cleaning, as a handheld unit equipped with the crevice tool for tight spots, and as a handheld unit with the dusting brush for upholstery or delicate surfaces. The wall mount is also visible, indicating a storage solution.
5. Konfigurazioa eta Muntaketa
Jarraitu urrats hauek zure xurgagailua muntatzeko:
- Muntatu makila-xurgagailua: Insert the metallic tube into the main motor unit until it clicks into place. Then, attach the motorized floor brush to the other end of the metallic tube, ensuring it is securely fastened.
- Eskuko konfigurazioa: To use as a handheld vacuum, detach the metallic tube and motorized floor brush from the motor unit. Attach either the crevice tool or the dusting brush directly to the motor unit's suction opening.
- Horma-muntatzeko instalazioa: Choose a suitable location near a power outlet. Use the provided screws to securely attach the wall mount to the wall. Ensure it is at a height that allows the vacuum to hang freely.

Figure 5.1: Wall Mount Storage
This image shows a user placing the assembled stick vacuum onto the wall mount, demonstrating how the appliance can be conveniently stored and charged when not in use.
6. Bateria kargatzea
The PRIMO PR501SV is powered by an 18.5V Lithium-ion battery. Before first use, fully charge the battery.
- Connect the power adapter to the charging port on the motor unit.
- Konektagailua entxufe batera konektatu.
- The battery indicator lights will illuminate during charging. A full charge typically takes 4-5 hours.
- Once fully charged, the indicator lights will show a full battery level. Disconnect the charger.

Figure 6.1: Battery Indicator and Runtime
This close-up image displays the battery charge indicator on the vacuum cleaner. It shows two modes: 'MAX-R' (Max Power) offering approximately 20 minutes of runtime, and 'ECO-G' (Eco Mode) providing around 40 minutes of runtime, indicating the battery's endurance based on the selected power setting.
7. Funtzionamendu-argibideak
Your vacuum cleaner offers two speed settings and multiple configurations for versatile cleaning.
7.1. Power On/Off and Speed Settings
- Press the power button once to turn on the vacuum in ECO mode.
- Press the power button a second time to switch to MAX power mode.
- Sakatu pizteko botoia hirugarren aldiz hutsean itzaltzeko.
7.2. Stick Vacuum Mode
Use this mode for cleaning floors, carpets, and larger areas.
- Ensure the metallic tube and motorized floor brush are securely attached to the motor unit.
- Select the desired power mode (ECO or MAX).
- Guide the vacuum over the surface to be cleaned. The motorized brush helps agitate dirt for effective cleaning.

Figure 7.1: Agile and Flexible Cleaning
This image highlights the vacuum's maneuverability, showing it easily reaching under furniture like a sofa. The design allows for a 180-degree swivel, making it agile and flexible for cleaning hard-to-reach areas.
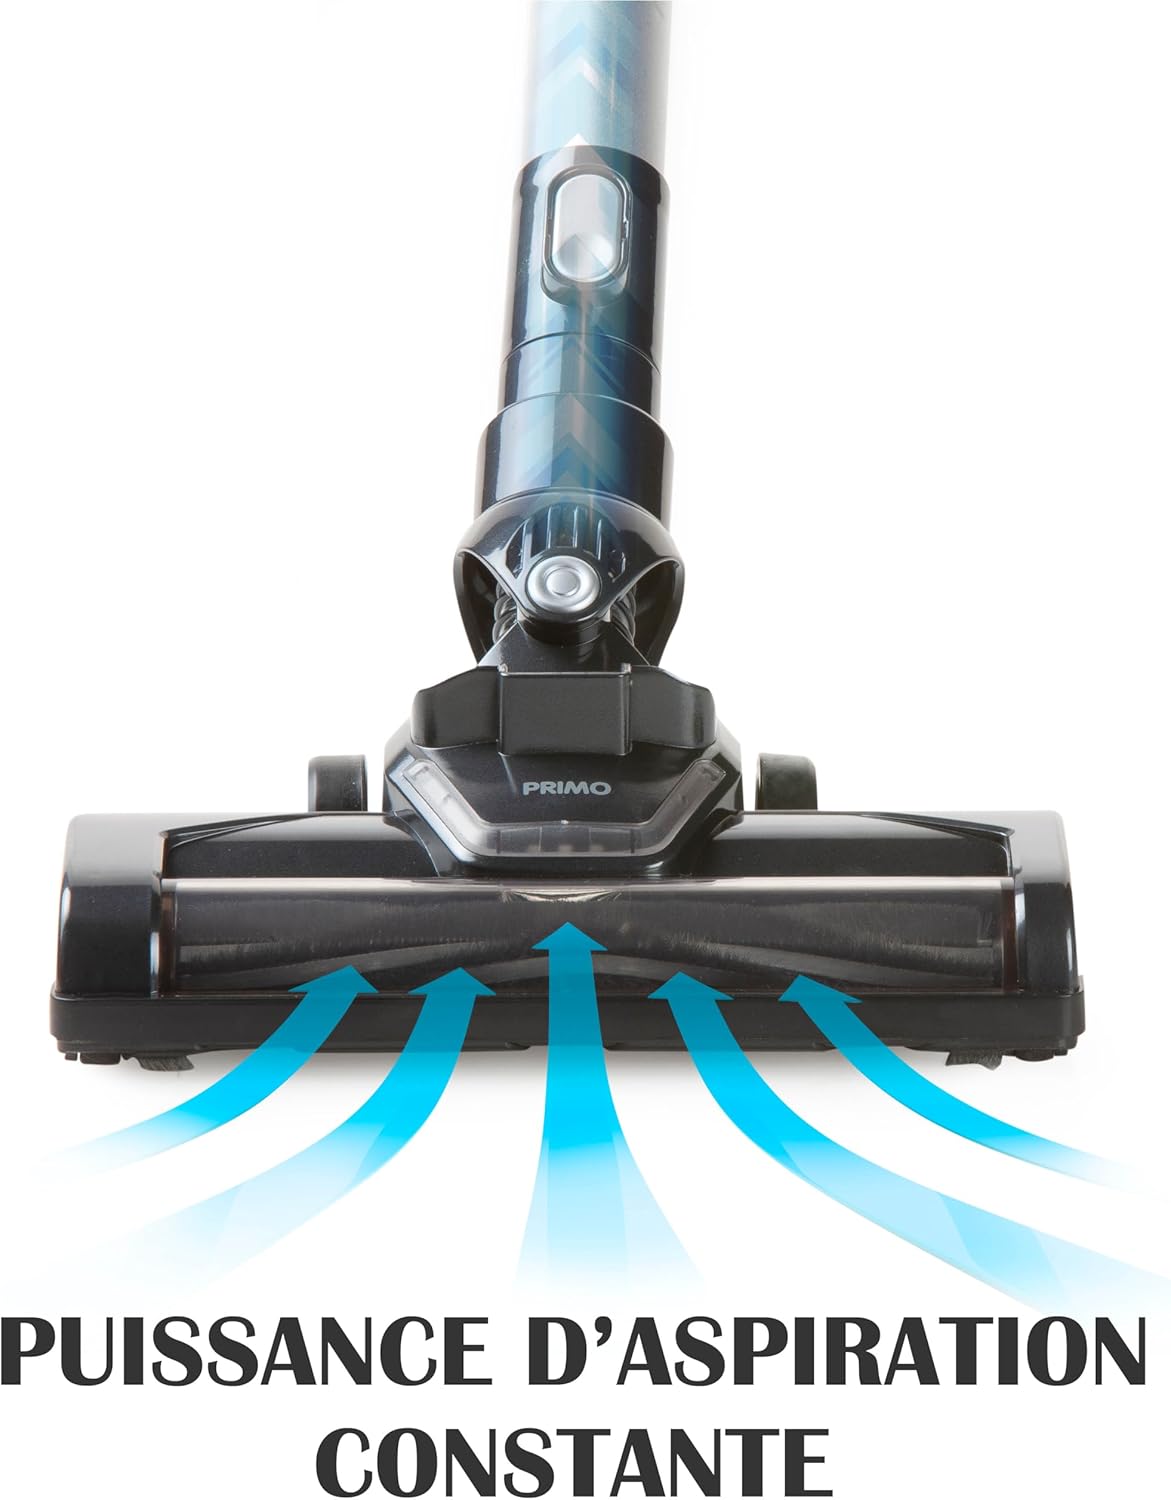
Figure 7.2: Constant Suction Power
This graphic illustrates the consistent and powerful suction generated by the vacuum's floor brush. Blue arrows depict the airflow, demonstrating how dirt and debris are effectively drawn into the vacuum head for thorough cleaning.
7.3. Handheld Vacuum Mode
Ideal for cleaning upholstery, car interiors, stairs, and small spills.
- Detach the metallic tube and motorized floor brush from the motor unit.
- Attach the crevice tool for narrow gaps or the dusting brush for surfaces like curtains or keyboards.
- Turn on the vacuum and clean the desired area.

Figure 7.3: Handheld Cleaning on Upholstery
This image shows the PRIMO PR501SV being used as a handheld vacuum to clean a sofa. It highlights the convenience and effectiveness of this mode for cleaning furniture and other elevated surfaces.
8. Mantentzea
Mantentze-lan erregularrak zure xurgagailuaren errendimendu optimoa bermatzen du eta bizitza luzatzen du.
8.1. Emptying the Dust Reservoir
Empty the 0.6 L dust reservoir regularly, especially when it reaches the 'MAX' line.
- Ziurtatu xurgagailua itzalita dagoela.
- Press the release button on the dust reservoir to detach it from the motor unit.
- Hold the dust reservoir over a trash bin and open the bottom flap to empty the contents.
- Close the flap and reattach the dust reservoir to the motor unit until it clicks securely.

Figure 8.1: Easy Dust Reservoir Emptying
This image illustrates the simple process of detaching the 0.6-liter dust reservoir from the main unit for emptying. The design allows for quick and hygienic disposal of collected debris.
8.2. HEPA iragazkia garbitzea
The HEPA 13 filter retains 99.95% of dust particles. Clean it regularly to maintain suction power.
- Remove the dust reservoir as described above.
- Carefully remove the HEPA filter from inside the dust reservoir.
- Hauts soltea kentzeko, iragazkia astiro-astiro zaborrontzi baten gainean jarri.
- If heavily soiled, rinse the filter under running water. Ensure it is completely dry before reinserting. Do not use detergents or hot water.
- Reinsert the dry HEPA filter into the dust reservoir and reattach the reservoir to the motor unit.
8.3. Zoruko eskuila motorizatua garbitzea
Ileak eta hondakinak korapilatu egin daitezke eskuila-arrabolean, eta horrek eragin dezake errendimenduan.
- Ensure the vacuum is turned off and disconnected from the metallic tube.
- Locate the release mechanism on the side of the motorized brush head.
- Remove the brush roll from the housing.
- Use scissors or a brush to remove any tangled hair or debris from the brush roll.
- Sartu berriro eskuila-arrabola garbia eta finkatu lekuan.
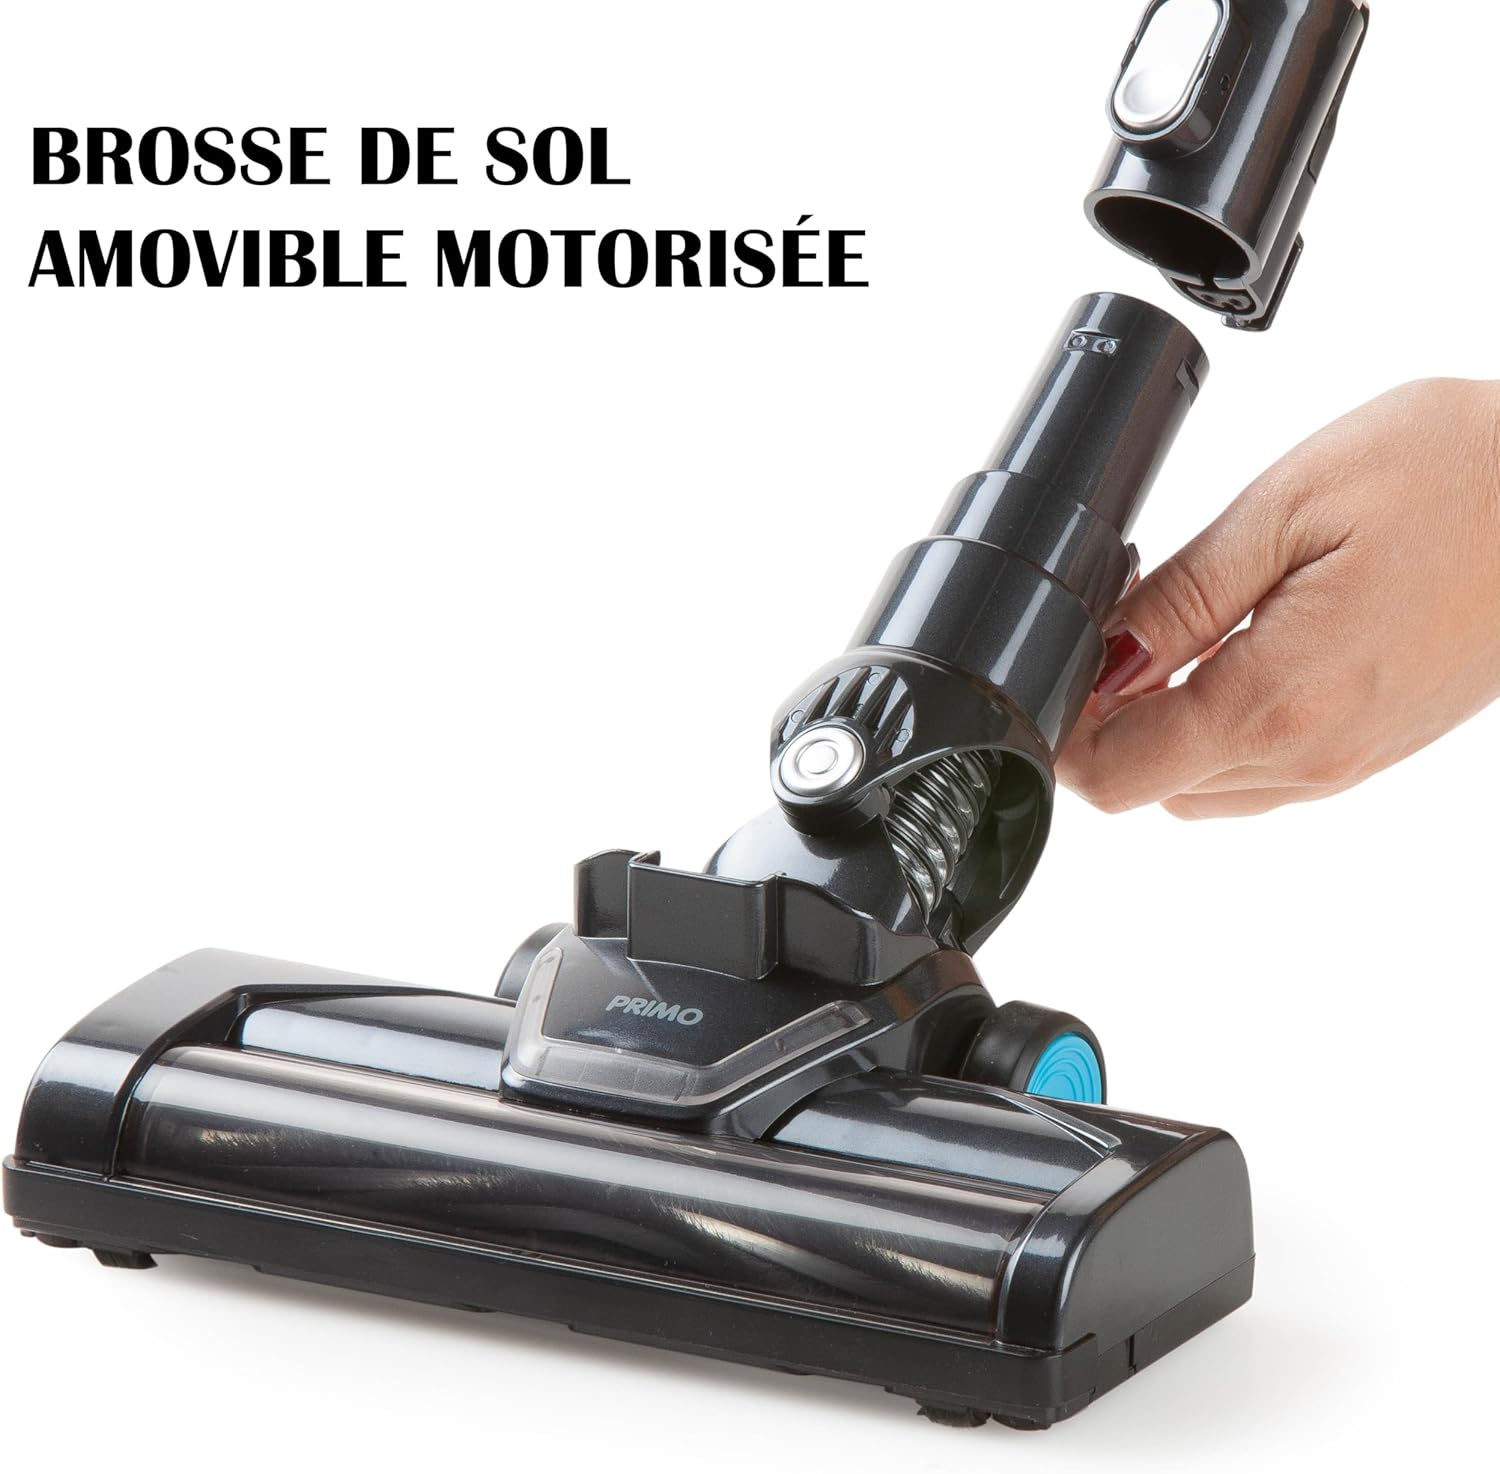
Figure 8.2: Removable Motorized Floor Brush
This image shows the motorized floor brush being detached from the vacuum's main body. This feature allows for easy access to the brush roll for cleaning tangled hair and debris, ensuring consistent performance.
9. Arazoak
If you encounter issues with your PRIMO PR501SV, refer to the following common problems and solutions:
| Arazoa | Kausa posiblea | Irtenbidea |
|---|---|---|
| Hutsa ez da pizten | Bateria deskargatuta dago Pizteko botoia ez da behar bezala sakatu | Kargatu bateria guztiz Sakatu irmo pizteko botoia |
| Xurgatze potentzia baxua | Dust reservoir is full Iragazkia beteta dago Eskuila-arrabola korapilatuta dago Nozzle/tube is blocked | Empty the dust reservoir Garbitu HEPA iragazkia Clean the motorized brush roll Check and clear any blockages in the nozzle or tube |
| Motorized brush not rotating | Eskuila-arrabola korapilatuta dago Connection to main unit is loose | Garbitu eskuila erroilua Ensure the brush head is securely attached to the tube or motor unit |
| Bateriaren iraupen laburra | Bateria ez dago guztiz kargatuta Using MAX power mode continuously Bateria degradatzea | Ziurtatu bateria guztiz kargatuta dagoela (4-5 ordu) Use ECO mode for longer runtime Jarri harremanetan bezeroarentzako arreta-zerbitzuarekin bateriaren iraupena denborarekin nabarmen gutxitzen bada |
Irtenbide hauek probatu ondoren arazoa konpontzen ez bada, jarri harremanetan bezeroarentzako arreta-zerbitzuarekin.
10. Zehaztapenak
| Ezaugarri | Zehaztapena |
|---|---|
| Modelo zenbakia | PR501SV |
| Marka | PRIMO |
| Mota | Haririk gabeko makila xurgagailua 3-in-1 |
| Bateria | 18.5 V litio-ioizkoak |
| Kargatzeko Denbora | 4-5 ordu |
| Runtime (ECO mode) | Gutxi gorabehera. 40 minutu |
| Runtime (MAX power) | Gutxi gorabehera. 20 minutu |
| Dust Reservoir Capacity | 0.6 litro |
| Iragazki mota | HEPA 13 |
| Abiadura kopurua | 2 |
| Zarata Maila | 75 dB |
| Pisua | 2 kilogramo |
| Neurriak (L x W x H) | 16 x 23 x 113 cm |
| Gomendatutako azalera | Zoru gogorrak |
| Dakarten osagaiak | Motor unit, metallic tube, motorized floor brush, crevice tool, dusting brush, power adapter, wall mount |
11. Bermea eta Laguntza
For warranty information and customer support, please refer to the warranty card included with your purchase or visit the official PRIMO webgunea. Gorde erosketaren egiaztagiria berme-erreklamazioetarako.