1. Sarrera
Thank you for choosing the Tornado TCM-14512ES Espresso Machine. This manual provides essential information for the safe and efficient operation, maintenance, and troubleshooting of your new appliance. Please read these instructions thoroughly before first use and retain them for future reference.
This espresso machine is designed to prepare high-quality espresso and froth milk for various coffee beverages. It features a 15-bar pump pressure system and a 1.2-liter water tank capacity.
2. Segurtasun-argibideak
- Always ensure the appliance is connected to a grounded power outlet with the correct voltage (220-240V).
- Ez sartu gailua, korronte-kablea edo entxufea uretan edo beste likidoren batean.
- Keep hands and cords away from hot surfaces and steam. The steam wand and portafilter can become very hot during operation.
- Deskonektatu makina entxufetik garbiketa, mantentze-lanak edo erabiltzen ez denean.
- Ez erabili aparatua kablea edo entxufea hondatuta duen, edo gaizki funtzionatzen badu edo nolabait hondatu bada.
- Etxetresna hau etxeko erabilerarako soilik da. Ez erabili kanpoan.
- Ensure the water tank is filled with clean, cold water before operation. Do not operate without water.
- Haurrak gainbegiratu behar dira aparatuarekin jolasten ez dutela ziurtatzeko.
3. Produktua amaitu daview
Familiarize yourself with the components of your Tornado TCM-14512ES Espresso Machine:
- Ur-tanga (1.2 litroko edukiera)
- Control Knob (Power, Espresso, Steam)
- Potentzia adierazle argia
- Prest adierazle argia
- Portafiltroaren heldulekua
- Iragazki-saskia (kafe xehatuarentzat)
- Lurrun-makila / Esne-apargailua
- Tantaka-erretilua eta parrilla kendugarria
- Kafe Saltokia
- Tamper/Measuring Spoon (often included)

3.1. irudia: Aurrealdea view of the Tornado TCM-14512ES Espresso Machine, showing the control knob, portafilter, steam wand, and drip tray.
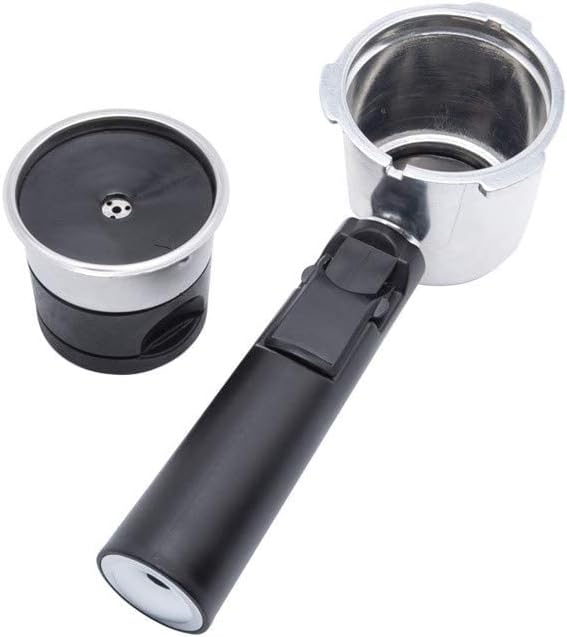
3.2. irudia: Detached portafilter with a single filter basket, ready for coffee grounds.

3.3. irudia: Filter basket with its lid open, illustrating the internal structure for holding coffee grounds.
4. Konfigurazioa
4.1 Paketatzea
- Kontu handiz kendu makinako ontziratze-material guztiak.
- Place the machine on a stable, flat, heat-resistant surface, away from water sources.
- Ensure all accessories are present: portafilter, filter basket(s), measuring spoon/tamper.
4.2 Hasierako garbiketa
- Wash the water tank, portafilter, filter basket(s), and drip tray with warm, soapy water. Rinse thoroughly and dry.
- Garbitu makinaren kanpoaldea iragarkiarekinamp oihal.
4.3 Ur depositua betetzea
- Kendu ur depositua makinaren atzeko aldetik.
- Bete depositua ur hotz eta freskoarekin MAX maila-adierazleraino.
- Jarri ur-depositua berriro bere tokian ondo finkatuta.
4.4 Makina prestatzea (lehen erabilera)
- Ziurtatu ur depositua beteta dagoela.
- Plug the machine into a power outlet. Turn the control knob to the "Power" position (usually indicated by an 'I' or a power symbol). The power indicator light will illuminate.
- Jarri katilu bat kafearen irteeraren azpian.
- Turn the control knob to the "Espresso" position (coffee cup symbol). Water will start to flow through the coffee outlet. Let approximately 100ml of water run through.
- Turn the control knob back to the "Power" position to stop the flow.
- Next, turn the control knob to the "Steam" position (steam symbol). Allow steam to release from the steam wand for a few seconds to clear any air. Turn the knob back to "Power".
- Makina orain prestatuta eta erabiltzeko prest dago.
5. Funtzionamendu-argibideak
5.1 Espressoa egitea
- Prestatu makina: Ensure the water tank is filled. Plug in the machine and turn the control knob to "Power". Wait for the "Ready" indicator light to illuminate, indicating the machine has reached the optimal brewing temperature.
- Prestatu Portafiltroa: Insert the desired filter basket into the portafilter. For a single shot, use the smaller basket; for a double shot, use the larger one.
- Gehitu kafe-lurra: Fill the filter basket with finely ground espresso coffee. Use the measuring spoon to add the correct amount (approx. 7g for a single shot, 14g for a double shot).
- Tamp Kafea: Erabili tamper to press the coffee grounds firmly and evenly. Wipe any excess grounds from the rim of the portafilter.
- Erantsi iragazki-portagailua: Align the portafilter with the group head (coffee outlet) on the machine. Insert it and twist firmly to the right until it is securely locked in place.
- Kopa jarri: Position one or two espresso cups under the coffee outlet.
- Espressoa prestatu: Once the "Ready" light is on, turn the control knob to the "Espresso" position. Espresso will begin to flow into your cup(s).
- Gelditu garagardoa egitea: When the desired amount of espresso is reached (typically 25-30ml per shot), turn the control knob back to the "Power" position to stop the flow.
- Kendu iragazki-portagailua: Carefully twist the portafilter to the left to unlock and remove it. Be cautious as it will be hot. Discard the used coffee grounds.
5.2 Esnea irabiatzea
- Prestatu Steam-erako: Ensure the machine is plugged in and turned on. Turn the control knob to the "Steam" position. Wait for the "Ready" indicator light to illuminate, indicating the machine has reached steaming temperature.
- Lurrun-haga garbitzeko: Before frothing, place an empty cup under the steam wand and briefly open the steam valve (if applicable, or turn the control knob slightly to release a burst of steam) to clear any condensed water. Close the valve/knob.
- Esnea prestatu: Bete altzairu herdoilgaitzezko apar-pitxer bat esne hotzarekin (esnekikoa edo esnekirik gabekoa) tutuaren azpiraino.
- Esne apartsua: Immerse the tip of the steam wand just below the surface of the milk. Open the steam valve fully (or turn the control knob to the "Steam" position). Hold the pitcher at an angle, moving it slightly up and down to incorporate air and create foam.
- Berotu esnea: Once desired foam is achieved, lower the pitcher to immerse the steam wand deeper into the milk to heat it without adding more air. Continue until the pitcher is hot to the touch (approx. 60-70°C).
- Utzi lurruntzeari: Close the steam valve (or turn the control knob back to "Power"). Remove the pitcher.
- Lurrun-haga garbia: Berehala garbitu lurrun-hagatxoa sprayarekinamp oihal bat erabili esne-hondakinak lehortzea saihesteko. Ireki berriro lurrun-balbula laburki makilaren barruko esnea hustutzeko.
6. Garbiketa eta Mantentze-lanak
Regular cleaning ensures optimal performance and extends the lifespan of your espresso machine.
6.1 Eguneko garbiketa
- Iragazkia eta iragazkia saskia: Erabilera bakoitzaren ondoren, kendu iragazki-eramailea, bota kafe-hondarra eta garbitu iragazki-eramailea eta iragazki-saskia ur korrontearen azpian.
- Tantaketarako erretilua: Empty and clean the drip tray and grid daily. Wash with warm, soapy water and rinse.
- Lurrun-makila: As mentioned in the operating instructions, wipe the steam wand immediately after frothing milk and purge it to prevent blockages.
- Kanpoaldea: Garbitu makinaren kanpoaldea leun batekin, damp oihal. Ez erabili garbitzaile urratzaileak edo zurgatzaileak.
6.2 Ur depositua garbitzea
- Clean the water tank weekly with warm, soapy water. Rinse thoroughly to remove any soap residue.
6.3 Kalifikatzailea
Mineral deposits from water can build up inside the machine over time, affecting performance. Descale your machine every 2-3 months, or more frequently if you have hard water or use it often.
- Erabili espresso makinetarako bereziki diseinatutako kalka kentzeko soluzio komertzial bat, fabrikatzailearen argibideak jarraituz.
- Bestela, ozpin zuriaren eta uraren disoluzio bat erabil daiteke (1:1 proportzioan).
- Run the descaling solution through the machine as if brewing coffee, and also through the steam wand.
- After descaling, run several cycles of clean water through the machine to rinse thoroughly and remove any descaling solution residue.
7. Arazoak
Bezeroarentzako arreta-zerbitzuarekin harremanetan jarri aurretik, mesedez, kontsultatu honako arazo ohikoenak eta haien irtenbideak:
| Arazoa | Kausa posiblea | Irtenbidea |
|---|---|---|
| No water flow / Machine not pumping water. | Water tank empty, airlock in pump, clogged filter. | Fill water tank. Prime the machine (Section 4.4). Clean filter basket. |
| Espressoa polikiegi isurtzen da edo batere ez da isurtzen. | Coffee ground too fine, coffee tamped too hard, clogged filter basket. | Use coarser grind. Tamp less firmly. Clean filter basket. Descale machine. |
| Espresso flows too quickly / Weak coffee. | Coffee ground too coarse, not enough coffee, coffee tamparinegi ed. | Use finer grind. Increase coffee amount. Tamp sendoago. |
| Ez dago lurrunik lurrun-hagatik. | Steam wand clogged, machine not heated to steam temperature. | Clean steam wand thoroughly. Wait for "Ready" light in steam mode. Descale machine. |
| Makinak ura isurtzen du. | Water tank not seated correctly, portafilter not locked properly, seals worn. | Ensure water tank is secure. Lock portafilter firmly. Contact support if seals are worn. |
8. Zehaztapen Teknikoak
| Ezaugarri | Zehaztapena |
|---|---|
| Marka | Tornadoa |
| Modelo zenbakia | TCM-14512ES |
| liburukiatage | 220-240 volt |
| Potentzia / Wattage | 1050 Watt |
| Ur deposituaren edukiera | 1.2 litro |
| Ponpa Presioa | 15 Taberna |
| Materiala | Metala |
| Kolorea | Beltza eta Zilarrezkoa |
| Ezaugarri bereziak | Esne-apargailua, Iragazki iraunkorra, Termikoa, Tenporizadorea, Ur-iragazkia |
| Elementuaren pisua | 4.06 kilogramo |
| Paketearen neurriak | 36.5 x 35.5 x 23.5 cm |
9. Bermea eta Laguntza
Your Tornado TCM-14512ES Espresso Machine comes with a manufacturer's warranty. Please refer to the warranty card included with your purchase for specific terms and conditions, including the warranty period and coverage details.
For technical assistance, spare parts, or warranty claims, please contact the retailer where you purchased the product or the authorized Tornado service center in your region. Keep your proof of purchase for warranty validation.