iTOMA CKS207
iTOMA CKS207 Wireless Charging Alarm Clock User Manual
Eredua: CKS207
Sarrera
Eskerrik asko erosketagatik.asing the iTOMA CKS207 Wireless Charging Alarm Clock. This device combines a digital alarm clock with advanced features such as 15W ultra-fast wireless charging, Bluetooth 5.0 connectivity, a USB charging port, dual alarms, FM radio, and an adjustable LED display with night light function. Please read this manual carefully to ensure proper operation and to fully utilize all features.
Paketearen edukia
- iTOMA CKS207 iratzargailua
- Elikatze-moldagailua
- Erabiltzailearen eskuliburua
Produktua amaituview
Familiarize yourself with the main components and controls of your iTOMA CKS207 alarm clock.

1. irudia: Aurrealdea view of the iTOMA CKS207 alarm clock, showcasing its large digital display, wireless charging pad, and a smartphone charging via USB port.

Figure 2: Top panel controls, including buttons for alarm settings (AL1, AL2), clock setting (CLOCK SET), snooze/volume, FM radio, Bluetooth pairing, and dimmer control.
Ezaugarri nagusiak:
- 1.4-inch Cyan LED Display for clear time visibility.
- 15W Ultra-Fast Wireless Charging Pad.
- Bluetooth 5.0 for audio streaming.
- USB Charging Port (5V/2.1A) for additional device charging.
- Dual Alarm with 4 selectable modes (Every Day, One Day, Weekdays, Weekend).
- FM Radio with 20 preset stations.
- Adjustable Dimmer (4 levels) and Automatic Brightness Sensor.
- Cyan LED Night Light.
- 12/24-hour time format.
Konfigurazioa
1. Energia-konexioa
- Unpack the alarm clock and power adapter.
- Connect the power adapter to the DC IN port on the back of the alarm clock.
- Entxufatu korronte-egokitzailea hormako entxufe estandar batera. Pantaila piztuko da.
2. Hasierako orduaren ezarpena
Upon first power-on, the clock may display a default time. Follow these steps to set the correct time:
- Eduki sakatuta ERLOJU MULTZOA button (refer to Figure 2) for 3 seconds. The hour digits will flash.
- Erabili TUNE+ or TUNE- ordua doitzeko botoiak.
- Sakatu ERLOJU MULTZOA berriro ordua berresteko eta minutuen ezarpenera joateko. Minutuen digituak keinuka hasiko dira.
- Erabili TUNE+ or TUNE- minutuak doitzeko botoiak.
- Sakatu ERLOJU MULTZOA berriro minutua baieztatzeko.
- Jarraitu sakatzen ERLOJU MULTZOA to cycle through Year, Month, Day settings, adjusting with TUNE+/TUNE- behar bezala.
- Sakatu ERLOJU MULTZOA one last time to exit time setting mode.
12 orduko eta 24 orduko formatuaren artean aldatzeko, sakatu ERLOJU MULTZOA button briefly while the time is displayed (not in setting mode).
Funtzionamendu-argibideak
1. Alarmak ezartzea (AL1 / AL2)
The iTOMA CKS207 features two independent alarms (AL1 and AL2).
- Eduki sakatuta AL1 or AL2 botoia 3 segundoz. Alarmaren orduko digituak keinuka hasiko dira.
- Erabili TUNE+ or TUNE- nahi duzun alarma-ordua ezartzeko.
- Sakatu AL1 or AL2 berriro ordua berresteko eta minutuen ezarpenera joateko.
- Erabili TUNE+ or TUNE- nahi duzun alarma minutua ezartzeko.
- Sakatu AL1 or AL2 again to select the alarm source (FM radio or Buzzer). Use TUNE+ or TUNE- aukeratzeko.
- Sakatu AL1 or AL2 again to select the alarm mode (Every Day, One Day, Weekdays, Weekend). Use TUNE+ or TUNE- aukeratzeko.
- Sakatu AL1 or AL2 one last time to save the alarm settings and exit.
To activate/deactivate an alarm, briefly press the AL1 or AL2 botoia. Alarma ikono bat agertuko/desagertuko da pantailan.

Figure 3: The alarm clock display indicating active dual alarms, ready to wake you up.
2. Haririk gabeko kargatzea
The iTOMA CKS207 features a 15W ultra-fast wireless charging pad on its top surface.
- Jarri zure Qi-rekin bateragarria den telefonoa edo gailua zuzenean kargatzeko euskarrian.
- Ziurtatu gailua alfonbra erdian dagoela kargatzeko modu optimoa lortzeko.
- A charging indicator (if available on your device) will confirm charging has begun.
Oharra: Remove any metal objects or thick cases from your device before charging wirelessly.
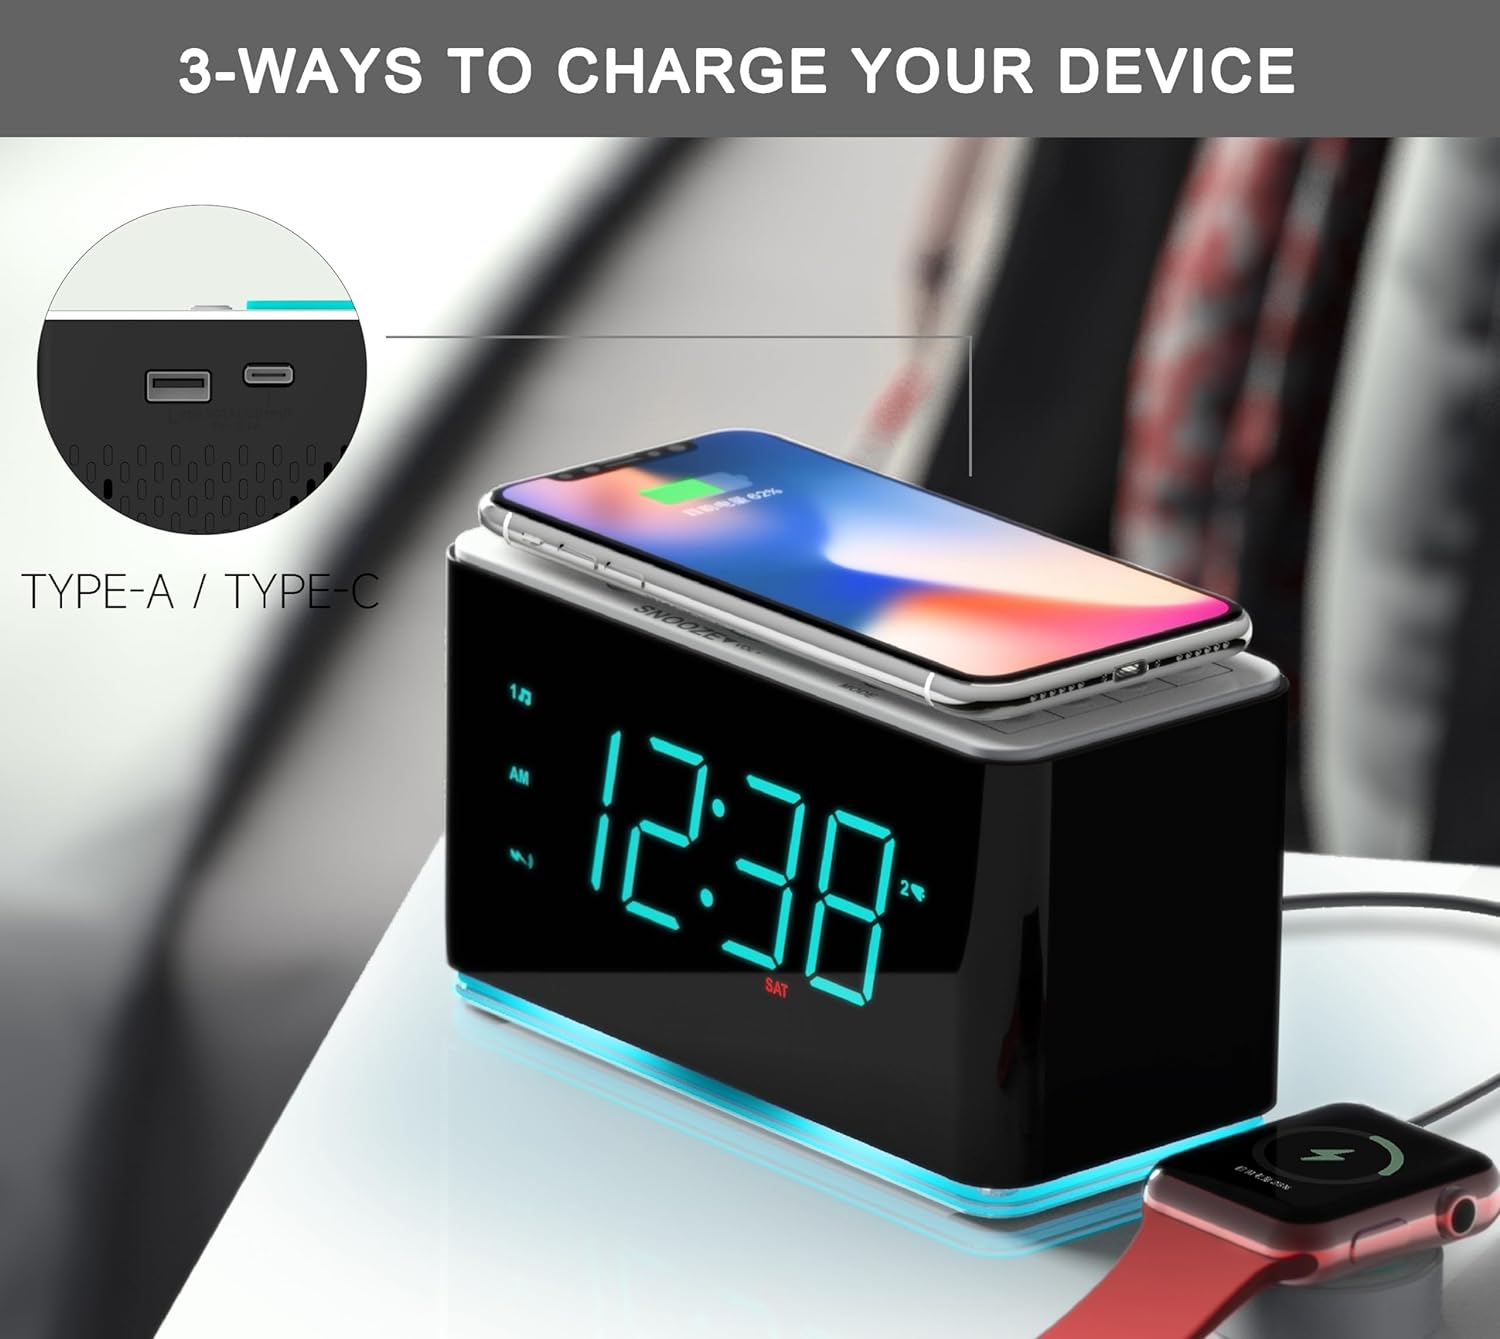
Figure 4: The alarm clock offers multiple charging options, including wireless charging on top and wired charging via USB-A and USB-C ports.
3. USB kargatzeko ataka
In addition to wireless charging, a USB-A charging port (5V/2.1A) is available on the back of the unit for wired charging of other devices.
- Connect your device's USB charging cable to the USB port on the back of the alarm clock.
- Konektatu kablearen beste muturra zure gailura.
- Kargatzen hasiko da automatikoki.
4. Bluetooth funtzionamendua
Erreproduzitu audioa haririk gabe zure Bluetooth gaitutako gailutik.
- Sakatu ON/OFF unitatea pizteko botoia.
- Sakatu FM/BT PAIR button to switch to Bluetooth mode. The Bluetooth icon will flash on the display.
- On your mobile device, enable Bluetooth and search for "iTOMA CKS207".
- Select "iTOMA CKS207" to pair. Once paired, the Bluetooth icon on the alarm clock will stop flashing and remain solid.
- You can now play music from your device through the alarm clock's speaker.
- Erabili VOL+ / Boluntario buttons on the alarm clock or your device to adjust volume.
- To disconnect, simply turn off Bluetooth on your device or press the FM/BT PAIR button again on the alarm clock to switch modes.

Figure 5: The alarm clock connected via Bluetooth to a smartphone, ready for audio playback.
5. FM Irratiaren funtzionamendua
Entzun zure FM irrati-kate gogokoenak.
- Sakatu ON/OFF unitatea pizteko botoia.
- Sakatu FM/BT PAIR botoia FM irrati modura aldatzeko.
- To auto-scan and save stations: Press and hold the FM STO./BT PAIR button for 3 seconds. The radio will scan and save available stations automatically (up to 20 presets).
- To manually tune: Briefly press TUNE+ or TUNE- to fine-tune the frequency. Press and hold TUNE+ or TUNE- to auto-scan to the next available station.
- To recall preset stations: Briefly press the FM MEM/BT PAIR botoia behin eta berriz gordetako irratiak zeharkatzeko.
- Doitu bolumena erabiliz VOL+ / Boluntario botoiak.
6. Display Dimmer and Night Light
The display brightness can be adjusted manually or automatically.
- Manual Dimmer: Sakatu labur DIMMER button to cycle through 4 brightness levels (Bright, Dim, Invisible, OFF).
- Automatic Dimmer: The built-in sensor automatically adjusts display brightness based on ambient light. This feature is always active.
- Gaueko argia: Sakatu LED button to turn the cyan LED night light on or off.

Figure 6: Visual representation of the 4-level dimmer control, from bright to completely off, allowing for comfortable viewing in any light condition.
7. Errepikapen funtzioa
Alarma jotzen duenean, sakatu botoi handia SNOOZE/VOL- button on top to temporarily silence the alarm for 9 minutes. The alarm will sound again after the snooze period.
8. Lo egiteko tenporizadorea
The sleep timer allows you to fall asleep to FM radio or Bluetooth audio, which will automatically turn off after a set period.
- While FM radio or Bluetooth is playing, press the LO/ORDU ZONA button repeatedly to cycle through sleep timer options (e.g., 120, 90, 60, 30, 15, 10 minutes, OFF).
- The selected time will appear on the display. The unit will automatically turn off after the set time.
Mantentzea
- Garbiketa: Use a soft, dry cloth to clean the surface of the alarm clock. Do not use liquid cleaners or abrasive materials.
- Potentzia: Always disconnect the power adapter before cleaning or if the unit will not be used for an extended period.
- Ingurumena: Keep the unit away from direct sunlight, heat sources, excessive dust, moisture, or strong magnetic fields.
- Ordezko Bateria: The unit contains a CR5 battery for time backup during power outages. If the time is consistently incorrect after power interruptions, the backup battery may need replacement by a qualified technician.
Arazoak konpontzea
| Arazoa | Kausa posiblea | Irtenbidea |
|---|---|---|
| Argirik ez / Pantaila itzalita | Korronte-egokitzailea ez dago konektatuta edo entxufea ez dabil. | Ziurtatu korronte-egokitzailea ondo konektatuta dagoela unitatean eta funtzionatzen duen hormako entxufe batean. |
| Haririk gabeko kargatzeak ez du funtzionatzen | Device not Qi-compatible; device not centered; thick case or metal objects on device. | Verify device compatibility. Reposition device. Remove case/metal objects. |
| Bluetootha ez da parekatzen | Alarm clock not in pairing mode; device Bluetooth off; too far from unit. | Sakatu FM/BT PAIR button. Ensure device Bluetooth is on. Move device closer (within 10m). |
| FM irratiaren harrera eskasa | Seinale ahula; unitatearen posizioa. | Extend the FM antenna fully. Reposition the unit for better reception. |
| Alarma ez da jotzen | Alarma ez da aktibatu; bolumena baxuegia; alarma ordua/modua okerra. | Ensure alarm icon is displayed. Increase volume. Recheck alarm settings. |
Zehaztapenak
| Ezaugarri | Xehetasuna |
|---|---|
| Eredua | CKS207 |
| Bistaratzea | 1.4-inch Cyan LED |
| Haririk gabeko kargaren irteera | Gehienez 15W |
| USB kargatzeko irteera | 5V / 2.1A |
| Bluetooth bertsioa | 5.0 |
| Bluetooth barrutia | Gehienez 10 metro (33 oin) |
| FM Radio Frequencies | 87.5 - 108 MHz |
| Potentzia Sarrera | AC 100-240V, 50/60Hz (via included adapter) |
| Backup Bateria | 1 x CR5 (barne) |
| Neurriak | 15.75 x 7.37 x 8.64 cm (6.2 x 2.9 x 3.4 hazbete) |
| Pisua | 730 g (1.6 lb) |
Bermea eta Laguntza
iTOMA products are designed and manufactured to the highest quality standards. For detailed warranty information and customer support, please refer to the warranty card included in your package or visit the official iTOMA webgunea. Gorde erosketaren egiaztagiria bermearen erreklamazioetarako.
For technical assistance or inquiries, please contact iTOMA customer support through their official channels. Contact information can typically be found on the product packaging or the brand's webgunea.
Webgunea: Visit the iTOMA Store on Amazon
Ask a question about this manual
Ask about setup, troubleshooting, compatibility, parts, safety, or missing instructions. Manuals+ will review the question and use this page’s manual context to help answer it.