
Saooer BLUE 20A
Saooer 20A Solar Charge Controller User Manual
Model: BLUE 20A
Sarrera
This manual provides essential information for the safe and efficient operation of your Saooer 20A Solar Charge Controller. This intelligent regulator is designed to manage the working of solar panels and batteries in a solar system, featuring dual USB ports for mobile device charging. It is compatible with 12V and 24V systems and includes multiple protection functions to ensure system efficiency and prolong battery lifespan.

1. irudia: Aurrealdea view of the Saooer 20A Solar Charge Controller.
Segurtasun-argibideak
- Ensure all connections are correct before powering on the controller. Incorrect wiring can damage the device or connected components.
- The controller is designed for indoor use or in a protected environment. Avoid exposure to direct sunlight, high temperatures, or moisture.
- Do not attempt to disassemble or repair the controller yourself. Refer to qualified personnel for service.
- Mantendu haurren eskura.
- This controller is only suitable for lead-acid batteries: OPEN, AGM, GEL. Do not use with other battery types like Lithium-ion or LiFePO4, as this may cause damage or safety hazards.
- Always connect the battery first, then the solar panel, and finally the load. When disconnecting, reverse the order: disconnect the load, then the solar panel, and finally the battery.
Produktuaren Ezaugarriak
- Sistema Automatikoaren Bolumenatage Identifikazioa: Automatically detects 12V/24V system voltage.
- PWM kargatzea: Efficient Pulse Width Modulation charging mode.
- USB portu bikoitzak: Provides 5V/2A output for charging mobile devices.
- LCD pantaila: Clear display of status and data, allowing for convenient mode switching and parameter configuration.
- Babes funtzio anitzak: Includes short-circuit protection, open-circuit protection, reverse protection, and over-load protection.
- Parametro erregulagarriak: User-adjustable charge and discharge parameters.
- Tenperatura-konpentsazioa: Automatic temperature compensation for optimal charging.
Konfigurazioa eta Instalazioa
Follow these steps carefully to install your solar charge controller. Incorrect installation can lead to damage or malfunction.
- Prestatu kableatua: Ensure all wires are properly stripped and have appropriate connectors if necessary. Use wires of sufficient gauge for your system's current.
- Konektatu bateria: Connect the battery to the charge regulator first. Observe correct polarity (+ to + and - to -). The controller will automatically recognize the battery voltage (12V edo 24V).
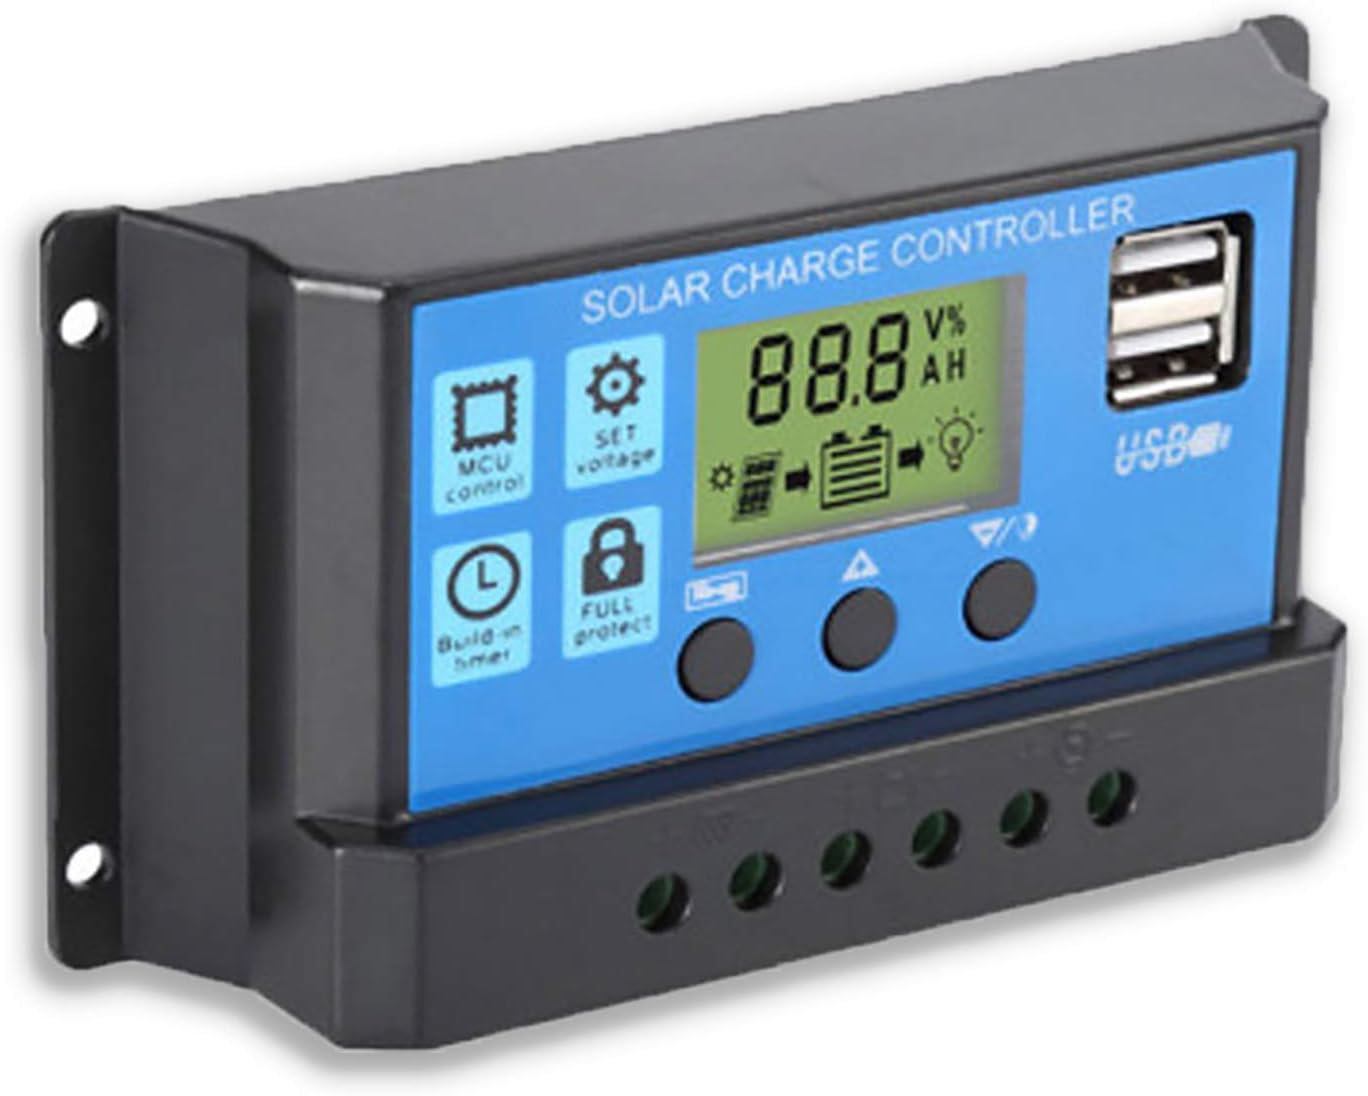
2. irudia: Aldea view showing the connection terminals for battery, solar panel, and load.
- Konektatu eguzki-panela: Connect the solar panel to the solar charge controller. Ensure correct polarity.
- Karga konektatu: Connect the consumer or load to the charge controller regulator. Ensure correct polarity.
Ohar garrantzitsua: Always connect the battery first, then the solar panel, and finally the load. When disconnecting the controller, please remove the solar panel, then the load, and finally the battery. This sequence helps the controller recognize the battery voltage correctly and prevents damage.
Funtzionamendu-argibideak
LCD pantaila eta botoiak

3. irudia: Angeludun view showing the LCD display and control buttons.
The controller features an LCD display and three buttons for operation:
- Menuko botoia: Used to cycle through display modes and enter parameter setting mode.
- Gora botoia: Used to increase values or navigate upwards in menus.
- Behera botoia: Used to decrease values or navigate downwards in menus.
Bistaratzeko moduak
Press the Menu button to cycle through the following display modes:
- Bateria Voltage (V)
- Eguzki Panela Voltage (V)
- Karga-korrontea (A)
- Battery Temperature (°C)
- Karga-korrontea (A)
- Deskarga-korrontea (A)
- Load Working Mode (24H, 0-23H, 0H)
Parametroen ezarpenak
To enter parameter setting mode, press and hold the Menu button for 5 seconds. Use the Up and Down buttons to adjust values, and the Menu button to confirm and move to the next parameter. Press and hold Menu again to exit setting mode.
| Parametroa | Deskribapena | Default (12V) | Range (12V) |
|---|---|---|---|
| B01/B02/B03 | Battery Type Selection (B01=Lead-acid, B02=Lithium Ion, B03=LiFePO4) | B01 | N/A |
| Charge Off Voltage | liburukiatage at which charging stops | 14.4V | 13.0V - 15.0V |
| Deskarga Berkonexio Bolumenatage | liburukiatage at which load reconnects after low voltagdeskonektatu | 12.6V | 11.0V - 13.5V |
| Deskarga-geldialdiaren bolumenatage | liburukiatage at which load disconnects to protect battery | 10.7V | 9.0V - 11.5V |
| Load Working Time | Timer for load output (24H, 0-23H, 0H) | 24H | N/A |
Note: For 24V systems, multiply the 12V values by two.
Mantentzea
- Ohiko ikuskapena: Aldian-aldian egiaztatu kableatu-konexio guztiak estutasuna eta korrosioa duten ikusteko.
- Garbitasuna: Keep the controller clean and free from dust. Use a dry cloth for cleaning.
- Aireztapena: Ziurtatu aireztapen egokia dagoela kontrolatzailearen inguruan, gehiegi berotzea saihesteko.
- Bateria osasuna: Kontrolatu bateria boltage and health regularly. Replace batteries as needed.
Arazoak konpontzea
| Arazoa | Kausa posiblea | Irtenbidea |
|---|---|---|
| Kontrolatzailea ez da pizten / LCDa hutsik | Bateria ez dago konektatuta edo polaritatea alderantzikatua; Bateriaren bolumenatage baxuegia. | Check battery connections and polarity. Ensure battery has sufficient charge. |
| Solar panel not charging battery | Solar panel not connected or reverse polarity; Insufficient sunlight; Damaged solar panel. | Check solar panel connections and polarity. Ensure panel is in direct sunlight. Test solar panel output. |
| Karga ez dabil | Load not connected or reverse polarity; Battery voltage too low (low voltage disconnect); Overload protection activated. | Check load connections and polarity. Charge battery. Reduce load or check for short circuit. |
| USB atakak ez dira kargatzen | Bateria boltage too low; Device not compatible; Faulty USB cable. | Ensure battery is charged. Try a different device or cable. |
| Controller gets hot | Gehiegizko karga; Aireztapen eskasa. | Reduce load. Ensure controller has adequate airflow and is not in an enclosed space. |
Zehaztapenak
| Ezaugarri | Xehetasuna |
|---|---|
| Eredua | URDINA 20A |
| Sistema Boltage | 12V / 24V Auto |
| Karga/Deskarga Korronte maximoa | 20A |
| USB irteera | Dual USB, 5V/2A (Max) |
| Bateria motaren bateragarritasuna | Lead-acid (OPEN, AGM, GEL) |
| Produktuaren neurriak | 5.12 x 2.76 x 1.5 inches (133mm x 70mm x 38mm approx.) |
| Elementuaren pisua | 5 ontza |
| Bistaratzea | LCDa |
| Funtzionamendu-tenperatura | -35°C eta +60°C artean |

Figure 4: Product dimensions of the solar charge controller.
Bermea eta Laguntza
For warranty information or technical support, please contact the manufacturer, Saooer, through their official channels. Refer to your purchase documentation for specific warranty terms and contact details.
Fabrikatzailea: Saooer
ASIN: B095764VB7
UPC: 605832982977
Bisita dezakezu Saooer Store on Amazon informazio gehiago lortzeko edo laguntzarekin harremanetan jartzeko.
Ask a question about this manual
Ask about setup, troubleshooting, compatibility, parts, safety, or missing instructions. Manuals+ will review the question and use this page’s manual context to help answer it.