
1. Sarrera
This manual provides instructions for the assembly, operation, and maintenance of your iPower 4x4 Grow Tent Kit. This kit includes a 48"x48"x78" grow tent, a 200W full-spectrum LED grow light, a 6-inch inline fan, a carbon filter, ducting, and various accessories designed for indoor plant cultivation.
2. Segurtasun informazioa
- Always disconnect power before performing any maintenance or assembly.
- Ziurtatu konexio elektriko guztiak ondo daudela eta tokiko araudi elektrikoak betetzen dituztela.
- Ez jarri osagai elektrikoak uraren edo gehiegizko hezetasunaren eraginpean.
- Keep the grow tent and all components away from flammable materials.
- Ensure adequate ventilation to prevent heat buildup inside the tent.
- Wear appropriate safety glasses when working with LED grow lights to protect your eyes.
3. Paketearen edukia
Egiaztatu behean zerrendatutako osagai guztiak zure paketean daudela:
- 48"x48"x78" Grow Tent (1)
- 200W LED Grow Light (1)
- 6" Inline Fan (1)
- 6" Carbon Filter (1)
- 6" x 25' Ducting (1)
- 5 Gallon Plant Bags (5)
- Ducting Repair Adhesive Tape (1)
- Hygrometer Thermometer (1)
- Mechanical Timer (1)
- 3' x 3' Elastic Trellis Netting (1)
- Grow Room Glasses (1)
- Metal Poles and Connectors for Tent Frame
- Zoruko erretilu kendugarria
- Erreminta Poltsa

Image: Essential accessories included in the kit, such as grow bags, ducting, repair tape, hygrometer, timer, trellis netting, and grow room glasses.
4. Konfiguratzeko argibideak
4.1. Hazkuntza-denda muntatzea
- Markoa muntatu: Connect the metal poles using the solid metal corner connectors. Depress the tab on the pole while inserting it into the connector to lock it securely in place. The frame is designed for tool-free assembly.
- Drape the Canvas: Carefully drape the heavy-duty oxford canvas over the assembled metal frame. Ensure the zippers are aligned correctly for easy access.
- Install Floor Tray: Place the removable waterproof floor tray inside the tent. Secure it to the frame using the provided security straps to prevent spills.

Image: Illustration of the all-metal construction and tool-free assembly process for the grow tent frame.

Image: Demonstrates the removable floor tray, its easy setup, secure straps, and cleaning process.
4.2. LED hazkuntza-argien instalazioa
- Zintzilikatu argia: Use the provided hanging kit to suspend the LED grow light from the top bars of the tent frame. Adjust the height according to your plant's growth stage and light requirements.
- Konektatu energia: Plug the LED grow light into a suitable power outlet. Ensure the power cord is routed safely and not pinched.

Image: Close-up of the LED grow light featuring CREE COB technology, highlighting its brightness and efficiency.

Image: The LED grow light with two integrated cooling fans and an aluminum heat-sink for thermal management.
4.3. Aireztapen Sistemaren Konfigurazioa
- Assemble Fan and Filter: Connect the 6" inline fan to the 6" carbon filter. The fan can be mounted inside or outside the tent.
- Lotu hodiak: Connect the 6" ducting to both ends of the fan/filter assembly. Use ducting repair adhesive tape to secure connections and prevent air leaks.
- Route Ducting: Route the ducting through the dual sleeve duct ports of the grow tent. These ports minimize light seepage and are adjustable for 4", 6", or 8" ducting.
- Mount System: Hang the assembled fan and filter system from the tent's support bars using appropriate hangers.
- Abiadura-kontrolagailua konektatu: Plug the inline fan into the variable speed controller, then plug the controller into a power outlet.
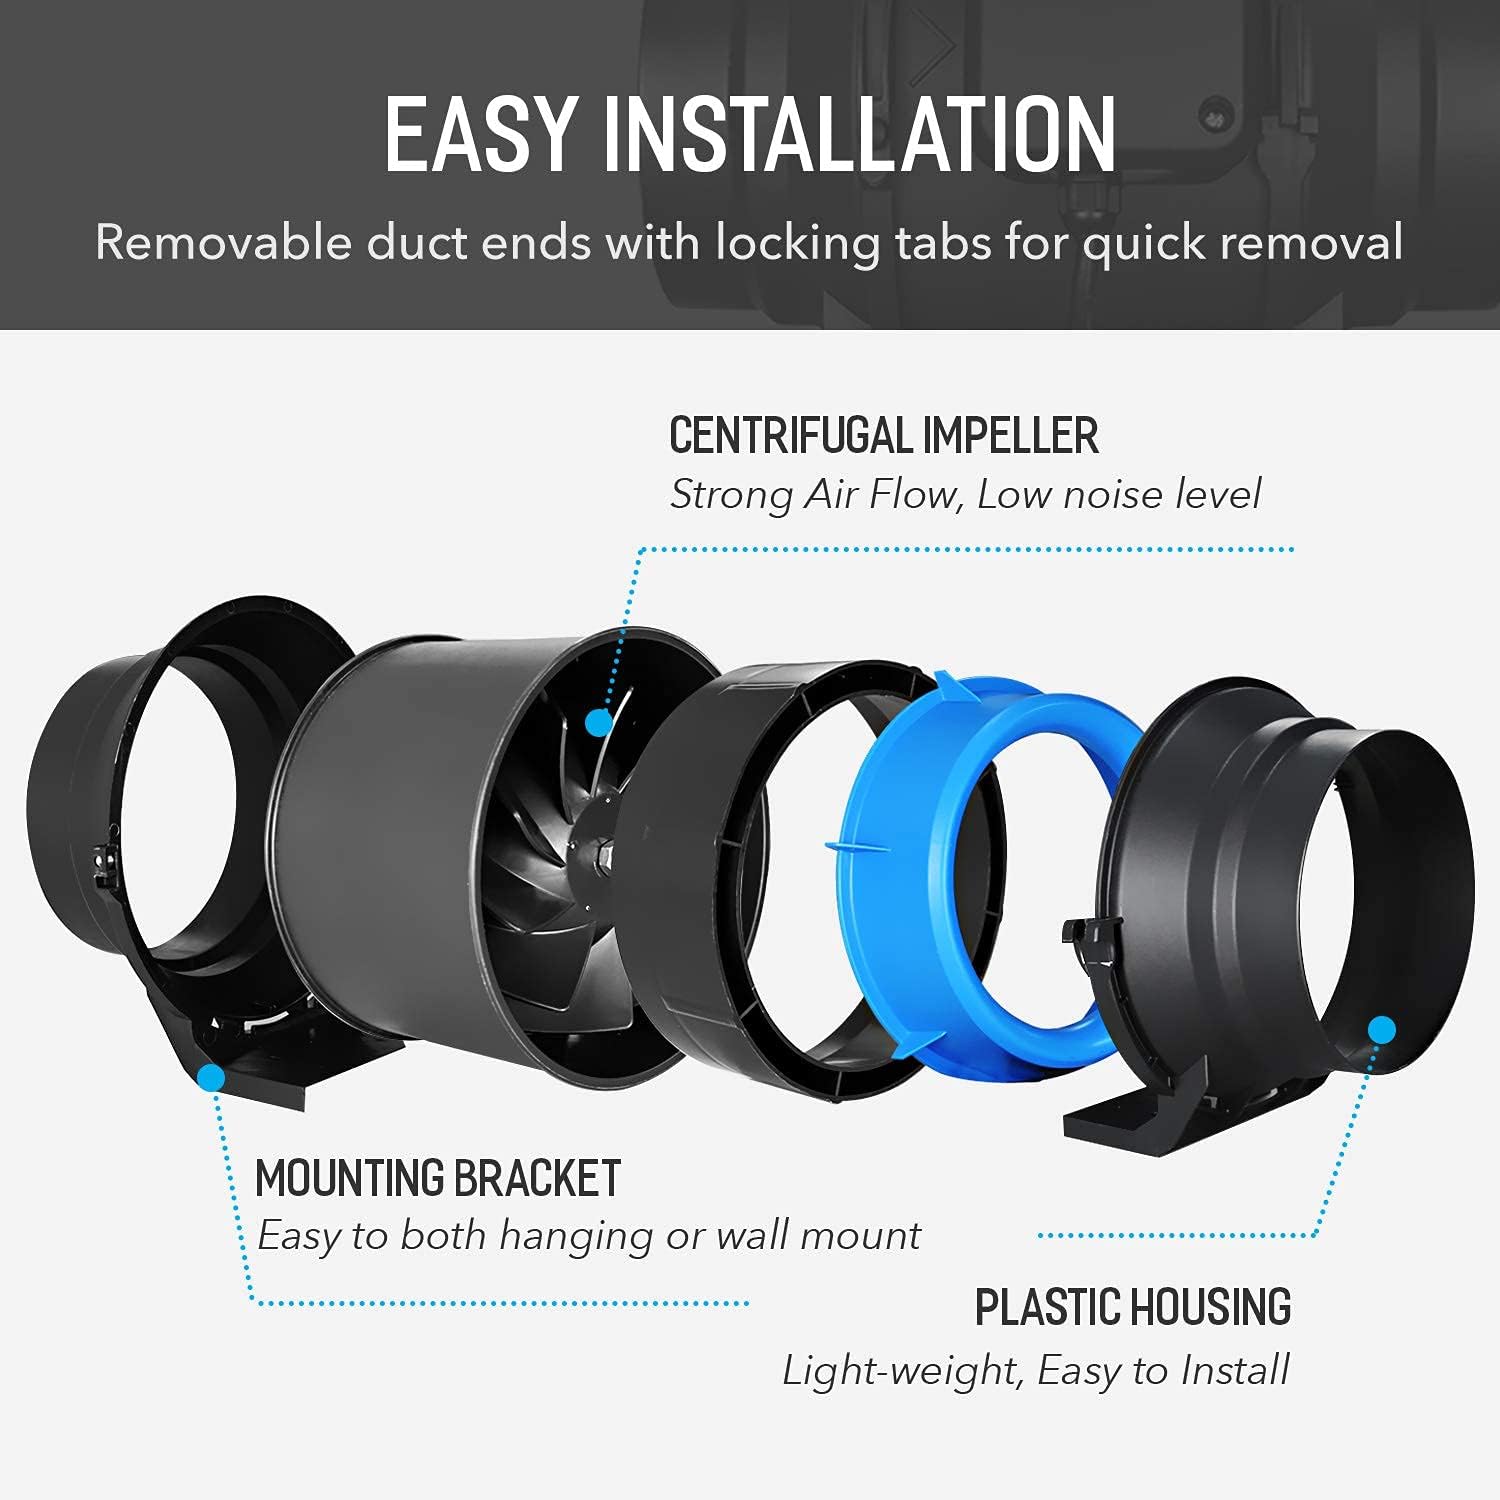
Irudia: Lehertua view of the inline fan, showing its centrifugal impeller, mounting bracket, and plastic housing for easy installation.

Image: Cross-section of the carbon filter, illustrating its internal structure with a pre-filter, charcoal bed, and mesh layers for odor removal.

Image: Diagram illustrating the airflow path through the carbon filter, inline fan, and ducting for effective grow tent ventilation.
4.4. Osagarrien kokapena
- Hygrometer Thermometer: Place the hygrometer thermometer inside the tent to monitor temperature and humidity levels.
- Mechanical Timer: Use the mechanical timer to automate the on/off cycles for your LED grow light.
- Sare-sarea: Install the 3'x3' elastic trellis netting as needed to support plants and manage canopy growth.

Irudia: Ohiaample setup of the iPower grow tent kit, showing plants, the LED light, and the ventilation system in operation.
5. Funtzionamendu-argibideak
5.1. LED hazkuntza-argiaren funtzionamendua
The LED grow light features two switches for different growth stages:
- VEG Switch: Controls the 2 COB lamp beads, suitable for the vegetative growth phase.
- BLOOM Switch: Controls the 58 small lamp beads, ideal for the flowering phase.
- VEG + BLOOM: When both switches are turned on, all lamp beads illuminate, providing maximum light power for intense growth.

Image: Diagram showing the VEG and BLOOM switches on the LED grow light and their respective light outputs.
5.2. Aireztapen Sistemaren Funtzionamendua
The inline fan's speed can be adjusted using the variable speed controller:
- Turn the dial to select between Off, Low, Medium, and High fan speeds.
- Adjust the fan speed as needed to maintain optimal temperature and humidity levels within the grow tent.

Image: The variable speed controller for the inline fan, showing its Off, High, Medium, and Low settings.
6. Mantentzea
6.1. Hazkuntza-denda garbitzea
- The removable floor tray can be easily taken out and cleaned with water and mild soap.
- Wipe down the interior and exterior of the tent canvas with a damp cloth as needed. Avoid harsh chemicals that could damage the material.
6.2. Karbono-iragazkiaren mantentze-lanak
- The pre-filter should be cleaned or replaced regularly to maintain optimal airflow and odor filtration.
- The carbon bed has a limited lifespan. Replace the carbon filter when you notice a decrease in odor control effectiveness.
6.3. LED Grow Light Cleaning
- Ensure the light is unplugged and cool before cleaning.
- Gently wipe the LED surface and cooling fins with a dry, soft cloth to remove dust and debris.
7. Arazoak
- Argia ez pizten: Check power connections, ensure the light is plugged in, and verify that the VEG/BLOOM switches are in the 'ON' position. Check the mechanical timer settings.
- Haizagailua ez dabil: Ensure the fan is plugged into the speed controller and the controller is plugged into a power outlet. Check the speed controller setting.
- Poor Airflow/Odor Control: Check for blockages in the ducting. Ensure the carbon filter is correctly installed and not past its effective lifespan. Clean or replace the pre-filter.
- Excessive Heat/Humidity: Increase fan speed, ensure all ventilation ports are open, and consider adjusting the LED light's height.
8. Zehaztapenak
| Osagaia | Zehaztapena |
|---|---|
| Hazkuntza-denda neurriak | 48"L x 48"Z x 78"A |
| Markoaren materiala | Metala |
| Kanpoko Materiala | Oxford Canvas |
| LED Grow Light Power | 200W |
| LED Spectrum | Full Spectrum (COB, 630nm, 12000k, 3500k, IR, UV, 460nm) |
| Lerroko haizagailuaren tamaina | 6 hazbeteko |
| Lerroko haizagailuaren aire-fluxua | 294 CFM |
| Inline Fan Speed | 2450 RPM |
| Lerroko haizagailuaren zarata-maila | < 35 dB |
| Inline Fan Input Power | 50 W |
| liburukiatage/Maiztasuna | 110V/60Hz |
| Ducting Length | 25 ft (fully extended) |
| Elementuaren pisua | 62.9 kilo |

Image: Detailed technical specifications for the 6-inch inline fan.

Image: Breakdown of the full spectrum LED configuration, including COB, 630nm, 12000k, 3500k, IR, UV, and 460nm diodes.
9. Bermearen informazioa
iPower products typically come with a manufacturer's warranty. Please refer to the warranty card included with your product or visit the official iPower webwebgunean bermearen baldintza zehatzak ikusteko. Gorde erosketa-agiria erosketaren frogagiri gisa bermearen erreklamazioetarako.
10. Bezeroarentzako arreta
For technical assistance, troubleshooting, or replacement parts, please contact iPower customer support. You can typically find contact information on the iPower webgunearen bidez edo produktua erosi duzun dendariaren bidez.
Sareko baliabideak: Bisitatu iPower Store on Amazon produktuari buruzko informazio eta laguntza gehigarria lortzeko.


