1. Sarrera
1.1 Gehiagoview
This manual provides detailed instructions for the safe and effective use of the Uni-T UT50A Digital Multimeter. The UT50A is a portable, battery-powered instrument designed for measuring DC/AC voltage, DC/AC current, resistance, capacitance, frequency, diode, and continuity. It features a large LCD display with backlight for easy reading.
1.2 Segurtasun informazioa
To ensure safe operation, please read and understand all instructions and warnings before using the multimeter. Failure to observe safety precautions may result in electric shock, fire, or damage to the meter. Always adhere to local and national safety codes.
- Ez aplikatu voltage edo neurgailuarentzat zehaztutako gehienezko mugak gainditzen dituen korrontea.
- Kontuz ibili voltag30V AC RMS, 42V peak edo 60V DC-tik gorakoak. Bolumen hauektagshock arriskua dakar.
- Ziurtatu proba-kableak egoera onean daudela, isolamendu kalteturik gabe.
- Deskonektatu beti zirkuituaren korrontea eta deskargatu bolumen handiko karga guztiak.tage capacitors before making resistance, continuity, or diode measurements.
- Ez erabili neurgailua hondatuta dagoela dirudienez edo bateriaren estalkia behar bezala itxita ez badago.
- Irakurketa zehatzak bermatzeko, aldatu bateria bateria baxuaren adierazlea agertzen den bezain laster.
2. Produktuaren ezaugarriak
The Uni-T UT50A Digital Multimeter offers a range of features for various electrical measurements:
- Large LCD display with backlight for clear visibility.
- Auto-ranging and manual ranging capabilities.
- Data Hold function to freeze displayed readings.
- Overload protection on all ranges.
- Bateria baxuaren adierazlea.
- Eskurik gabe erabiltzeko euskarri integratua.
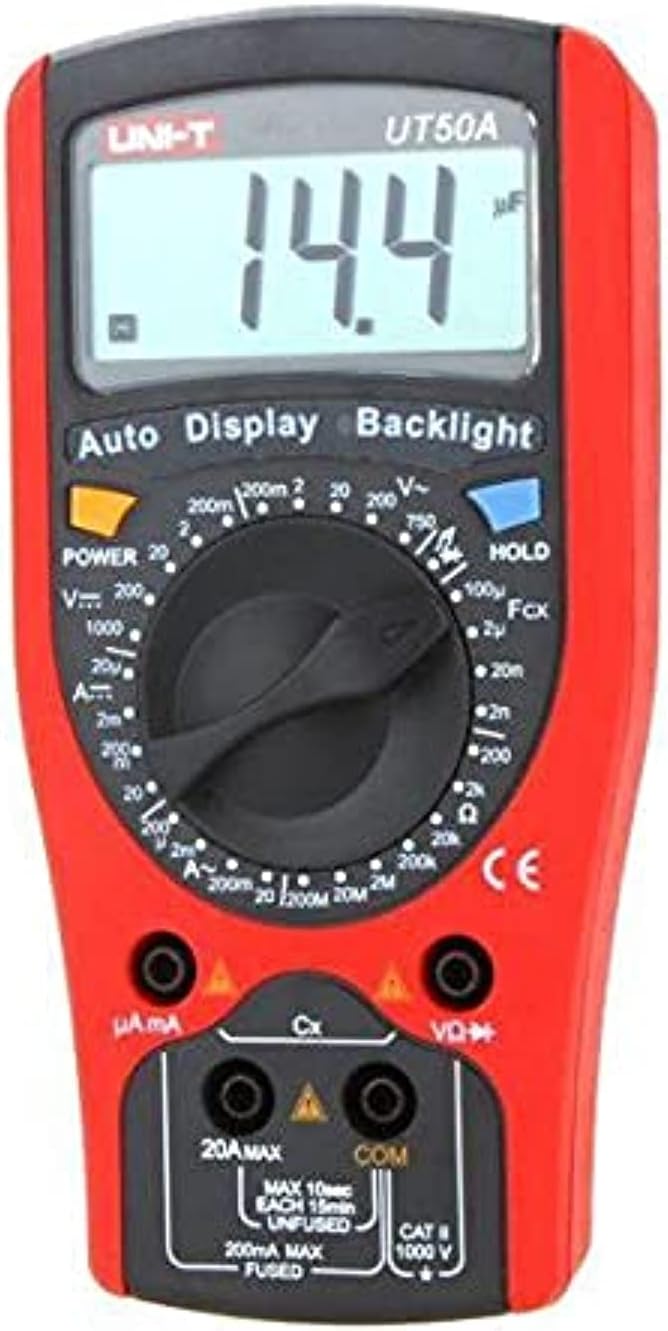
2.1. irudia: Aurrealdea view of the Uni-T UT50A Digital Multimeter, showing the LCD display, rotary switch, and input jacks.
3. Konfigurazioa
3.1 Bateriaren instalazioa
The UT50A requires a 9V battery for operation. To install or replace the battery:
- Ziurtatu multimetroa itzalita dagoela eta proba-kable guztiak deskonektatuta daudela.
- Bilatu bateriaren konpartimentua neurgailuaren atzealdean.
- Kendu eusteko torlojua(k) eta kendu bateriaren estalkia.
- Sartu 9V-ko bateria berri bat, polaritate zuzena errespetatuz (+ eta -).
- Jarri bateriaren estalkia berriro eta finkatu torloju(ekin).
3.2 Proba-kablearen konexioa
Neurketa zehatzak eta seguruak egiteko, ezinbestekoa da proba-kableen konexio egokia.
- Connect the black test lead to the 'COM' (Common) input jack.
- Liburukirakotage, resistance, capacitance, frequency, diode, and continuity measurements, connect the red test lead to the 'VΩK+' input jack.
- For current measurements (mA/μA), connect the red test lead to the 'μA mA' input jack.
- For high current measurements (up to 20A), connect the red test lead to the '20A MAX' input jack.

Image 3.1: Uni-T UT50A Digital Multimeter showing the input jacks and connected test leads.
4. Funtzionamendu-argibideak
The rotary switch is used to select the desired measurement function. Ensure the test leads are connected to the correct input jacks for the selected function.

4.1 irudia: Gertuko planoa view of the Uni-T UT50A rotary function switch.
4.1 Funtzio hautaketa
Turn the rotary switch to the desired measurement function. The display will show the appropriate unit or symbol.
4.2 DC Voltage Measurement (VK)
- Connect the black lead to 'COM' and the red lead to 'VΩK+'.
- Turn the rotary switch to the 'VK' range. Select an appropriate range if not in auto-ranging mode.
- Konektatu proba-kableak zirkuitu edo probatu beharreko osagaiarekin paraleloan.
- Irakurri liburukiatagLCDaren balioa.
4.3 AC Voltage Neurketa (V∼)
- Connect the black lead to 'COM' and the red lead to 'VΩK+'.
- Turn the rotary switch to the 'V∼' range. Select an appropriate range if not in auto-ranging mode.
- Connect the test leads in parallel to the AC circuit or component.
- Irakurri liburukiatagLCDaren balioa.
4.4 DC Current Measurement (AK)
- Garrantzitsua: Disconnect power to the circuit before connecting the meter in series.
- For mA/μA measurements, connect the red lead to 'μA mA'. For 20A measurements, connect the red lead to '20A MAX'. Black lead to 'COM'.
- Turn the rotary switch to the appropriate 'AK' range (e.g., 200mA, 20A).
- Konektatu neurgailua zirkuituarekin seriean.
- Jarri korrontea zirkuituan eta irakurri korrontearen balioa.
4.5 Korronte alternoaren neurketa (A∼)
- Garrantzitsua: Disconnect power to the circuit before connecting the meter in series.
- For mA/μA measurements, connect the red lead to 'μA mA'. For 20A measurements, connect the red lead to '20A MAX'. Black lead to 'COM'.
- Turn the rotary switch to the appropriate 'A∼' range (e.g., 200mA, 20A).
- Konektatu neurgailua zirkuituarekin seriean.
- Jarri korrontea zirkuituan eta irakurri korrontearen balioa.
4.6 Erresistentziaren neurketa (Ω)
- Ziurtatu zirkuitua deskonektatuta dagoela eta kondentsadore guztiak deskargatuta daudela.
- Connect the black lead to 'COM' and the red lead to 'VΩK+'.
- Turn the rotary switch to the 'Ω' range.
- Konektatu proba-kableak neurtu beharreko osagaira.
- Irakurri erresistentziaren balioa LCD pantailan.
4.7 Kapazitantziaren neurketa (F)
- Ziurtatu kondentsadorea guztiz deskargatuta dagoela neurketa egin aurretik.
- Connect the black lead to 'COM' and the red lead to 'VΩK+'.
- Turn the rotary switch to the 'F' (Capacitance) range.
- Konektatu proba-kableak kondentsadorearen artean.
- Irakurri kapazitate-balioa LCD pantailan.
4.8 Diodoen proba (→|)
- Ziurtatu zirkuitua desenergizatuta dagoela.
- Connect the black lead to 'COM' and the red lead to 'VΩK+'.
- Turn the rotary switch to the '→|' (Diode) range.
- Konektatu kable gorria diodoaren anodora eta kable beltza katodora.
- Pantailak aurrerako bolumena erakutsiko dutage drop. Reverse the leads; the display should show 'OL' (Open Loop) for a good diode.
4.9 Continuity Test (♫)
- Ziurtatu zirkuitua desenergizatuta dagoela.
- Connect the black lead to 'COM' and the red lead to 'VΩK+'.
- Turn the rotary switch to the '♫' (Continuity) range.
- Connect the test leads across the component or wire.
- Erresistentzia 50Ω gutxi gorabehera baino txikiagoa bada, txisteak joko du jarraitutasuna adieraziz.
4.10 Maiztasunaren neurketa (Hz)
- Connect the black lead to 'COM' and the red lead to 'VΩK+'.
- Turn the rotary switch to the 'Hz' (Frequency) range.
- Connect the test leads in parallel to the signal source.
- Read the frequency value on the LCD.
4.11 Datuak gordetzeko funtzioa
Sakatu 'HOLD' botoia pantailan uneko irakurketa izozteko. Sakatu berriro eusteko funtzioa askatzeko.
4.12 Atzeko argiztapen funtzioa
Press the 'Backlight' button to turn on the display backlight for better visibility in low-light conditions. Press it again to turn off the backlight.
5. Mantentzea
5.1 Garbiketa
Garbitu neurgailua casiniragarkiarekin gamp cloth and a mild detergent. Do not use abrasives or solvents. Ensure the meter is dry before use.
5.2 Bateria ordezkatzea
Refer to Section 3.1 for detailed instructions on battery replacement. Replace the 9V battery when the low battery indicator appears on the display.
5.3 Fusiblearen ordezkapena
If the current measurement function fails, the fuse may need replacement. This procedure should only be performed by qualified personnel.
- Ziurtatu multimetroa itzalita dagoela eta proba-kable guztiak deskonektatuta daudela.
- Ireki bateriaren konpartimentua 3.1 atalean azaltzen den bezala.
- Kontu handiz kendu fusible zaharra.
- Replace with a fuse of the exact same type and rating (e.g., F 200mA/250V for mA/μA range, F 20A/250V for 20A range). Refer to the meter's specifications for correct fuse ratings.
- Securely close the battery/fuse compartment.
6. Arazoak
- Ez dago pantailarik edo pantaila ahula: Check battery charge. Replace the 9V battery if low.
- Irakurketa okerrak: Ensure test leads are correctly connected to the appropriate input jacks and the rotary switch is set to the correct function and range. Check battery charge.
- Korrontearen neurketak ez du funtzionatzen: Check the fuse. Refer to Section 5.3 for fuse replacement.
- 'OL' (Gainezka) bistaratzen da: The measured value exceeds the selected range. Select a higher range or ensure the circuit is within the meter's capabilities.
7. Zehaztapenak
| Zehaztapena | Xehetasuna |
|---|---|
| Fabrikatzailea | Uni-T |
| Eredua | UT50A |
| Neurketa Mota | Multimetro digitala |
| Energia iturri mota | Bateriaren bidez |
| Beharrezko bateriak | Yes (9V) |
| Elementuaren pisua | 11 g |
| Paketearen neurriak | 7 x 6 x 5 cm |
| Kolorea | Anitza |
| Estiloa | Digitala |
8. Bermea eta Laguntza
For warranty information and technical support, please refer to the documentation included with your purchase or contact Uni-T customer service directly. Keep your purchase receipt as proof of purchase for warranty claims.