
OMTech USB7B47 OMTCA
OMTech 70W CO2 Laser Engraver and Cutter User Manual
Model: USB7B47 OMTCA
1. Sarrera
Thank you for choosing the OMTech 70W CO2 Laser Engraver and Cutter. This manual provides essential information for the safe and efficient operation, setup, and maintenance of your new laser machine. Please read this manual thoroughly before operating the device to ensure proper usage and to prevent damage or injury.
This laser engraver is designed for precision engraving and cutting of various materials, featuring a 400x750 mm (16x30 inch) workbed, autofocus capability, and Ruida controls. It is compatible with LightBurn software and supports Windows, Mac OSX, and Linux operating systems, making it suitable for a wide range of home DIY and professional applications.

Figure 1.1: The OMTech 70W CO2 Laser Engraver and Cutter, showcasing its design and the LightBurn software logo.
2. Segurtasun informazioa
Operating a laser engraver involves inherent risks. Adhere to all safety guidelines to prevent injury or damage to the equipment. This device is a Laser Class 2 product with 0.827 mW output power.
2.1 Segurtasun-neurri orokorrak
- Always wear appropriate laser safety glasses when the laser is in operation.
- Ensure proper ventilation to remove fumes and smoke generated during engraving/cutting.
- Ez utzi inoiz makina arretarik gabe funtzionatzen ari den bitartean.
- Su-itzalgailu bat gertu eduki eta nola erabili jakin.
- Do not engrave or cut materials that produce toxic fumes or are highly flammable.
- Ziurtatu makina behar bezala lurrarekin lotuta dagoela.
- Mantendu eskuak eta arropa solteak pieza mugikorretatik urrun.
- Deskonektatu korrontea mantentze-lan edo garbiketa egin aurretik.
2.2 Larrialdi geldialdia
Locate the emergency stop button on the control panel. In case of any emergency, press this button immediately to halt all machine operations.
3. Produktua amaitu daview & Osagaiak
The OMTech 70W CO2 Laser Engraver is equipped with several key features for optimal performance and user convenience.

Figure 3.1: Key features of the OMTech 70W CO2 Laser Engraver, including engraving area, laser tube power, autofocus, and auto-lift platform.
3.1 Osagai nagusiak
- 70W CO2 Laser Tube: The core component for engraving and cutting.
- Autofokatze sistema: Automatically adjusts the laser focus for different material thicknesses.
- Electric Lift Workbed: Allows for easy adjustment of the working distance.
- Ruida Control Panel: Intuitive interface for machine operation and settings.
- 16" x 30" (400x750 mm) Engraving Area: Ematen du ample space for various projects.
- Debris Collection System: Helps manage waste materials.
- 4-Way Pass-Through Doors: Enables processing of larger materials.
- Transparent Acrylic Glass Cover: Segurtasunerako viewing of the engraving process.

Figure 3.2: Visual breakdown of the OMTech laser engraver's key components, including the work bed, debris collection, laser tube, control panel, autofocus, and pass-through.
4. Konfigurazio gida
Follow these steps for the initial setup of your OMTech laser engraver.
4.1 Desontziratzea eta kokatzea
- Carefully remove the machine from its packaging. It is recommended to have at least two people for this process due to the machine's weight (approximately 114 kg).
- Jarri grabatzailea gainazal egonkor eta lau batean, ondo aireztatutako leku batean, material sukoietatik urrun.
- Ensure there is sufficient space around the machine for operation and maintenance, especially for the 4-way pass-through doors.
4.2 Periferikoak konektatzea
- Connect the exhaust fan system to the machine and vent it outdoors or to a suitable filtration system.
- Connect the water chiller (not included, but essential for laser tube cooling) to the laser tube's inlet and outlet ports. Ensure the chiller is filled with distilled water.
- Connect the power cable to a grounded electrical outlet.
- Connect the machine to your computer via USB or Ethernet cable.
5. Funtzionamendu-argibideak
This section details the basic operation of your laser engraver.
5.1 Powering On and Initial Checks
- Ensure the water chiller is running and circulating water through the laser tube.
- Turn on the main power switch on the machine.
- The Ruida control panel will power on.
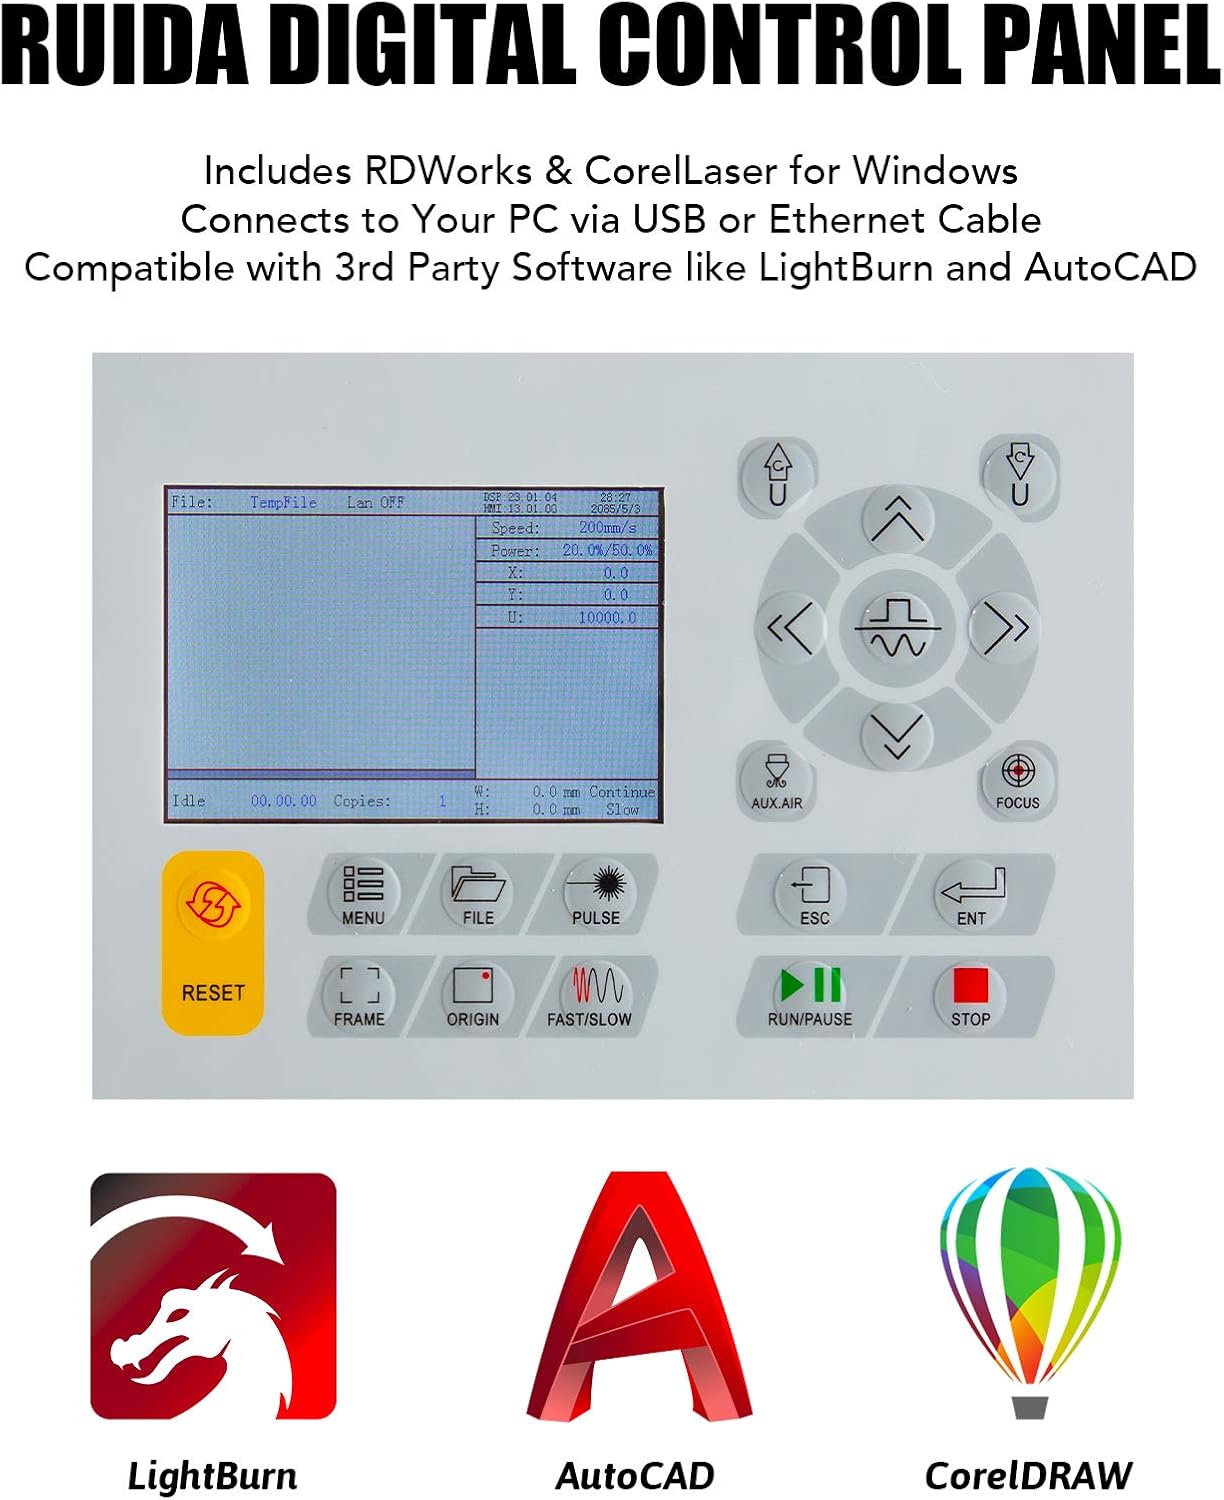
Figure 5.1: The Ruida Digital Control Panel, showing its display and various function buttons.
5.2 Loading Material and Focusing
- Place your material onto the workbed.
- Use the electric lift workbed controls on the Ruida panel to adjust the bed height.
- Utilize the autofocus function by pressing the dedicated button on the control panel. The machine will automatically adjust the laser head to the correct focal distance for your material.

5.2. irudia: hurbileko planoa view of the autofocus mechanism, which automatically corrects focus at the touch of a button.
5.3 Starting a Job
- Prepare your design in LightBurn or other compatible software (see Section 6).
- Send the job to the laser engraver.
- On the Ruida panel, select the job and press "Start" or "Run/Pause".
- Monitor the engraving/cutting process closely.
6. Softwarea eta konektibitatea
Your OMTech laser engraver is designed for seamless integration with various software platforms.
6.1 Sistema bateragarriak
The machine is compatible with:
- Windows sistema eragileak
- Mac OSX operating systems
- Linux operating systems

Figure 6.1: Visual representation of the laser engraver's compatibility with Windows, Linux, and Mac OS.
6.2 Gomendatutako softwarea
- LightBurn: Highly recommended software for laser engraving and cutting, offering powerful design and control features.
- RDWorks: Included software for Windows users.
- CorelLaser: Included software for Windows users, compatible with CorelDRAW.
- Hirugarrenen softwarea: Compatible with other software like AutoCAD.
For detailed instructions on software installation and usage, please refer to the respective software manuals or online resources.
7. Mantentze-lanak eta zainketa
Mantentze-lan erregularrak zure laser grabagailuaren iraupena eta errendimendu optimoa bermatzen ditu.
7.1 Eguneko mantentze-lanak
- Clean the workbed and debris collection system after each use.
- Inspect the laser lens and mirrors for dust or debris. Clean gently with a lens cleaning solution and cotton swab if necessary.
- Check the water level and temperature in the chiller.
7.2 Weekly/Monthly Maintenance
- Clean and lubricate the guide rails and bearings to ensure smooth movement of the laser head.
- Inspect the laser tube for any signs of damage or degradation.
- Replace the water in the chiller with fresh distilled water.

Figure 7.1: Close-up of the 70W CO2 laser tube, which produces stable beams over its long service life.
8. Arazoak
Atal honek aurki ditzakezun arazo ohikoenak eta haien irtenbide posibleak jorratzen ditu.
| Arazoa | Kausa posiblea | Irtenbidea |
|---|---|---|
| Laserrak ez du jaurtitzen | No water flow from chiller, chiller error, laser tube issue, power supply issue. | Check chiller connection and water level. Verify laser power supply. Contact support if tube is faulty. |
| Grabaketa/ebaketa kalitate eskasa | Incorrect focus, dirty lens/mirrors, wrong power/speed settings, material issues. | Perform autofocus. Clean optics. Adjust power/speed settings in software. Ensure material is suitable. |
| Makina ez da ordenagailura konektatzen | Loose USB/Ethernet cable, driver issues, software settings. | Check cable connections. Reinstall drivers. Verify software communication settings. |
| Workbed not moving | Motor issue, control panel issue, obstruction. | Check for obstructions. Restart machine. If problem persists, contact support. |
9. Zehaztapen Teknikoak
| Zehaztapena | Xehetasuna |
|---|---|
| Modelo zenbakia | USB7B47 OMTCA |
| Laser mota | CO2 laserra |
| Laser Potentzia | 70W |
| Laser Klasea | Class 2 (0.827 mW output power) |
| Grabatu Eremua | 400 x 750 mm (16 x 30 hazbeteko) |
| Workbed Type | Electric Lift Workbed (Dual Honeycomb & Knife Blade Platforms) |
| Kontrol Sistema | Ruida Controls |
| Software bateragarria | LightBurn, RDWorks, CorelLaser, AutoCAD |
| OS bateragarria | Windows, Mac OSX, Linux |
| Produktuaren neurriak | 125.98 x 91.95 x 87.12 cm (49.6 x 36.2 x 34.3 hazbete) |
| Elementuaren pisua | 113.99 kg (251.3 lb) |
| Materiala | LCD (likely referring to the control panel display) |

Figure 9.1: The spacious 16" x 30" engraving area, providing over 3.3 square feet for projects.
10. Bermea eta laguntza
For warranty information and technical support, please refer to the official OMTech website or contact their customer service directly. Keep your purchase receipt and model number (USB7B47 OMTCA) handy for any inquiries.
You can visit the OMTech Store for more information: OMTech Official Store
Ask a question about this manual
Ask about setup, troubleshooting, compatibility, parts, safety, or missing instructions. Manuals+ will review the question and use this page’s manual context to help answer it.