1. Sarrera
This manual provides essential instructions for the safe and effective operation of your CREWORKS 15"x15" 5-in-1 Heat Press Machine. This versatile machine is designed for heat transfer applications on various items, including T-shirts, caps, mugs, and plates, utilizing its interchangeable attachments. Please read this manual thoroughly before initial use and retain it for future reference.

Figure 1: CREWORKS 5-in-1 Heat Press Machine with various attachments for T-shirts, mugs, caps, and plates.
2. Segurtasun-argibideak
Your safety is paramount. Observe all warnings and instructions to prevent injury or damage to the machine. This product contains chemicals known to the State of California to cause cancer and birth defects or other reproductive harm (Proposition 65 warning).
- Erabili beti makina gainazal egonkor eta beroarekiko erresistente batean.
- Keep hands clear of the heating platen during operation. The platen reaches high temperatures.
- Utilize the 360-degree swing-away feature to move the heating element away from the working area when loading or unloading items, minimizing burn risk.
- Lan-eremuan aireztapen egokia ziurtatu.
- Ez utzi makina zaindu gabe piztuta edo berotzen ari den bitartean.
- Deskonektatu makina entxufetik erabiltzen ez duzunean edo garbitu eta mantentze-lanak egin aurretik.
- Ez murgildu makina edo haren osagai elektrikoak uretan edo beste likido batzuetan.
- Mantendu haurrak eta maskotak makinatik urrun funtzionatzen ari diren bitartean.

Figure 2: The 360-degree swing-away design enhances safety during operation.
3. Produktua amaitu daview eta Osagaiak
Familiarize yourself with the main parts of your heat press machine:
- Heat Platen Handle: Used to raise and lower the heating element.
- Altuera doitzeko botoia: Adjusts the pressure applied by the heating platen.
- LCD Control Box: Digital display for setting and monitoring temperature and time.
- Heat-Resistant Platen Cover: Protects the heating element and ensures even heat distribution.
- Silicone & Foam Pads: Provide a soft, heat-resistant surface for items being pressed.
- Eranskin trukagarriak: Includes flat press (T-shirt), mug press, cap press, and plate presses (8" and 10").

Figure 3: The doubled tube design ensures even heating across the platen.

Figure 4: Heat-resistant casing and pads for safe operation.

Figure 5: Intelligent LCD Control Box for precise temperature and time settings.
4. Konfigurazioa
This section details the assembly of the heat press machine and its various attachments. For a visual guide, please refer to the assembly video below.
Video 1: This video guides users through the assembly process of the CREWORKS Heat Press Machine, demonstrating how to set up the flat press, and install the mug and cap press attachments.
4.1. Installing the Flat Press
- Set up the base by attaching the support brackets using the provided screws and wing nuts.
- Place the lower pad onto the base, aligning the holes, and secure it with the screws and wing nuts.
- Attach the upper heating platen assembly to the main column, ensuring it is securely fastened.
- Connect the control box cable to the designated port on the heating platen assembly.
4.2. Installing the Plate Press
- Remove the upper heating platen assembly by loosening the screws.
- Remove the round plate from the base by unscrewing it.
- Insert the foam pad for the plate press into the base.
- Attach the appropriate plate press attachment (8" or 10") to the main column and secure it.
- Connect the control box cable to the plate press attachment.
4.3. Installing the Mug Press
- Remove the flat press upper and lower pads.
- Attach the mug press heating element to the main column.
- Connect the control box cable to the mug press attachment.
4.4. Installing the Cap Press
- Remove any previously installed attachments.
- Attach the cap press heating element to the main column.
- Connect the control box cable to the cap press attachment.
5. Funtzionamendu-argibideak
This section outlines the general operation of the heat press machine for various applications.
2 bideoa: Bideo honek ikuspegi orokorra eskaintzen duview of the CREWORKS 15x15 inch Heat Press Machine, showcasing its 5-in-1 capabilities for various items like T-shirts, caps, mugs, and plates. It demonstrates the machine's features and ease of use for heat transfer applications.
5.1. Funtzionamendu Orokorra
- Entxufatu makina lurreko hartune elektriko batean.
- Turn on the power switch located on the control box.
- Use the digital control panel to set the desired temperature and time according to your transfer material's specifications. Refer to the image below for typical settings.
- Allow the machine to preheat until it reaches the set temperature.
- Place your item and transfer design onto the appropriate platen.
- Lower the heating platen and apply pressure using the handle. The timer will begin automatically.
- Once the timer expires, lift the heating platen and swing it away (if applicable) to safely remove your item.
Figure 6: The LCD control box with preset modes for different materials.
Typical Preset Modes:
- Silicone Fiber Fabrics: 302°F
- Cotton Clothing: 356°F
- Ceramic Mugs & Plates: 392°F
5.2. T-Shirt (Flat Press) Operation
Use the 15"x15" flat platen for T-shirts, bags, and other flat items.
- Place the T-shirt smoothly onto the lower platen.
- Position your transfer design on the T-shirt.
- Lower the heating platen and press for the recommended time (e.g., 30 seconds at 320-360°F).
- Lift the platen and remove the T-shirt.
5.3. Cap Press Operation
Attach the cap press for custom hats.
- Place the cap onto the curved platen.
- Position your transfer design on the cap.
- Lower the heating element and press for the recommended time (e.g., 40 seconds at 330-350°F).
- Lift the element and remove the cap.
5.4. Mug Press Operation
Use the mug press attachment for custom mugs.
- Insert the mug into the mug press attachment.
- Secure the mug and position your transfer design.
- Close the mug press and apply pressure for the recommended time (e.g., 30 seconds at 330-380°F).
- Open the press and carefully remove the hot mug.
5.5. Plate Press Operation
Utilize the plate press attachments for custom plates.
- Place the plate onto the foam pad in the base.
- Position your transfer design on the plate.
- Lower the heating element and press for the recommended time (e.g., 30 seconds at 330-380°F).
- Lift the element and carefully remove the hot plate.
6. Mantentzea
Mantentze-lan erregularrak zure bero-prensa makinaren iraupena eta errendimendu optimoa bermatzen ditu.
- Garbiketa: After each use, allow the machine to cool completely. Wipe down the heating platen and other surfaces with a soft, damp oihal. Ez erabili garbitzaile edo disolbatzaile urratzailerik.
- Biltegiratzea: Gorde makina leku garbi eta lehor batean, eguzki-argitik eta muturreko tenperaturetatik babestuta.
- Ikuskapena: Aldian-aldian egiaztatu torloju, azkoin eta konexio elektriko guztiak ondo finkatuta daudela ziurtatzeko.
7. Arazoak
If you encounter issues with your heat press machine, consider the following common solutions:
- Makina ez da pizten: Check if the power cord is securely plugged into a working outlet and the machine's power switch is in the 'ON' position.
- Temperature not reaching set point: Ensure the control box cable is firmly connected. Allow sufficient time for preheating.
- Bero-transferentzia irregularra: Verify that the pressure is evenly distributed across the platen. Adjust the height adjustment knob if necessary. Ensure the item is placed flat on the platen.
- LCD pantailako errore kodeak: Refer to the specific error code in the full product manual (if available) or contact customer support.
8. Zehaztapenak

Figure 7: Key specifications of the CREWORKS Heat Press Machine.
| Zehaztapena | Xehetasuna |
|---|---|
| Marka | LANAK |
| Eredua | B099RH2RYN |
| Materiala | Metala, Plastikoa |
| Kolorea | Beltza |
| liburukiatage | 110 Volt |
| Wattage | 1000 watt |
| Platen Eremua | 15" x 15" |
| Max. Tenperatura | 410 °F (210 °C) |
| Tenporizadorearen barrutia | 0-999 segundo |
| Eranskinak | 11 oz. Mug Press, Cap Press, 8" Plate Press, 10" Plate Press |
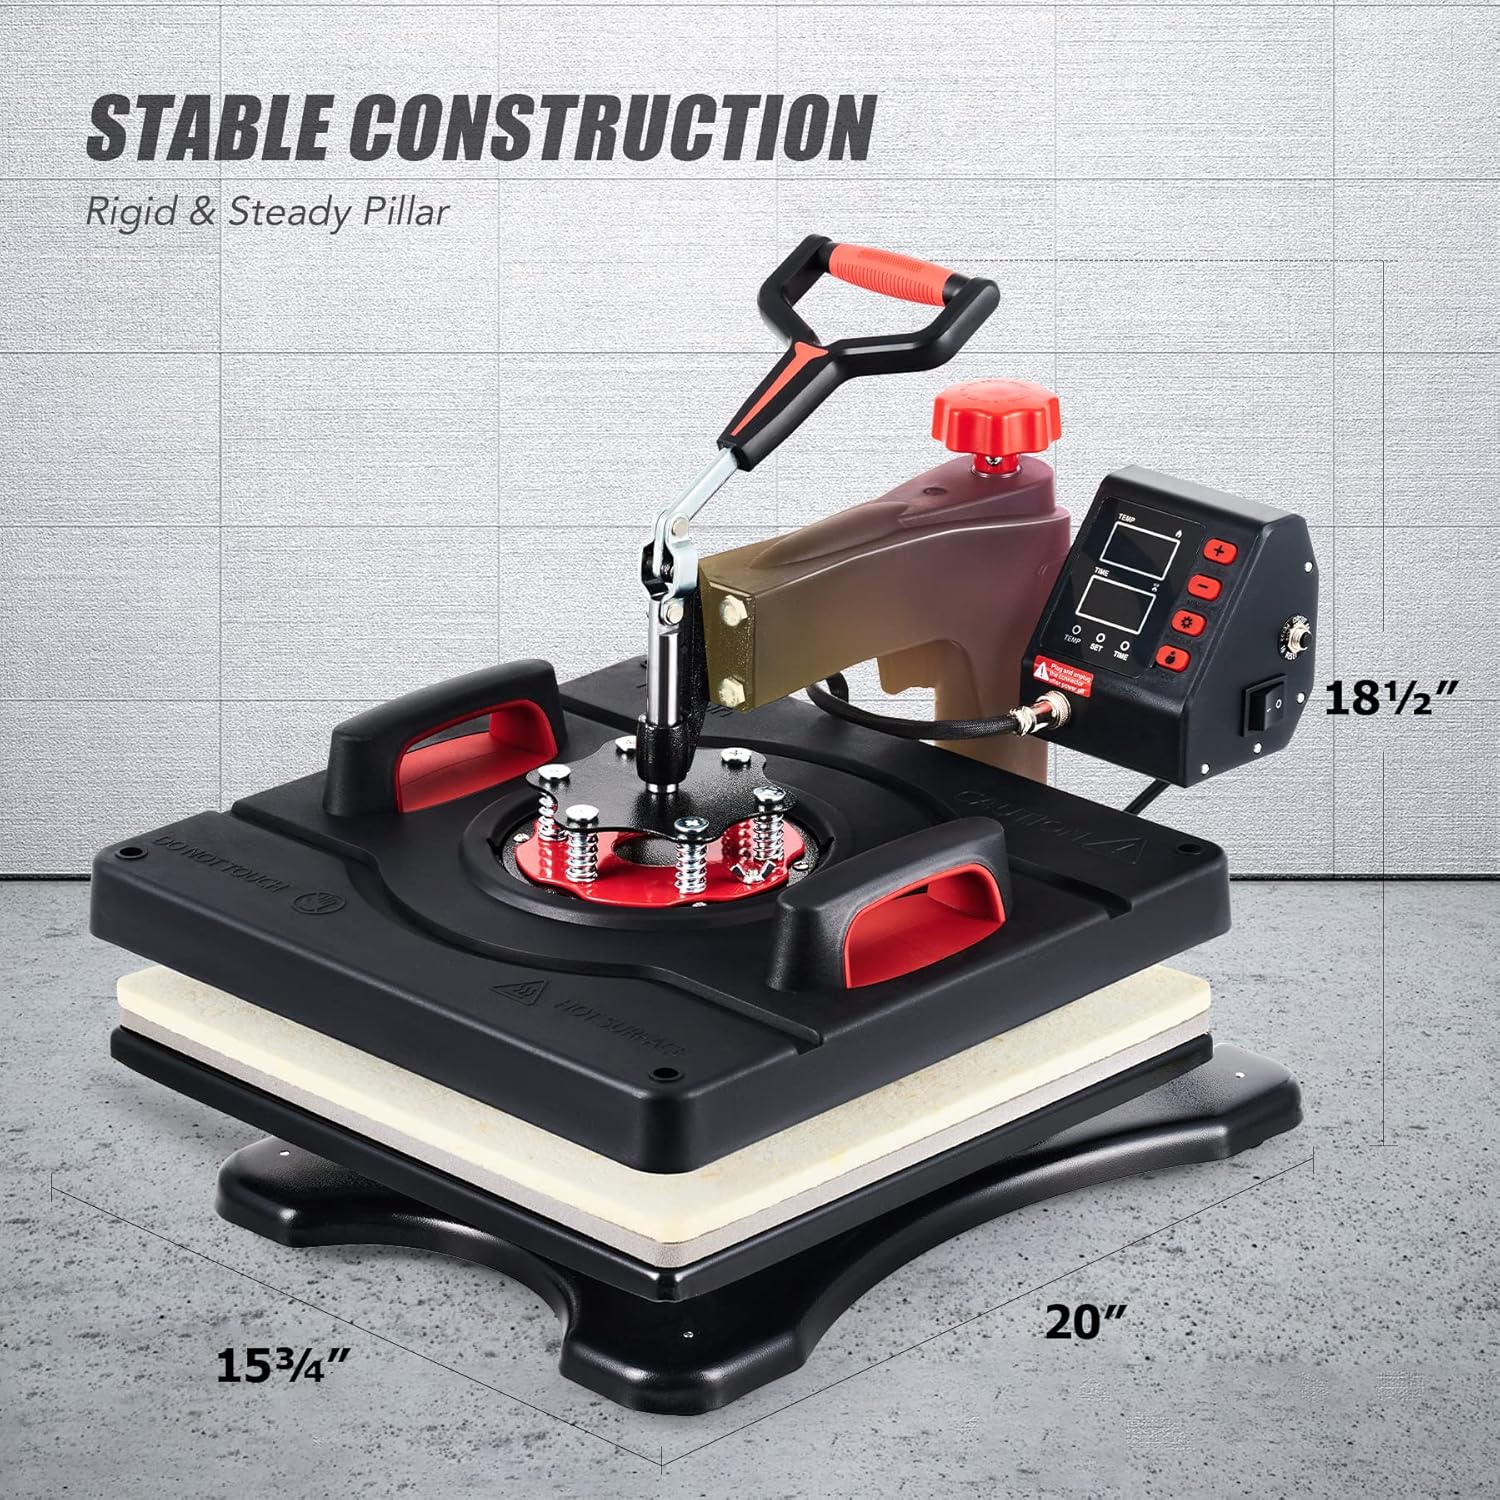
Figure 8: Physical dimensions of the CREWORKS Heat Press Machine.
9. Bermea eta Laguntza
The CREWORKS Heat Press Machine comes with a 6-month warranty. For warranty claims, technical support, or any questions not covered in this manual, please contact CREWORKS customer service. Keep your purchase receipt as proof of purchase for warranty purposes.