
1. Sarrera
This manual provides detailed instructions for the safe and efficient operation of your InFocus P120 INL412 Multimedia Projector (Model INL4128). Please read this manual thoroughly before using the projector and keep it for future reference. This projector is designed for high-quality image projection, suitable for various applications including presentations, home entertainment, and gaming.
2. Segurtasun informazioa
Proiektoreari kalterik ez egiteko eta erabiltzailearen segurtasuna bermatzeko, jarraitu segurtasun neurri hauek:
- Aireztapena: Ziurtatu proiektorearen inguruan aireztapen egokia dagoela. Ez blokeatu aireztapen-irekidurak. Mantendu gutxienez 30 cm-ko (12 hazbeteko) distantzia hormetatik edo beste objektuetatik.
- Energia iturria: Erabili zehaztutako elikatze-iturria eta bolumena soiliktage. Connect the power cord securely.
- Beroa: The projector generates heat during operation. Do not touch the projector's vents or exhaust areas directly after use.
- Argiaren irteera: Ez begiratu zuzenean proiektorearen lenteari l dagoenean.amp piztuta dago, argi biziak begietan kalteak eragin ditzakeelako.
- Lekua: Jarri proiektorea gainazal egonkor eta lau batean. Saihestu eguzki-argitan zuzenean, bero-iturrien ondoan edo hezetasun edo hauts handiko guneetan jartzea.
- Garbiketa: Deskonektatu kablea garbitu aurretik. Erabili zapi leun eta lehor bat. Ez erabili garbitzaile likido edo aerosolik.
- Zerbitzua: Ez saiatu proiektorea zeuk konpontzen. Konponketa guztiak zerbitzu-langile kualifikatuei eskatu.
3. Produktua amaitu daview
3.1 Top Panel and Lens Area
The top panel features the control buttons for basic operation and the lens area with focus and zoom adjustments.

3.1. irudia: Goikoa view of the InFocus P120 INL412 projector, highlighting the control panel on the right and the lens adjustment area on the left. The InFocus logo is visible on the top surface.
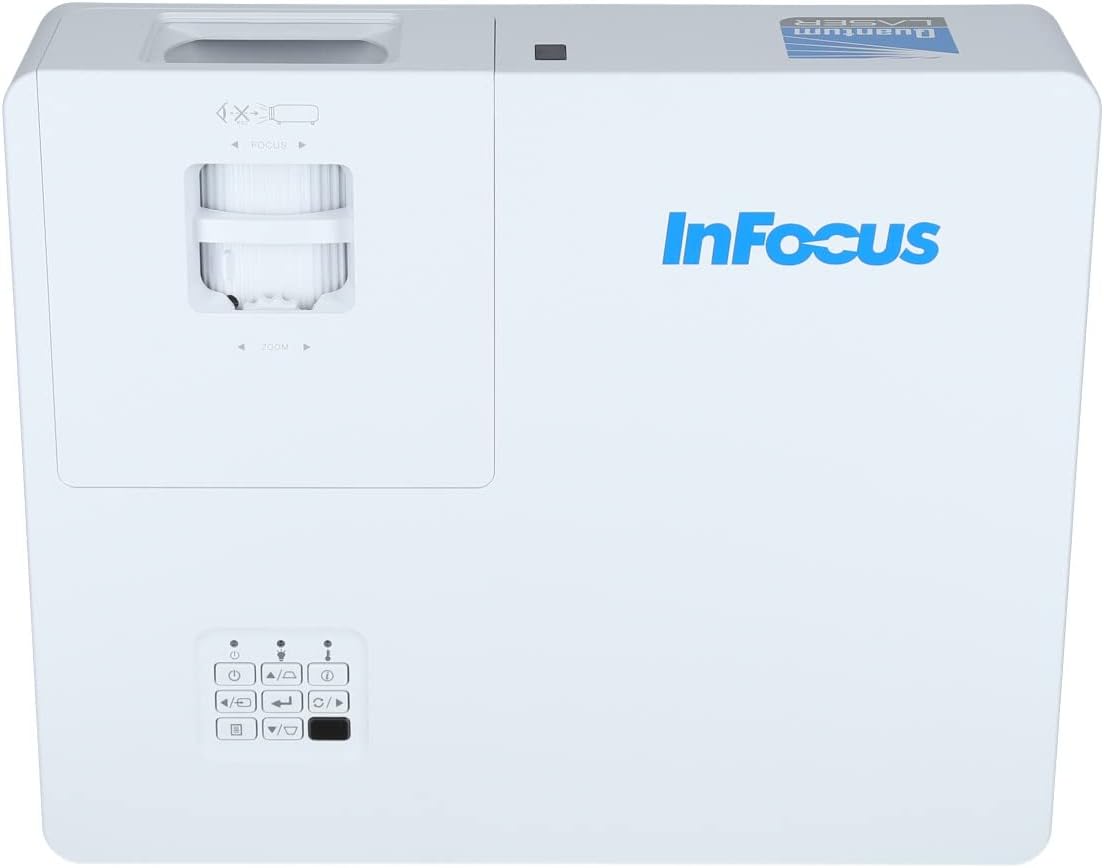
3.2. irudia: Itxigailu bat view of the projector's top panel, showing the focus and zoom rings near the lens opening and the array of control buttons for power, menu, source selection, and navigation.
3.2 Atzeko panelaren konexioak
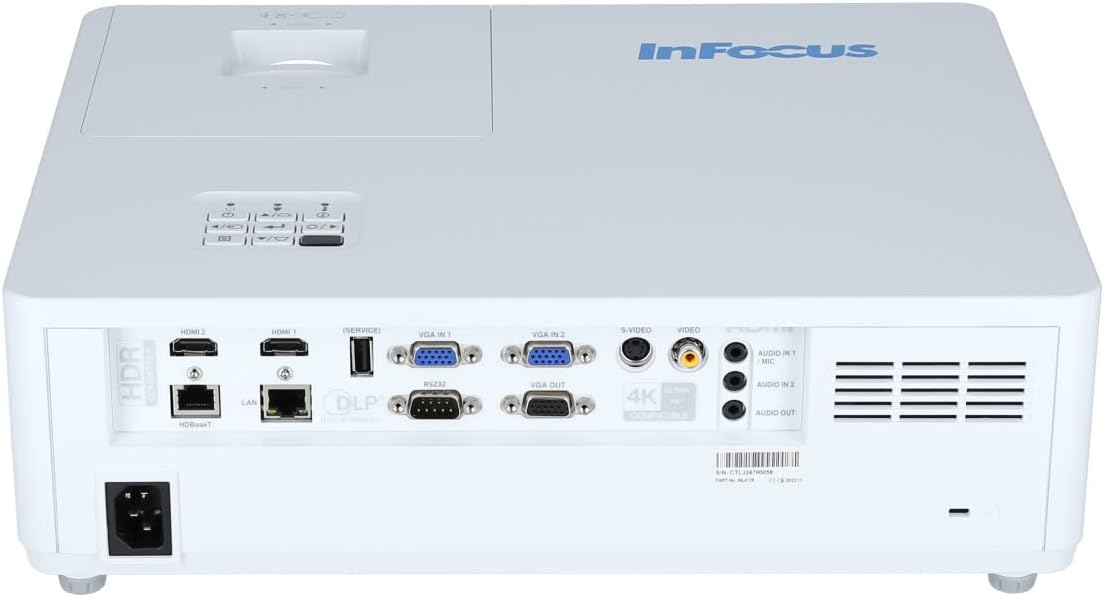
Atzeko panelak kanpoko gailuak konektatzeko hainbat sarrera eta irteera ataka eskaintzen ditu.

Figure 3.3: Rear panel of the InFocus P120 INL412 projector, displaying a comprehensive array of connectivity options including HDMI (x2), USB, S-Video, Ethernet (LAN), VGA In (x2), VGA Out, RS232, and Audio In/Out ports. The power input is located on the bottom left.
Key ports include:
- HDMI 1 eta 2: For connecting high-definition digital video and audio sources.
- USBa: For connecting USB devices, potentially for media playback or firmware updates.
- S-bideoa: For connecting older video sources.
- VGA IN 1 & 2: For connecting computers or other devices with VGA output.
- VGA IRTEERA: Kanpoko monitore batera konektatzeko.
- Ethernet (LAN): Sarearen konexiorako eta kontrolerako.
- Audio IN 1 & 2 / Audio OUT: Audio konexio analogikoetarako.
- RS232: Serieko kontrolerako.
- Potentzia sarrera: Korronte alternoko elikatze-kablea konektatzeko.
3.3 Front and Side Panels
The front panel houses the projection lens and front ventilation, while the side panels feature additional ventilation grilles.

3.4. irudia: Aurrealdea view of the InFocus P120 INL412 projector, displaying the main projection lens on the right and the extensive front ventilation grille on the left, crucial for heat dissipation.
3.5. irudia: Aldea view of the InFocus P120 INL412 projector, illustrating the side ventilation grilles that contribute to maintaining optimal operating temperature.
4. Konfigurazioa
4.1 Proiektorearen kokapena
Position the projector on a stable, flat surface or mount it securely. Ensure the projector is within the optimal projection distance for your screen size. Maintain clear space around the projector for proper ventilation.
4.2 Gailuak konektatzea
Before connecting any cables, ensure the projector and all source devices are powered off.
- HDMI konexioa: Connect an HDMI cable from your source device (e.g., laptop, Blu-ray player, gaming console) to either the HDMI 1 or HDMI 2 port on the projector.
- VGA konexioa: Connect a VGA cable from your computer to either VGA IN 1 or VGA IN 2. For audio, connect a separate audio cable from your computer's audio output to the corresponding Audio IN port on the projector.
- USB konexioa: Insert a USB drive into the USB port for media playback (if supported by firmware) or service functions.
- Ethernet (LAN) konexioa: Connect an Ethernet cable to the LAN port for network control or updates.
- Audio irteera: If using external speakers, connect an audio cable from the Audio OUT port on the projector to your audio system.
4.3 Energia-konexioa
Connect the power cord to the projector's power input and then plug the other end into a grounded electrical outlet.
5. Funtzionamendu-argibideak
5.1 Piztu/Itzaltzea
- Piztu: Sakatu Boterea button on the projector's control panel or the remote control. The power indicator light will change.
- Itzali: Sakatu Boterea button again. A confirmation message may appear. Press the button a second time to confirm shutdown. Allow the projector to cool down before unplugging it.
5.2 Fokua eta zooma doitzea
Biratu fokatze-eraztuna lentearen inguruan irudia zorrotz eta garbi agertu arte. Erabili zoom-eraztuna irudiaren tamaina pantailara egokitzeko.
5.3 Sarrera iturria hautatzea
Sakatu Iturria button on the control panel or remote control to cycle through available input sources (HDMI 1, HDMI 2, VGA 1, VGA 2, S-Video, USB). Select the input corresponding to your connected device.
5.4 Menu Nabigazioa
Erabili Menua button to access the on-screen display (OSD) menu. Use the arrow buttons to navigate through menu options and the Sartu botoia hautatzeko. Sakatu Menua berriro irteteko.
6. Mantentzea
6.1 Lentea garbitzea
Gently wipe the lens with a soft, lint-free cloth specifically designed for optical surfaces. Do not use abrasive cleaners or excessive force, as this can scratch the lens.
6.2 Cleaning the Projector Exterior
Erabili oihal leun eta lehor bat proiektorearen c garbitzeko.asing. Zikinkeria egoskorrerako, dampen the cloth slightly with water, then wipe dry immediately. Avoid getting liquids into the projector's openings.
6.3 Ventilation Care
Regularly check the projector's ventilation grilles for dust accumulation. Use a soft brush or a vacuum cleaner with a brush attachment to gently remove dust from the vents to ensure proper airflow and prevent overheating.
7. Arazoak
7.1 Ez da irudirik bistaratzen
- Ziurtatu proiektorea piztuta dagoela eta pizteko adierazlearen argia finko dagoela.
- Verify that the video cable (HDMI, VGA, etc.) is securely connected to both the projector and the source device.
- Egiaztatu sarrera-iturri zuzena hautatuta dagoela proiektorrean.
- Confirm that the source device (laptop, player) is powered on and outputting a signal.
7.2 Irudia lausoa edo fokutik kanpo dago
- Doitu proiektorearen lentearen fokatze-eraztuna irudia zorrotz egon arte.
- Ziurtatu proiektorea pantailatik distantzia egokian dagoela.
- Garbitu proiektorearen lentea zikin badago.
7.3 Soinurik ez
- If using HDMI, ensure the source device's audio output is set to HDMI.
- If using VGA, ensure a separate audio cable is connected from the source to the projector's Audio IN port.
- Egiaztatu proiektorearen eta iturburu-gailuaren bolumen-ezarpenak.
- If using external speakers, ensure they are properly connected to the Audio OUT port and powered on.
8. Zehaztapenak
| Ezaugarri | Xehetasuna |
|---|---|
| Marka | Infocus |
| Fabrikatzailea | Fokuan |
| Ereduaren izena | P120 INL412 |
| Modelo zenbakia | INL4128 |
| Urtea | 2023 |
| Hardware interfazea | Ethernet, HDMI, S-Video, USB |
| Elementu kopurua | 1 |
| Aspektu-erlazioa | 16:9 |
| Wattage | 341 watt |
| Pilak barne | Ez |
| Beharrezko bateriak | Ez |
| Forma-faktorea | Mahaigaina |
| Muntatze Mota | Mahai muntaia |
| Urruneko kontrola barne | Bai |
| Produktuaren neurriak | 56.13 x 46.48 x 25.15 cm |
| Elementuaren pisua | 5.5 kg |
| Irudiaren Gehieneko Tamaina | 308.28 hazbetekoa |
| Irudiaren gutxieneko tamaina | 910.63 milimetro |
| Eskuragarri dagoen lehen data | 5ko urtarrilaren 2022a |
9. Bermea eta Laguntza
For warranty information and technical support, please refer to the documentation included with your purchase or visit the official InFocus webgunea. Gorde erosketaren egiaztagiria bermearen erreklamazioetarako.