1. Sarrera
This manual provides detailed instructions for the safe and effective use of your Huepar DT30 2-in-1 Laser Tape Measure. This device combines a laser distance meter with a traditional tape measure, offering versatility for various measurement tasks. Please read this manual thoroughly before operating the device.
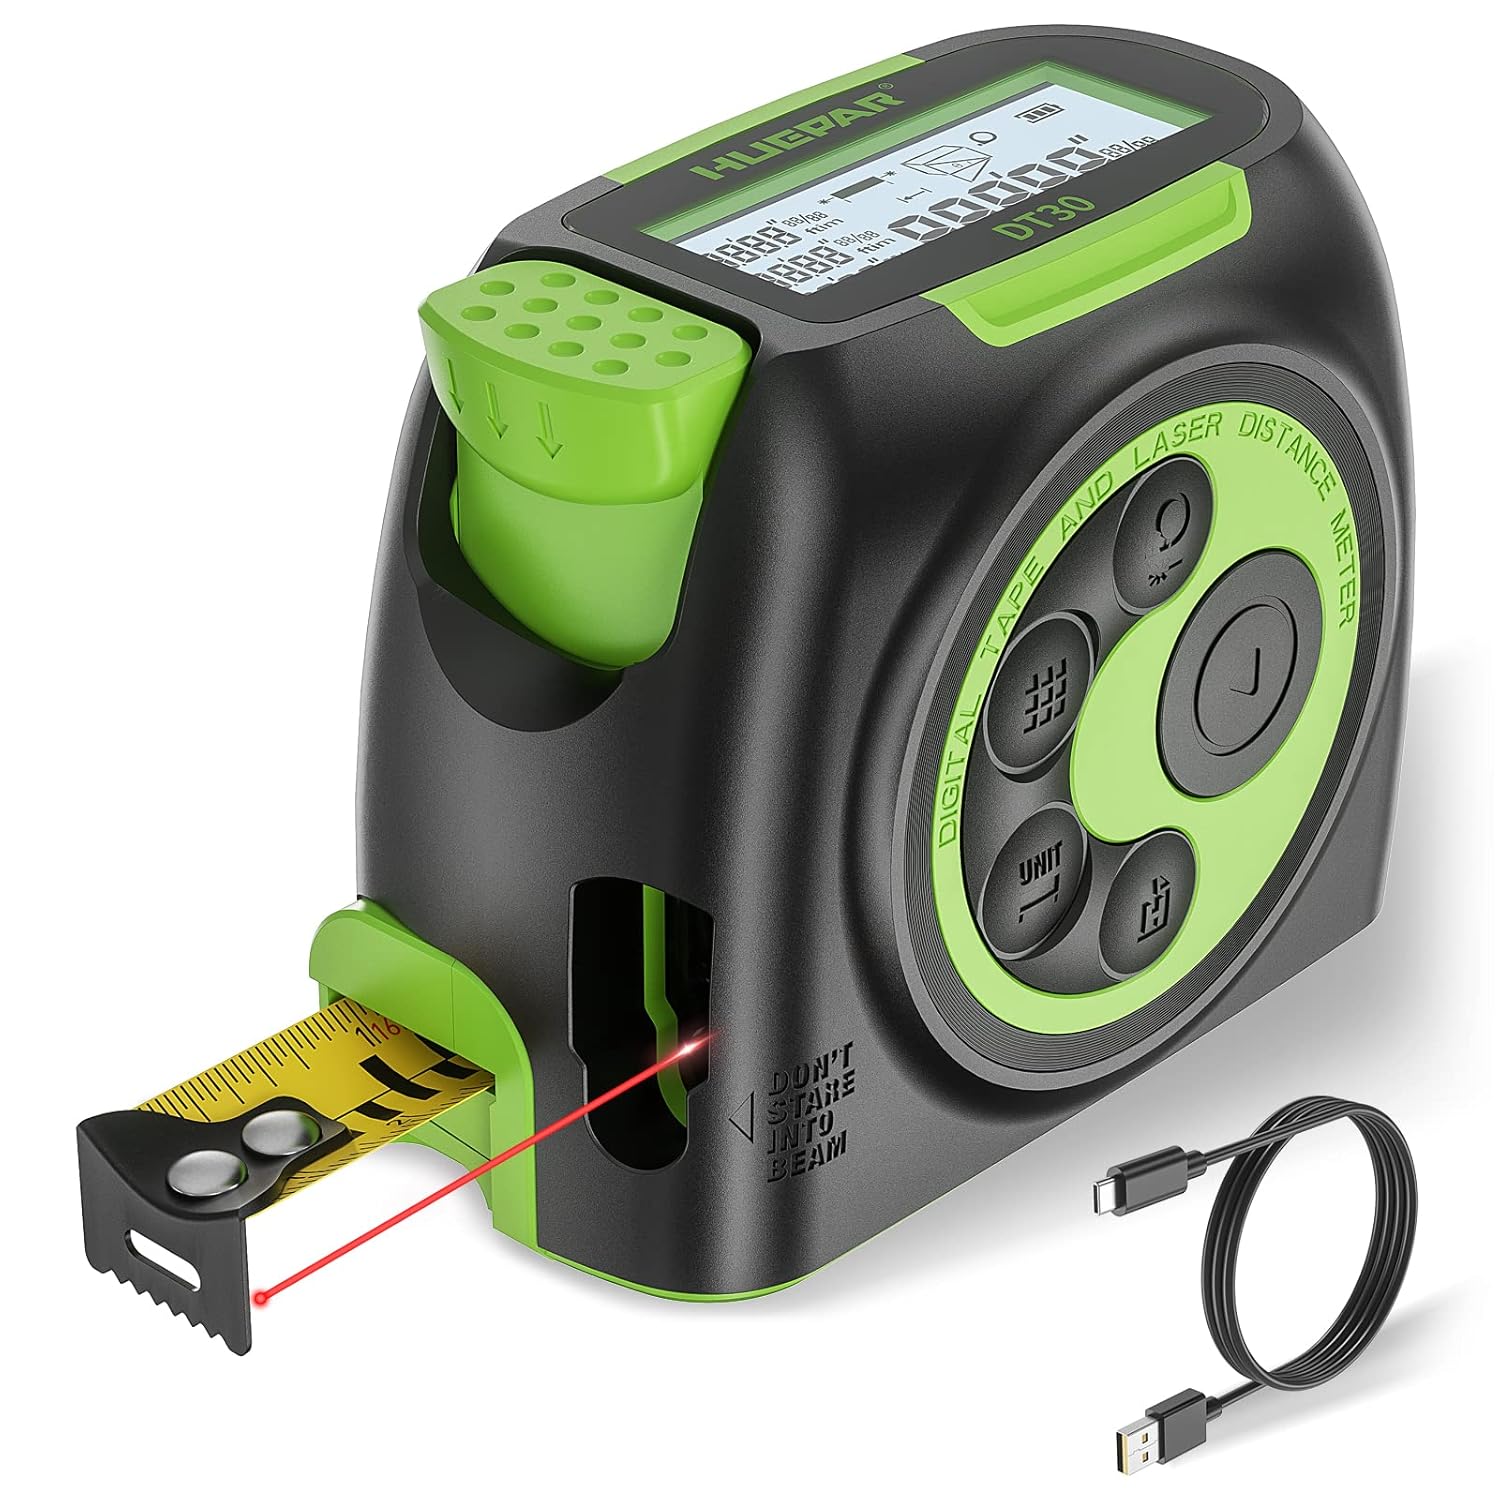
Image 1.1: Huepar DT30 2-in-1 Laser Tape Measure and accessories.
2. Segurtasun informazioa
OHARRA: This product emits a Class II laser. Avoid direct eye exposure to the laser beam. Do not stare into the beam. Do not aim the laser at people or animals. Use caution when operating near reflective surfaces.
- Always operate the device in accordance with the instructions in this manual.
- Ez saiatu gailua aldatzen edo desmuntatzen.
- Mantendu gailua haurren eskura.
- Ziurtatu gailua garbi eta lehor dagoela erabili aurretik.
- Ez erabili gailua leherketa-eremuetan edo material sukoien ondoan.
3. Produktua amaitu daview
Familiarize yourself with the components of your Huepar DT30 laser tape measure:

Image 3.1: Labeled components of the Huepar DT30.
- LCD screen: Displays measurements, modes, and battery status.
- Brake Lock: Secures the tape measure blade in position.
- Ruler hook: End hook for tape measure.
- Laser receiving port: Sensor for laser measurements.
- Laser emission port: Emits the laser beam.
- Digital display tape measure/laser mode button: Switches between digital tape and laser modes.
- Function button: Cycles through measurement functions (Area, Volume, Pythagorean).
- Measuring button: Activates laser measurement.
- Measure reference/unit switch button: Changes measurement reference point and units.
- Record button: Saves measurement data.
- ON/OFF button: Powers the device on or off.
- USB charging port: Type-C port for charging the internal battery.
4. Konfigurazioa
4.1 Bateria kargatzea
The Huepar DT30 is equipped with a built-in 380mAh Li-ion battery. Before first use, fully charge the device.
- Connect the provided Type-C USB cable to the charging port (12) on the device.
- Connect the other end of the USB cable to a compatible USB power source (e.g., phone charger, laptop, power bank).
- LCD pantailan bateriaren adierazleak kargatze-egoera erakutsiko du.
- A full charge typically takes approximately 3600 single measurements.
4.2 Piztu/Itzali
- Pizteko: Sakatu botoia ON/OFF botoia (11). The LCD screen will illuminate.
- Itzaltzeko: Sakatu eta eutsi botoiari ON/OFF botoia (11) for a few seconds. The device will also automatically shut down after 180 seconds of inactivity to conserve battery. The laser will automatically cut off after 30 seconds of inactivity.
5. Funtzionamendu-argibideak
5.1 Switching Measurement Modes (Laser / Tape)
The DT30 offers both laser and traditional tape measurement. Short press the Digital display tape measure/laser mode button (6) to switch between these two modes.

Image 5.1: Switching between digital tape and laser measurement modes.
5.2 Unitateak aldatzea
Sakatu laburra Measure reference/unit switch button (9) to cycle through the available measurement units: meters (m), feet (ft), inches (in), and fractional inches ('' '').

Image 5.2: Unit selection options on the DT30.
5.3 Adjusting Measuring Reference
The laser measurement can be taken from the front or the rear of the device. Long press the Measure reference/unit switch button (9) to toggle between the front and rear reference points. The LCD screen will indicate the selected reference.

Image 5.3: Adjusting the measurement reference point.
5.4 Laser Measurement Modes
Sakatu Funtzio botoia (7) to cycle through the following laser measurement modes:
- Distantzia bakarreko neurketa: Sakatu Measuring button (8) once to activate the laser, then press again to take a single measurement.
- Etengabeko neurketa: Sakatu Measuring button (8) once to activate the laser. The distance will update in real-time as you move the device. Press again to stop.
- Eremuaren neurketa: Select Area mode. Take two perpendicular distance measurements (length and width). The device will automatically calculate and display the area.
- Bolumenaren neurketa: Select Volume mode. Take three perpendicular distance measurements (length, width, height). The device will automatically calculate and display the volume.
- Pythagorean Measurement (2-point & 3-point): Select the desired Pythagorean mode. Follow the on-screen prompts to take the required measurements for indirect height or distance calculations.

5.4. irudia: Amaituview of measurement and calculation modes.
5.5 Tape Measure Usage
- Pull out the tape measure blade to the desired length.
- Erabili Brake Lock (2) to secure the tape in place.
- The movable ruler hook (3) allows for accurate internal and external measurements. For internal measurements, the inner side of the hook is the zero point. For external measurements, the outer side of the hook is the zero point.

Image 5.5: Tape measurement methods using the ruler hook.
5.6 Datu biltegiratzea
The device can store up to 50 groups of measurement data. Long press the Record button (10) to access the stored data. Short press to navigate through the records.

Image 5.6: Data storage function for reviewing past measurements.
6. Mantentzea
- Garbiketa: Garbitu gailua leun batekin, damp oihal. Ez erabili garbitzaile edo disolbatzaile urratzailerik.
- Biltegiratzea: Gorde gailua leku fresko eta lehor batean, eguzki-argitik eta muturreko tenperaturetatik babestuta.
- Bateria zaintzea: Kargatu bateria aldizka, gailua maiz erabiltzen ez bada ere, bateriaren osasuna mantentzeko. Saihestu bateria denbora luzez guztiz deskargatzea.
7. Arazoak
| Arazoa | Kausa posiblea | Irtenbidea |
|---|---|---|
| Gailua ez da pizten | Bateria baxua; Gailuaren matxura | Charge the battery; If problem persists, contact support. |
| Inaccurate laser measurements | Incorrect reference point; Obstruction in laser path; Environmental factors (e.g., strong light) | Verify reference point setting; Ensure clear laser path; Measure in suitable conditions. |
| Tape measure brake not holding | Mechanism wear or damage | Avoid forcing the tape; If damaged, contact support for repair or replacement. |
| LCD screen not visible | Low battery; Backlight off; Extreme temperatures | Charge battery; Backlight automatically turns off after 10s of inactivity, press any button to reactivate; Use within specified temperature range. |
| Data storage issues | Memory full; Device malfunction | Delete old data if memory is full; If problem persists, contact support. |
8. Zehaztapenak
| Ezaugarri | Zehaztapena |
|---|---|
| Eredua | DT30 |
| Laser Klasea | Class 2, output power <1mW |
| Laser uhin-luzera | 630~670nm |
| Laser neurketa-eremua | 0.65~197Ft (0.2~60m) |
| Zinta neurtzeko tartea | 16 oin (5 m) |
| Zehaztasuna Neurtzea | ±1/16 hazbete (±2 mm) |
| Energia iturria | 380mAh Li-ioizko bateria integratua |
| Battery Life (single measurement) | Gutxi gorabehera. 3600 aldiz |
| Kargatzeko ataka | C MOTA |
| Max Data Storage | 50 talde |
| Neurtzeko Unitateak | m/ft/in/'' '' |
| Automatic Laser Cut Off | 30 s |
| Itzaltze automatikoa | 180 s |
| Automatic Backlight Turn Off | 10 s |
| Neurriak | 3.54 x 2.23 x 2.91 hazbete (90 x 56.8 x 74 mm) |
| Pisua | 1.06 ontza (30 gramo) |
| Kasu Materiala | Akrilonitrilo Butadieno Estirenoa (ABS) |
9. Bermea eta Laguntza
9.1 Bermearen informazioa
Huepar offers a 2 or 3-year warranty for free repair or replacement, depending on the specific product and region. Please refer to your purchase documentation for exact warranty terms.
9.2 Bezeroarentzako laguntza
For any issues, questions, or technical assistance, please contact the Huepar support team. You can expect a reply within 24 hours. Lifetime technical support is provided for this product.
- Harremanetarako informazioa: Refer to the contact details provided with your product packaging or visit the official Huepar webgunea.

Image 9.1: Huepar After-sale Service Support overview.