Pretul 29100
Pretul KIT-8P Hole Saw Set Instruction Manual
Eredua: 29100
1. Produktua amaitu daview
The Pretul KIT-8P is a comprehensive set of hole saws designed for efficient and precise cutting in various materials. This kit includes 6 carbon steel hole saws of different sizes and 2 mandrels, providing versatility for your projects.
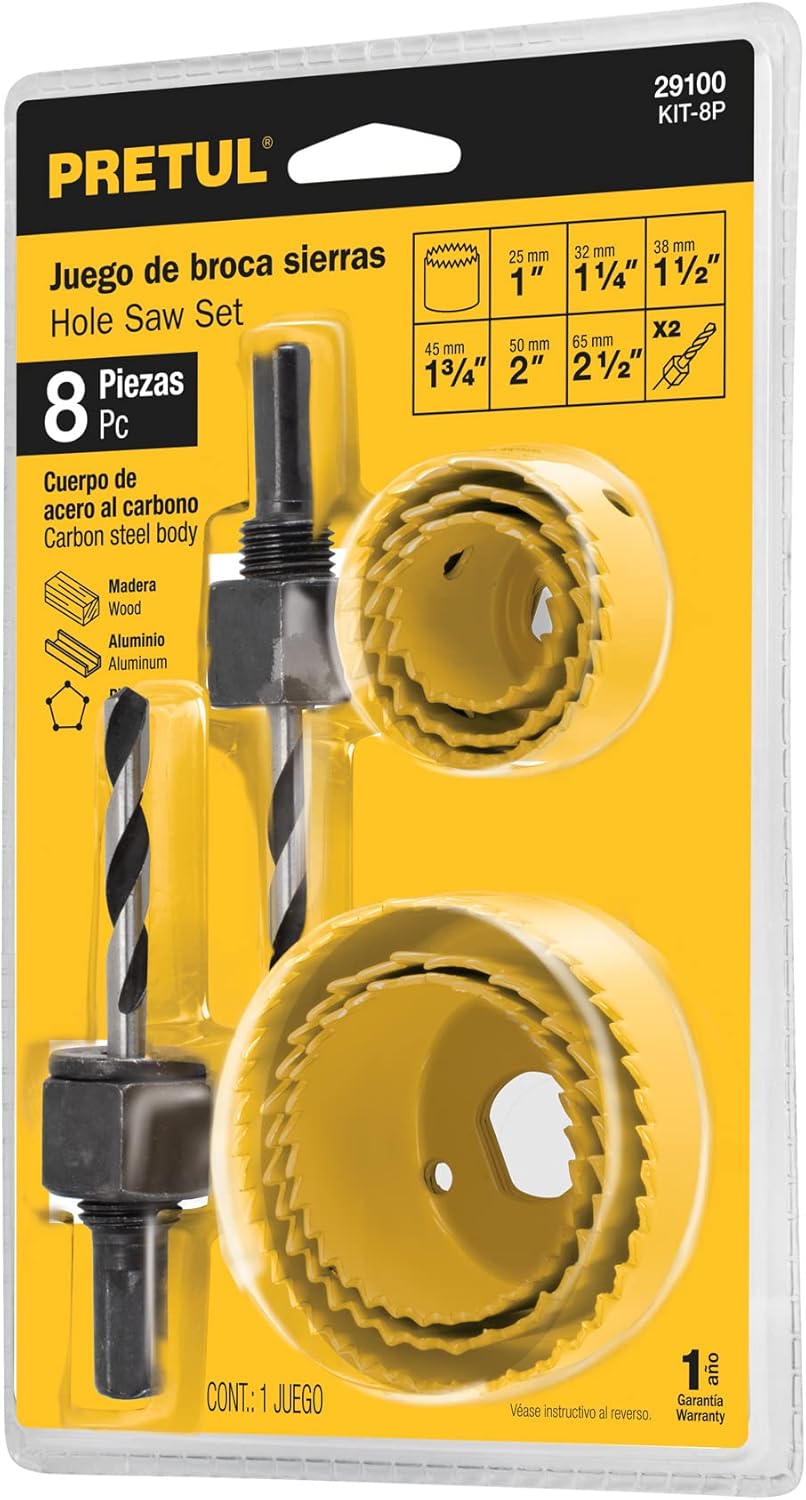
Image 1.1: Pretul KIT-8P Hole Saw Set, complete package.
Ezaugarri nagusiak:
- Carbon Steel Body: Ensures durability and effective cutting performance.
- Aplikazio polifazetikoa: Suitable for cutting holes in aluminum, wood, and plastic.
- Hainbat neurri: Includes a range of common hole saw diameters for various tasks.
2. Segurtasun informazioa
Always prioritize safety when using power tools and accessories. Failure to follow these safety guidelines may result in serious injury or damage to the product.
- Erabili Babes Pertsonaleko Ekipamendua (BPE): Always wear safety glasses or goggles to protect your eyes from flying debris. Consider gloves and hearing protection as needed.
- Lan-pieza segurua: Ensure the material you are cutting is firmly clamped or secured to prevent movement during operation.
- Erabili abiadura zuzena: Refer to your drill's manual for recommended speeds for different materials. Using an incorrect speed can cause overheating, premature wear, or material damage.
- Erabili aurretik ikuskatu: Before each use, check the hole saws and mandrel for any signs of damage, cracks, or excessive wear. Do not use damaged tools.
- Mantendu eskuak garbi: Never touch the rotating hole saw or the workpiece near the cutting area while the drill is operating.
- Deskonektatu energia: Always disconnect the drill from the power source before changing hole saws, making adjustments, or performing maintenance.
- Aireztapen egokia: Work in a well-ventilated area, especially when cutting materials that may produce dust or fumes.
- Gorde seguru: Store hole saws and mandrels in a dry, secure place, out of reach of children.
3. Paketearen edukia
The Pretul KIT-8P Hole Saw Set includes the following components:

3.1 irudia: Xehetasun zehatza view of KIT-8P contents and sizes.
- 6 Carbon Steel Hole Saws:
- 1 hazbete (25 mm)
- 1 1/4 hazbete (32 mm)
- 1 1/2 hazbete (38 mm)
- 1 3/4 hazbete (45 mm)
- 2 hazbete (50 mm)
- 2 1/2 hazbete (65 mm)
- 2 Mandrels:
- 3/8 hazbetekoa
- 5/16 hazbetekoa
4. Konfigurazioa eta Muntaketa
Follow these steps to properly assemble the hole saw with the mandrel and attach it to your drill.

Image 4.1: Hole Saw Assembly Diagram.
- Aukeratu zulo-zerra zuzena: Choose the hole saw size appropriate for your cutting needs.
- Attach Hole Saw to Mandrel: Thread the selected hole saw onto the mandrel. Ensure it is securely tightened. The pilot drill on the mandrel should extend beyond the teeth of the hole saw.
- Insert Mandrel into Drill Chuck: Open the chuck of your power drill. Insert the straight shank of the mandrel into the chuck, ensuring it is centered and fully seated.
- Tighten Drill Chuck: Securely tighten the drill chuck around the mandrel shank. Most drills require a chuck key or hand-tightening until the mandrel is firmly gripped and will not slip during operation.
- Muntaketa egiaztatu: Gently tug on the assembled hole saw to ensure it is securely attached to the drill and the hole saw is tight on the mandrel.
5. Funtzionamendu-argibideak
Once the hole saw is assembled and attached to your drill, follow these steps for effective and safe operation:
- Prestatu lan-pieza: Mark the center of the desired hole on your material. Secure the workpiece firmly to a stable surface using clamps edo morro bat ebakitzean mugimendua saihesteko.
- Pilotu zulagailua kokatu: Place the tip of the pilot drill directly on the marked center of your hole.
- Hasi zulatzen: Begin drilling at a slow speed to allow the pilot drill to create a guide hole. Once the pilot drill has penetrated the material, gradually increase the drill speed.
- Aplikatu presio etengabea: Apply consistent, moderate pressure to the drill. Avoid excessive force, which can cause the hole saw to bind, overheat, or damage the material.
- Kontrola mantendu: Keep a firm grip on the drill and maintain control throughout the cutting process. Be prepared for potential kickback, especially when the hole saw breaks through the material.
- Garbitu hondakinak: Periodically withdraw the hole saw from the cut to clear chips and debris, especially when cutting thicker materials. This helps prevent overheating and improves cutting efficiency.
- Osatu mozketa: Continue drilling until the hole saw has fully penetrated the material.
- Kendu nukleoa: Once the cut is complete, carefully remove the drill. The cut material core will typically be inside the hole saw. Use a screwdriver or similar tool to push out the core from the side slots of the hole saw.
Gomendatutako materialak:
- Aluminioa
- Egurra
- Plastikoa
6. Mantentzea
Proper maintenance will extend the life of your Pretul KIT-8P Hole Saw Set and ensure optimal performance.
- Garbiketa: After each use, clean the hole saws and mandrel to remove any accumulated dust, chips, or residue. Use a brush or compressed air. Avoid using harsh chemicals that could damage the finish.
- Lubrifikazioa (aukerakoa): For prolonged cutting or harder materials, applying a suitable cutting lubricant can reduce friction and heat, extending the life of the hole saw.
- Ikuskapena: Regularly inspect the teeth of the hole saws for dullness, damage, or missing teeth. Inspect the mandrel for bends or damage to the pilot drill. Replace worn or damaged components.
- Biltegiratzea: Store the hole saw set in its original packaging or a suitable tool case to protect it from moisture, dust, and physical damage. Keep it in a dry environment to prevent rust.
7. Arazoak
Here are some common issues you might encounter and their potential solutions:
| Arazoa | Kausa posiblea | Irtenbidea |
|---|---|---|
| Hole saw binds or stalls | Too much pressure; dull teeth; material too hard; chips not clearing. | Reduce pressure; replace hole saw; ensure material is suitable; clear chips frequently. |
| Poor cut quality or rough edges | Dull teeth; incorrect speed; unstable workpiece. | Replace hole saw; adjust drill speed; secure workpiece firmly. |
| Hole saw overheats | Excessive speed; insufficient chip clearance; no lubricant. | Reduce speed; clear chips more often; apply cutting lubricant. |
| Mandrel slips in drill chuck | Chuck not tightened enough; dirty shank. | Ensure chuck is fully tightened; clean mandrel shank before inserting. |
8. Zehaztapenak
| Modelo zenbakia | 29100 |
| Marka | Pretul |
| Materiala | Karbono altzairua |
| Pieza kopurua | 8 (6 Hole Saws, 2 Mandrels) |
| Hole Saw Sizes | 1", 1 1/4", 1 1/2", 1 3/4", 2", 2 1/2" |
| Mandrel Sizes | 3/8", 5/16" |
| Amaitu | Estali gabea |
| Zurtoin mota | Zuzena |
| Tool Cutting Type | Espirala |
| Paketearen neurriak | 20.3 x 12.9 x 3.3 cm |
| Paketearen pisua | 350 g |
| Fabrikatzailea | Truper SA de CV |
9. Bermea eta Laguntza
The Pretul KIT-8P Hole Saw Set comes with a 1 urteko bermea erosketa-datatik aurrera, fabrikazio-akatsak estaliz. Gorde erosketaren egiaztagiria berme-erreklamazioetarako.
For technical support, warranty inquiries, or replacement parts, please contact Pretul customer service. Refer to the product packaging or the official Pretul webgunea kontaktu-informazio eguneratuena lortzeko.
Pretul is a brand of Grupo Truper.
Erlazionatutako dokumentuak - 29100
 |
Taladro de Banco PRETUL 8" TAPI-8P: Lista de Partes y Diagrama Lista detallada de partes y diagrama explosivo para el Taladro de Banco PRETUL de 8 pulgadas, modelo TAPI-8P (Código 29932), con especificaciones técnicas y contacto de servicio. |
 |
Guía de Instalación y Extracción del Broquero PRETUL BRO-1/2P Instrucciones detalladas para instalar y extraer el broquero PRETUL BRO-1/2P. Incluye pasos, compatibilidad con taladros de 1/2" (13 mm) y datos del importador TRUPER. |
 |
Diagrama de Partes y Lista de Componentes - Rotomartillo Inalámbrico Pretul ROTI-20P2 Consulte el diagrama detallado y la lista de partes para el rotomartillo inalámbrico Pretul ROTI-20P2. Identifique cada componente para mantenimiento y referencia. |
 |
Instrucciones de Instalación y Retiro del Broquero PRETUL Guía detallada para la instalación y el retiro de broqueros PRETUL (modelos BRO-3/8N-P y BRO-1/2N-P) para taladros reversibles y no reversibles. Incluye pasos, precauciones y descripciones de figuras. |
 |
Guía de Uso y Cuidado: Borla de Pulido PRETUL BOR-PULA-P Instrucciones detalladas para el uso y cuidado de la borla de pulido PRETUL modelo BOR-PULA-P, incluyendo especificaciones de velocidad, montaje, técnicas de aplicación y composición del material. |
 |
PRETUL TALI-20P2K 20V Cordless Drill and Accessory Kit User Manual Comprehensive user manual for the PRETUL TALI-20P2K 20V cordless drill and accessory kit, covering specifications, safety warnings, operation, maintenance, and troubleshooting. |
Ask a question about this manual
Ask about setup, troubleshooting, compatibility, parts, safety, or missing instructions. Manuals+ will review the question and use this page’s manual context to help answer it.