
Sarrera
This manual provides detailed instructions for the safe and proper installation and use of your MOUNTUP Universal Soundbar Mount, model MU9122. Please read all instructions carefully before beginning installation to ensure correct assembly and to prevent damage or injury.

Jeneral bat view of the MOUNTUP Universal Soundbar Mount MU9122 installed with a soundbar below a television.
Segurtasun Informazioa
- Ziurtatu osagai guztiak daudela eta kalterik gabe daudela instalazioa egin aurretik. Ez erabili kaltetutako piezak.
- This mount is designed for soundbars weighing up to 15 lbs (6.8 kg). Do not exceed this weight limit.
- Verify that the mounting surface (TV VESA holes, wood studs, or concrete wall) can safely support the combined weight of the TV, TV mount (if applicable), soundbar, and soundbar mount.
- Use appropriate tools and follow all steps precisely. If unsure, consult a qualified professional.
- Mantendu haurrak eta maskotak urrun instalatzean.

This image highlights the maximum weight capacity of the soundbar mount, which is 15 pounds or 6.8 kilograms.
Paketearen edukia
Please check to ensure all parts are included in your package. If any parts are missing or damaged, contact MOUNTUP customer support.
- Soundbar mounting brackets (main long brackets)
- Rotatable support plates
- Connecting plate (if applicable for specific configurations)
- Assorted screws, washers, and spacers for TV and soundbar attachment
- Concrete anchors and lag bolts (available upon request for concrete wall installation)
- Argibide eskuliburua
Zehaztapenak
| Modelo zenbakia | MU9122 |
| Produktuaren neurriak | 28.74 x 3.93 x 2.36 hazbete |
| Elementuaren pisua | 5.49 kilo |
| Gehienezko Karga Edukiera | 15 lb (6.8 kg) |
| Gailu bateragarriak | Universal Soundbars |
| Muntatze Mota | Wall Mount (wood studs, concrete) or TV Mount attachment |
| Ezaugarri doigarriak | Rotatable plates (swivel below soundbar), 6.5" extension for soundbars without thread inserts. |
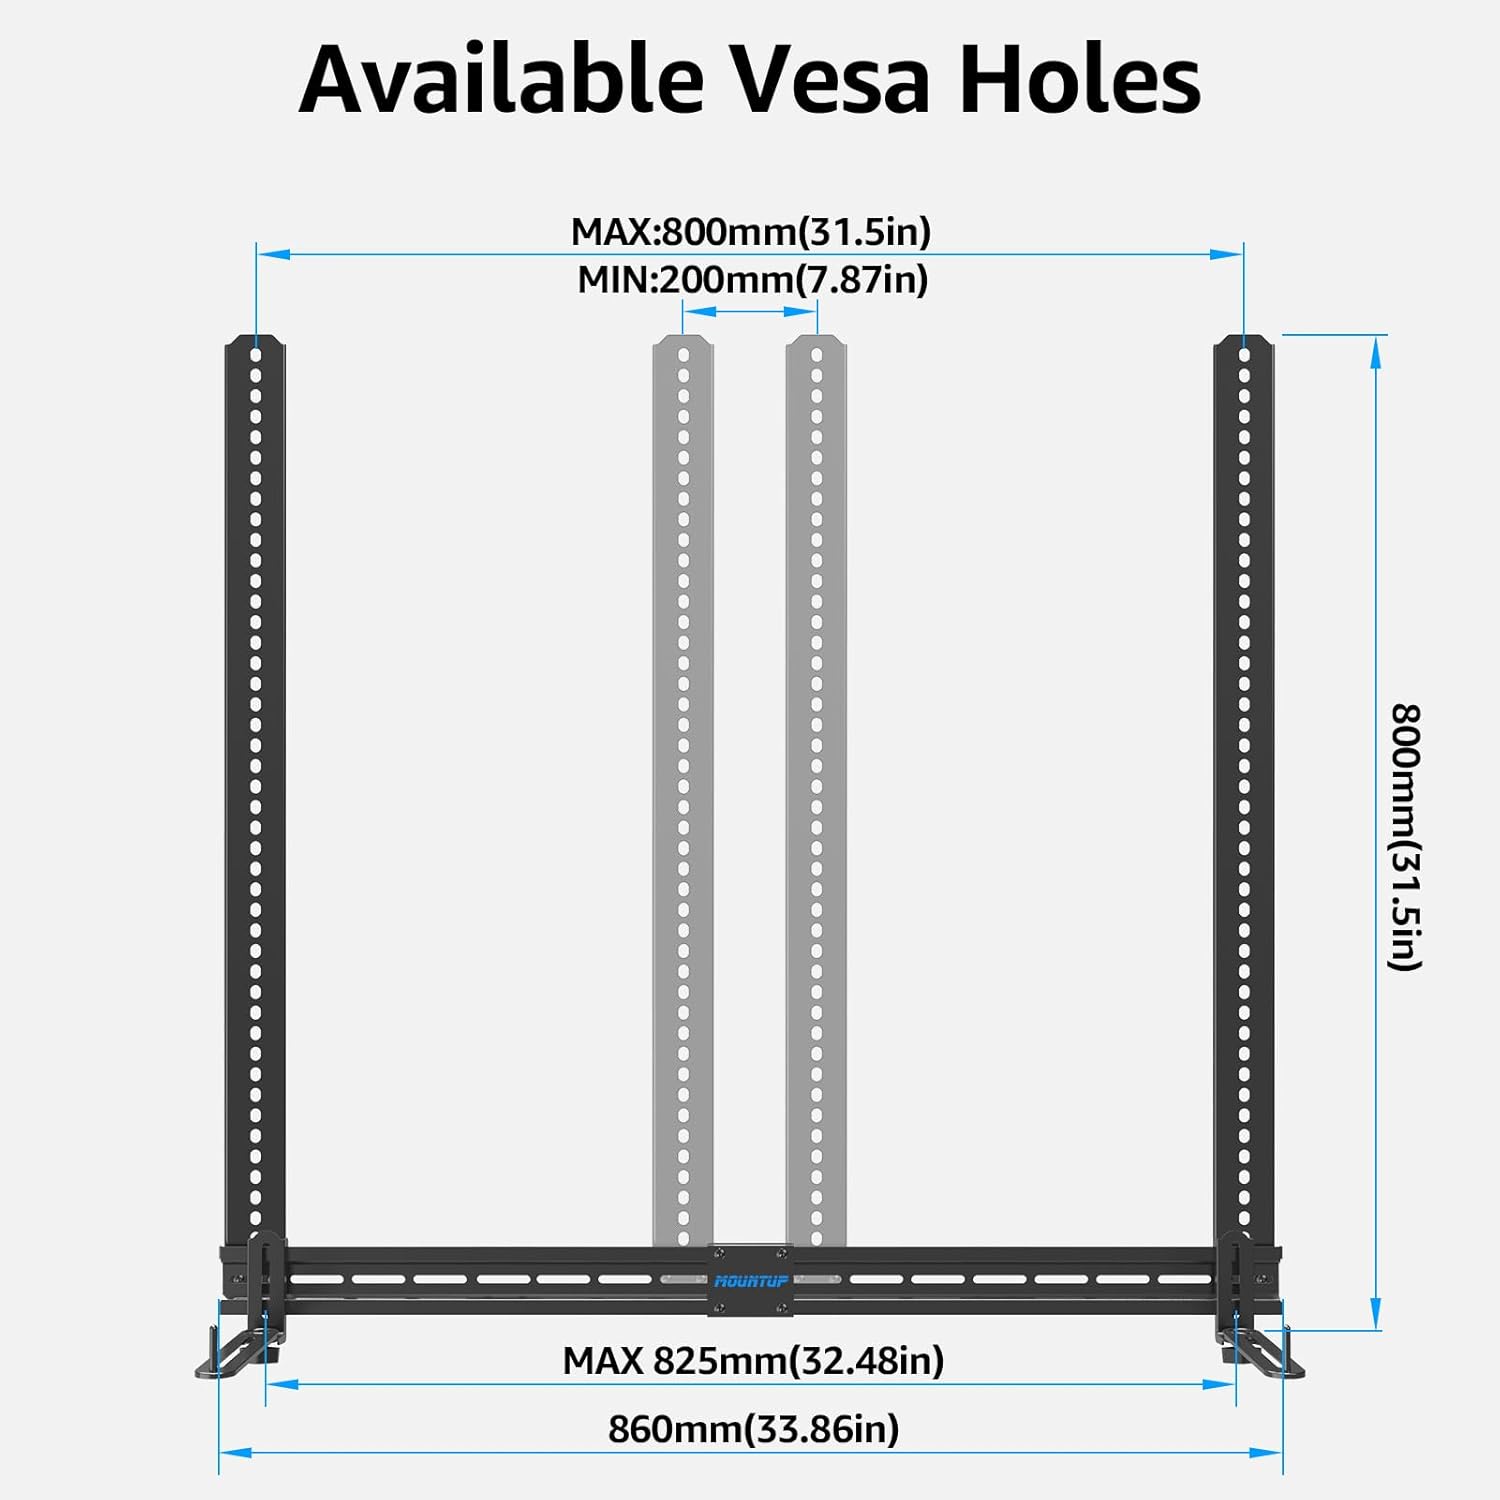
| VESA bateragarritasuna | Max: 800mm (31.5in), Min: 200mm (7.87in) |

This diagram illustrates the VESA compatibility range of the mount, showing both maximum and minimum dimensions for VESA holes.
Konfigurazioa eta Instalazioa
The MOUNTUP Universal Soundbar Mount MU9122 offers flexible installation options: directly to a wall (wood studs or concrete) or attached to your existing TV mount, either above or below the television.
Installation Options Overview

This image illustrates the four primary installation methods for the soundbar mount: direct wall mounting on concrete or wood studs, and attachment to a TV mount either above or below the television.
Step-by-Step Installation (General)
- Zehaztu muntaketa kokalekua: Decide whether to mount the soundbar above or below the TV, or directly to the wall. Consider cable management and optimal sound projection.
- Attach Main Brackets to TV Mount/Wall:
- For TV Mount Attachment: Align the long soundbar mounting brackets with the VESA holes on the back of your TV or the TV mount. Ensure the brackets are long enough to secure to at least four VESA holes for stability. Use the provided screws and spacers that fit your TV's VESA pattern.
- Horman muntatzeko: If mounting directly to a wall, locate wood studs or use appropriate anchors for concrete walls. Mark drilling points, drill pilot holes, and secure the main brackets using lag bolts (for wood studs) or concrete anchors and bolts (for concrete).

This image demonstrates the importance of using brackets long enough to secure to four VESA holes for enhanced safety and stability.
- Adjust Bracket Position: Position the main brackets vertically to achieve the desired height for your soundbar relative to the TV. Secure them firmly.
- Attach Rotatable Support Plates to Soundbar:
- Soundbars with Threaded Inserts (Bottom or Back Holes): Use the provided screws to attach the rotatable support plates to the threaded inserts on your soundbar.
- Soundbars without Threaded Inserts: The rotatable plates can extend up to 6.5 inches to cradle soundbars without direct mounting holes. Ensure the soundbar is securely seated.
- Secure Soundbar to Main Brackets: Carefully hang the soundbar (with attached support plates) onto the main brackets. Use the security screws to lock the rotatable plates and long brackets, ensuring the soundbar is sturdy and safely mounted.

This image demonstrates how to adjust the vertical position of the soundbar bracket on the TV mount to align with the soundbar's height.

This image details the attachment of the rotatable support plates to various soundbar types, including those with bottom or back mounting holes, and how the plates extend for soundbars without threaded inserts.

This diagram illustrates the three main steps for installation: connecting the main brackets, attaching them to the TV, and then hanging the soundbar onto the brackets.
Rotatable Plate Adjustment
Behe-profile rotatable plates can swivel to be less visible for aesthetic purposes. They can also be rotated to accommodate different soundbar designs and ensure a secure fit.
This image demonstrates the rotatable plates, highlighting their ability to swivel for aesthetics and adjust by 90 degrees for various soundbar configurations.
Funtzionamendua
Once installed, the soundbar mount requires no further operation. Its function is to securely hold your soundbar in the desired position relative to your television. Ensure all connections are tight and the soundbar is stable after installation.
Mantentzea
- Aldian-aldian egiaztatu torloju eta konexio guztiak ondo estututa eta finkatuta daudela ziurtatzeko.
- Garbitu euskarria zapi leun eta lehor batekin. Saihestu garbitzaile edo disolbatzaile urratzaileak.
- Do not hang additional items on the soundbar mount.
Arazoak konpontzea
| Arazoa | Kausa posiblea | Irtenbidea |
|---|---|---|
| Soundbar feels unstable or wobbly. | Screws are loose; incorrect installation; weight limit exceeded. | Tighten all screws. Re-check installation steps. Ensure soundbar weight is within 15 lbs (6.8 kg). |
| Soundbar does not fit the support plates. | Incorrect plate adjustment; soundbar dimensions incompatible. | Adjust the rotatable plates to extend up to 6.5 inches. If soundbar is too wide or heavy, it may not be compatible. |
| Mounting brackets do not align with TV VESA holes. | Incorrect bracket orientation; VESA pattern outside supported range. | Ensure brackets are oriented correctly. Verify your TV's VESA pattern is compatible with the mount's range (Max 800mm/31.5in, Min 200mm/7.87in). |
Bermea eta Laguntza
MOUNTUP products are designed for durability and ease of use. For warranty information or technical support, please refer to the official MOUNTUP webwebgunera edo jarri harremanetan zuzenean bezeroarentzako arreta-zerbitzura. Gorde erosketa-agiria berme-erreklamazioetarako.
MOUNTUP Customer Service: Kontsultatu produktuaren ontziratzea edo agiri ofiziala webharremanetarako datuak lortzeko gunea.


