1. Sarrera
This manual provides detailed instructions for the operation and maintenance of your Jectse X7 NFC Card Reader and RFID Duplicator. Please read this guide thoroughly before using the device to ensure proper functionality and to understand its full capabilities. This device is designed for reading, writing, and duplicating various IC and ID cards across multiple frequencies.
2. Produktua amaitu daview
The Jectse X7 is a portable, handheld NFC and RFID card duplicator featuring a full-color screen and a numeric keypad for easy interaction. It supports a wide range of frequencies and offers functions like smart cloning, advanced operations, frequency detection, and system settings.

Image 2.1: Jectse X7 NFC Card Reader with included UID buckles, UID cards, USB Type-C cable, and USB adapter.
2.1 Gailuaren osagaiak

Image 2.2: Key components of the Jectse X7 device.
- Bistaratzeko pantaila: Full-color screen with protective lens, scratch and pressure resistant.
- Pizteko botoia: Recessed design to prevent accidental pressing.
- Function Buttons (READ/WRITE): Used for reading and writing card data.
- Zenbaki-botoiak (0-9): For inputting card numbers or other data.
- Switching Button (*): Menuetan nabigatzeko edo moduak aldatzeko erabiltzen da.
- Confirm Button (#): Used to confirm selections or actions.
3. Ezaugarriak
- Full Frequency Support: Supports ID and IC full frequency bands including 13.56MHz, 125KHz, 175KHz, 250KHz, 300KHz, 375KHz, and 500KHz.
- Bateria integratua: Integrated 400mAh lithium battery for portable use.
- Type-C Connectivity: Supports Type-C for communication and power supply.
- NFC Simulation: Independent NFC simulation function allows devices with NFC capabilities to simulate encrypted IC cards with a single button.
- Aplikazioaren konexioa: Connects to a computer or compatible phone (Android and HarmonyOS) for quick upgrades and advanced functions.
- Funtzio nagusiak: Efficient decryption, editing, analysis, card packet management, and one-key encryption.

Image 3.1: Visual representation of the Jectse X7's core features.
4. Paketearen edukia
Pakete estandarrak barne hartzen ditu:
- 1 x Jectse X7 NFC Card Reader and RFID Duplicator
- 5 x UID Buckles
- 5 x UID Cards
- 1 x USB C motako kablea
- 1 x USB egokigailua
5. Konfigurazioa
5.1 Hasierako karga
Before first use, ensure the device is fully charged. Connect the provided USB Type-C cable to the device and a compatible USB power source (e.g., computer USB port, wall adapter). The charging indicator on the device will show its status.
5.2 Piztu/Itzaltzea
- Pizteko: Press and hold the recessed Power Button (⏻) pantaila piztu arte.
- Itzaltzeko: Eduki sakatuta pizteko botoia (⏻) until the device shuts down.
5.3 Ordenagailu edo telefono batera konektatzea
The device can be connected to a computer or a compatible Android/HarmonyOS phone for software upgrades and advanced functions. Use the provided USB Type-C cable.

Image 5.1: Device connected to a computer for upgrades or data management.

Image 5.2: Device connected to a mobile phone for app-based functions. Note: Only supports Android and HarmonyOS.
6. Funtzionamendu-argibideak
The Jectse X7 offers several modes of operation accessible via its main menu. Navigate using the number keys and the switching/confirm buttons.

Image 6.1: Main menu options on the Jectse X7 display.
6.1 Basic Read and Write (Smart Clone)
This mode allows for one-key reading and writing, automatically recognizing the card model and frequency.
- Menu nagusitik, hautatu "Smart Clone".
- Place the source card (the card you want to copy) on the device's reading area.
- Sakatu IRAKURRI button. The device will scan and display the card information.
- Remove the source card and place a blank UID card or buckle on the reading area.
- Sakatu IDATZI button to transfer the copied data to the new card.
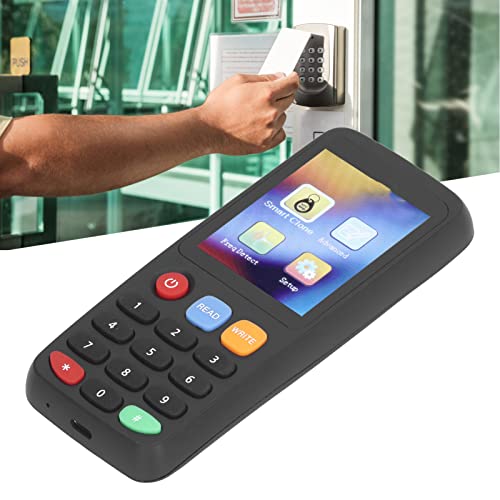
Image 6.2: Reading a card with the Jectse X7.
6.2 Frequency Detection (Freq Detect)
This function helps identify the frequency band of an unknown card.
- Menu nagusitik, hautatu "Freq Detect".
- Place the card on the reading area.
- The device will automatically detect and display the card's frequency.
6.3 Eragiketa aurreratuak
The "Advanced" menu provides options for formatting, reading, and writing GDM cards and certain special card types. Refer to the on-screen prompts for specific steps within this mode.
6.4 NFC Simulation
The Jectse X7 features an independent NFC simulation function, allowing it to emulate encrypted IC cards for use with NFC-enabled devices.
- Ensure the IC card data is successfully read and stored on the device.
- Navigate to the NFC Simulation option (if available in the menu or via a dedicated button).
- Activate the simulation. The device will then act as the original IC card when presented to an NFC reader.

Image 6.3: Using the NFC simulation feature.
6.5 App Connection and Upgrade
Connect the device to a computer or a compatible mobile phone (Android/HarmonyOS) using the Type-C cable to access the companion application. This app allows for quick upgrades, advanced decoding, and data management.

Image 6.4: App decoding interface on a connected smartphone.
7. System Settings (Setup)
The "Setup" menu allows you to customize various device parameters.
- Pantailaren distira: Adjust the display's illumination level.
- Itzali ordua: Configure automatic power-off duration.
- Keystore Clearing: Erase stored card data.
- Hizkuntza: Select the operating language.
- Sistemaren informazioa: View device details and firmware version.
8. Mantentzea
- Mantendu gailua garbi eta hautsik eta hezetasunik gabe. Erabili zapi leun eta lehor bat garbitzeko.
- Saihestu gailua erortzea edo tenperatura altuetan jartzea.
- Gorde gailua leku fresko eta lehor batean erabiltzen ez duzunean.
- Regularly check for software updates via the app connection to ensure optimal performance and compatibility.
9. Arazoak
If you encounter issues with your Jectse X7, consider the following:
- Gailua ez da pizten: Ziurtatu bateria kargatuta dagoela. Konektatu energia-iturri batera eta saiatu berriro.
- Unable to read card:
- Ensure the card is placed correctly on the reading area.
- Verify the card type is supported by the device (ID or IC).
- Try using the "Freq Detect" function to confirm the card's frequency.
- Some encrypted cards may require advanced decryption methods via the app.
- Unable to write card:
- Ensure you are using a compatible writable card (e.g., UID card for IC, T5577 for ID).
- Verify the source card was read successfully.
- Check if the target card is damaged or already contains data that prevents overwriting.
- Aplikazioaren konexio arazoak:
- Ziurtatu USB kablea ondo konektatuta dagoela.
- Confirm your phone's operating system is Android or HarmonyOS.
- Check for the latest version of the companion app.
10. Zehaztapenak
| Ereduaren izena | Jectseew0uki26ga-12 |
| Marka | Jetse |
| Onartutako maiztasunak | 13.56MHz, 125KHz, 175KHz, 250KHz, 300KHz, 375KHz, 500KHz |
| Media mota | IDCard, IC Card |
| Konektibitate Teknologia | USB C motakoa |
| Bateria | 400mAh Lithium Battery (Built-in) |
| Compatible Devices (App) | Android, HarmonyOS |
| Paketearen neurriak | 7.36 x 6.18 x 2.2 hazbete |
| Elementuaren pisua | 7.41 ontza |
11. Ohar garrantzitsuak
The Jectse X7 is designed to read and write ID and IC cards. It is crucial to verify the type of card you intend to use before attempting any operations, as not all card types are universally compatible or writable.

Image 11.1: Reminder regarding card type compatibility.
12. Bermea eta Laguntza
For warranty information, technical support, or further assistance, please refer to the contact details provided with your purchase or visit the official Jectse webgunea. Gorde erosketa-agiria berme-erreklamazioetarako.