ELEGOO Mars 4 Ultra
ELEGOO Mars 4 Ultra MSLA 3D Printer User Manual
Model: Mars 4 Ultra | Brand: ELEGOO
1. Segurtasun informazioa
Please read this manual carefully before operating the ELEGOO Mars 4 Ultra 3D Printer. Adherence to safety guidelines is crucial for proper operation and to prevent injury or damage.
- Always operate the printer in a well-ventilated area to minimize exposure to resin fumes.
- Wear appropriate personal protective equipment (PPE), including gloves and safety glasses, when handling liquid resin or cleaning the printer.
- Mantendu inprimagailua eta erretxina haurren eta animalien eskura ez dauden lekuetan.
- Avoid direct skin and eye contact with liquid resin. In case of contact, wash thoroughly with soap and water. If irritation persists, seek medical attention.
- Do not expose the resin to direct sunlight or UV light, as this will cause it to cure.
- Ensure the power supply is disconnected before performing any maintenance or cleaning procedures.
- Dispose of uncured resin and contaminated cleaning materials according to local regulations.
2. Zer dago kutxan
The ELEGOO Mars 4 Ultra package includes the following components:
- Mars 4 Ultra 3D Printer Machine
- Wifi antena
- USB Aire Purifikatzailea
- Eraiki plataforma
- Erretxina depositua
- U Disk (USB Drive)
- Maskara
- Eskularruak
- Inbutua
- Backup Torlojuak
- Egokitzailea
- Erreminta Kit
- Arraskagailua
- Erabiltzailearen eskuliburua (dokumentu hau)

2.1. irudia: The ELEGOO Mars 4 Ultra 3D Printer shown with its various included accessories, such as the build platform, resin tank, USB air purifier, and tools.
3. Produktua amaitu daview
The ELEGOO Mars 4 Ultra is a high-performance MSLA 3D printer designed for detailed resin printing. Key features include:
- 7-Inch 9K Mono LCD: Equipped with an 8520x4320 resolution and 18µm XY resolution, allowing for highly detailed models. The mono LCD is protected by 9H hardness tempered glass for durability.
- Wi-Fi konexioa: Supports both 2.4G and 5G networks with a transfer speed of 6-10Mbps for effortless file transferentzia.
- Powerful Linux OS: Features a built-in 4G RAM and Linux operating system for faster and smoother operation and efficient resource management.
- Effortless Leveling: A 4-point leveling system simplifies setup, requiring only one initial leveling. The laser-carved build plate surface enhances adhesion, reducing print failures. Includes a brand new ACF release liner film for high printing success rates at faster speeds.
- User-Friendly Touch Screen: A 4-inch HD IPS touch screen with 800x480 pixels resolution and support for 12 languages for easy navigation.

3.1. irudia: The 7-inch 9K Monochrome LCD offers exceptional detail with an 8520x4320 resolution and 18µm XY resolution.

3.2. irudia: High-speed Wi-Fi transfer capabilities allow for quick and convenient file transfers to the printer.

3.3. irudia: The powerful Linux OS with 4GB RAM ensures fast and smooth operation.
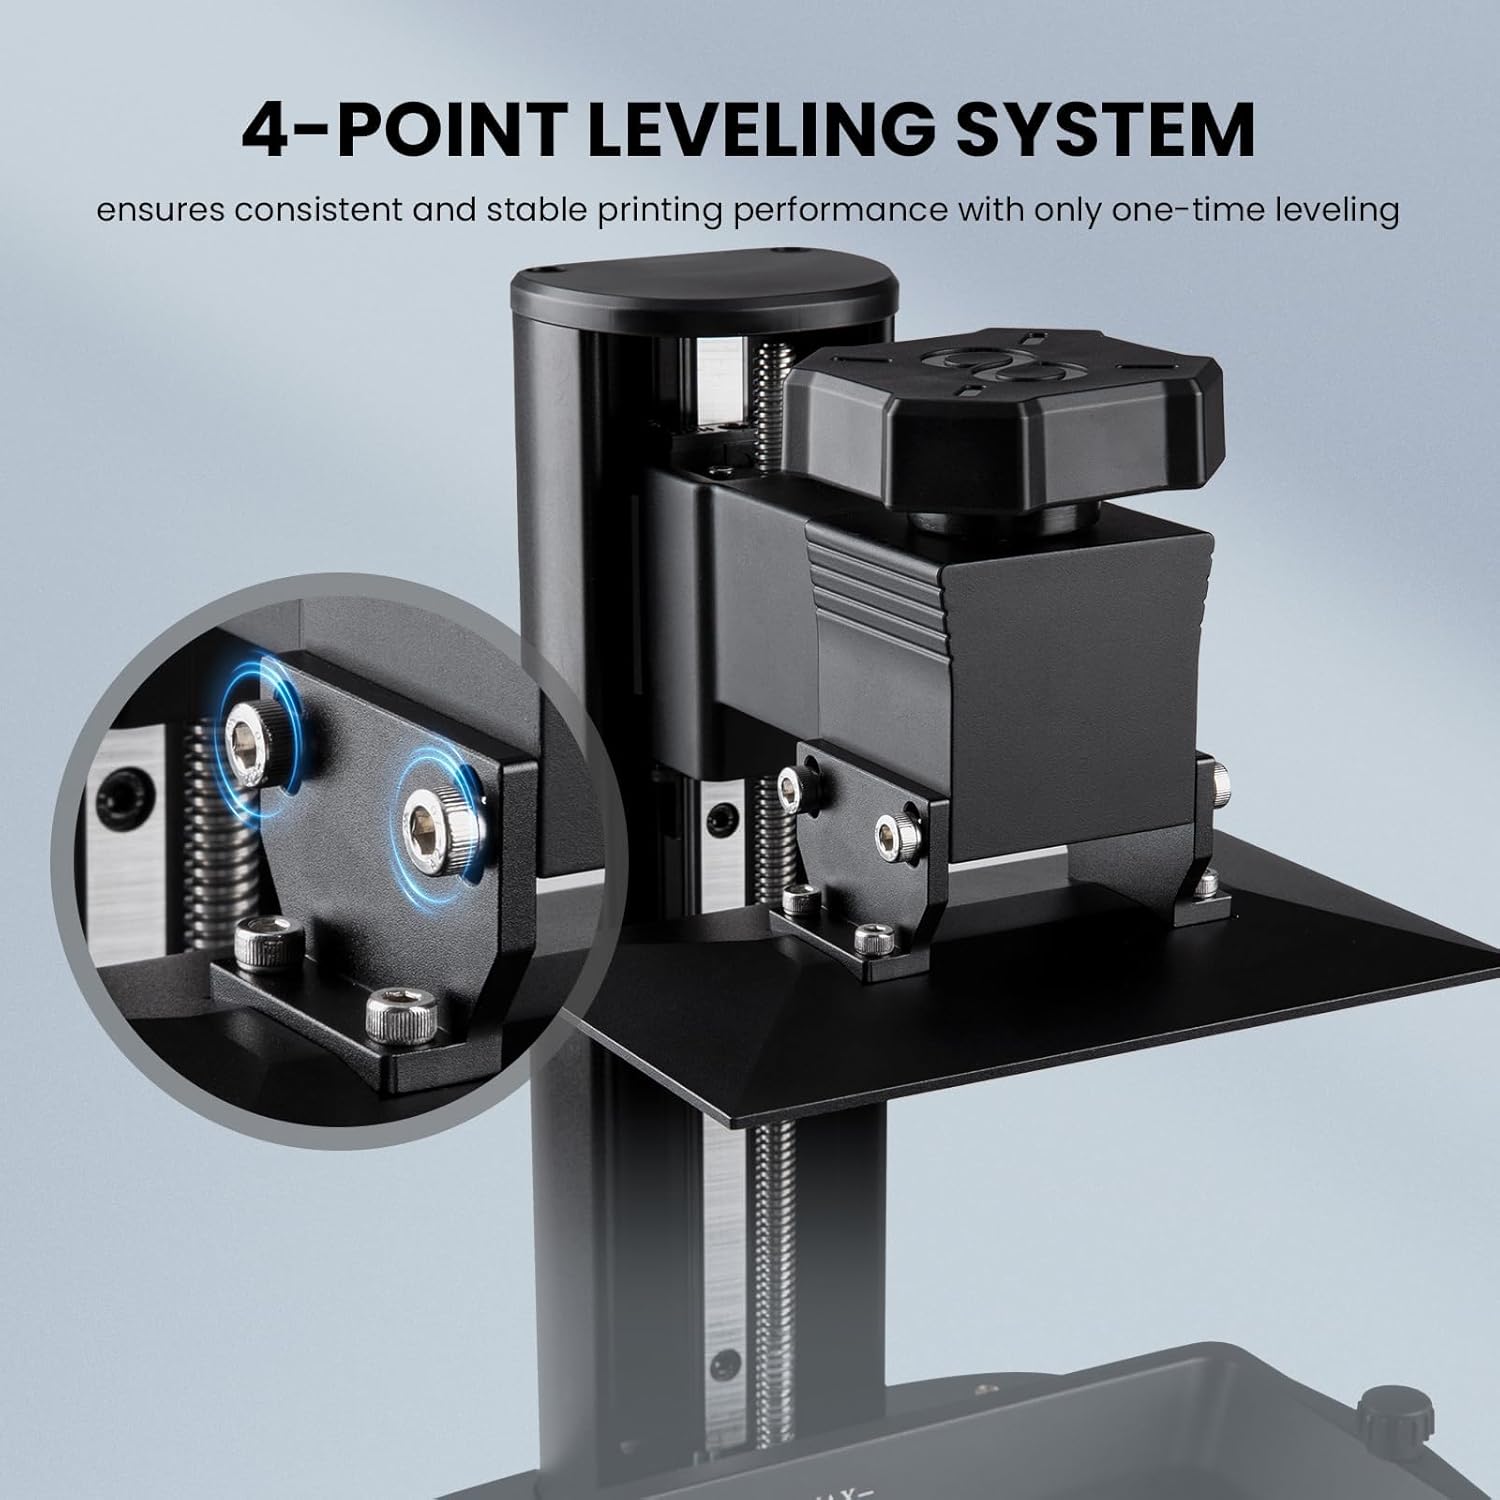
3.4. irudia: The 4-point leveling system simplifies the calibration process for consistent prints.

3.5. irudia: The user-friendly 4-inch HD IPS touch screen supports 12 languages for intuitive control.
4. Konfigurazioa
4.1 Hasierako deskutxatzea eta kokapena
Carefully remove all components from the packaging. Place the printer on a stable, level surface in a well-ventilated area, away from direct sunlight and heat sources. Ensure sufficient space around the printer for operation and maintenance.
4.2 Software-instalazioa
The ELEGOO Mars 4 Ultra requires slicing software to prepare 3D models for printing. While the manual may suggest specific software, users have reported success with various slicers. It is recommended to use the latest version of a compatible slicing software such as Lychee Slicer or Chitubox (ensure it supports the .ctb format for this printer model).
- Download the latest version of your preferred slicing software from the official webgunea.
- Instalatu softwarea zure ordenagailuan.
- Add the ELEGOO Mars 4 Ultra printer profile within the software settings.
- Configure print settings according to the resin manufacturer's recommendations and your specific printing needs.

4.1. irudia: The Voxeldance Tango Slicer, compatible with the Mars 4 Ultra, offers static and dynamic modes for preparing models.
4.3 Eraikitzeko plakaren berdintzea
Proper leveling of the build plate is essential for successful prints. The Mars 4 Ultra features an effortless 4-point leveling system.
- Ensure the resin tank is empty and clean.
- Askatu eraikuntza-plakako torlojuak.
- Lower the build plate until it touches the LCD screen.
- Estutu eraikuntza-plakako torlojuak.
- Raise the build plate to its home position.
- Perform a test print to verify leveling.
4.4 Erretxina kargatzea
Before printing, carefully pour the desired resin into the resin tank. Ensure the resin level does not exceed the maximum fill line.
- Erretxina botila ondo astindu isuri aurretik.
- Slowly pour the resin into the resin tank, avoiding bubbles.
- Close the printer's UV cover to protect the resin from ambient light.
5. Funtzionamendu-argibideak
5.1 Basic Printing Process
- Prepare your 3D model using slicing software and save it to a USB drive in the compatible .ctb format.
- Insert the USB drive into the printer's USB port.
- On the touch screen, navigate to the 'Print' menu.
- Select your desired print file USB unitatetik.
- Confirm the print settings and start the printing process.
- Monitor the first few layers to ensure proper adhesion.
- Once printing is complete, carefully remove the build plate and printed model.
5.2 Wi-Fi konexioa
The Mars 4 Ultra supports Wi-Fi for convenient file transferentzia.
- Ensure the Wi-Fi antenna is securely connected to the printer.
- On the touch screen, navigate to the 'System' or 'Settings' menu.
- Select 'Wi-Fi' and connect to your desired 2.4G or 5G network.
- Follow the on-screen instructions to establish the connection.
- Once connected, you can transfer sliced files directly from your computer to the printer via the network.
6. Mantentzea
6.1 Cleaning the Resin Tank and Build Plate
Regular cleaning is vital for print quality and printer longevity.
- After each print, use a plastic scraper to carefully remove any cured resin residue from the FEP film in the resin tank.
- If changing resin types or storing the printer, empty the resin tank and clean it with isopropyl alcohol (IPA).
- Clean the build plate with IPA after each print to remove any remaining resin.
6.2 LCD Screen Care
The 9K mono LCD is a critical component. Handle it with care.
- Avoid touching the LCD screen directly with your hands.
- If resin spills on the LCD, immediately clean it with a soft cloth and IPA. Do not use abrasive materials.
- The LCD is protected by tempered glass, but excessive force can still cause damage.
6.3 DC Port Replacement
In the event that the DC port requires replacement, follow these steps carefully. This procedure involves internal components and should only be attempted if you are comfortable with basic electronics repair.
6.1. bideoa: This video demonstrates the process of replacing the DC port on the ELEGOO Mars 4 Ultra 3D Printer. It covers disassembling the back cover, disconnecting internal cables, removing the old DC terminal, installing the new one, and reassembling the printer.
- Itzali eta deskonektatu: Ensure the printer is completely powered off and unplugged from the power source.
- Kendu atzeko estalkia: Use a 2.0mm Allen wrench to loosen the 6 screws on the back cover and the 2 screws under the back cover. Carefully lay the back cover flat, noting internal cable connections.
- Deskonektatu kableak: Remove the motor cable, limit switch cable, cooling fan cable, and USB port cable from the motherboard.
- Unplug LCD Screen Cable: Tear off the black tape on the LCD screen port and unplug the LCD screen port cable from the motherboard.
- Unplug Wi-Fi Cable: Unplug the Wi-Fi cable from the motherboard.
- Remove Middle Plate: Use a 2.5mm Allen wrench to loosen the six screws securing the middle plate. Lift up the middle plate, paying attention to combing the cables.
- Remove Hood: Use a 2.0mm Allen wrench to loosen the four screws securing the hood at the bottom of the printer. Carefully take out the hood, sorting out internal wiring.
- Remove DC Port Cable: Remove the DC port cable from the screen adapter board. Take out the DC port cable terminal. Use tweezers to gently press down on the wire core in the terminal and pull out the wire core. Take out the white terminal of the cable.
- Loosen DC Terminal Nut: Use needle-nose pliers or an open-end wrench to loosen the nut securing the DC terminal. Remove the nut and washer from the DC terminal and take them out by passing them through the DC cable.
- Install New DC Terminal: Take out the new DC terminal assembly. Pass the DC cable through the reserved hole on the DC terminal and place the DC terminal in the mounting position. Pass the nut and washer through the DC cable and place them in the mounting position of the DC terminal.
- Connect Wires to Terminal: Take out the cable terminal and insert the wire core into the terminal. Oharra: The wire core has a fixed insertion direction. Do not insert the left and right wire cores in reverse.
- Tighten DC Terminal: Slightly tighten the nut by hand. Use needle-nose pliers or an open-end wrench to tighten the DC terminal.
- Connect DC Cable: Insert the DC cable into the DC port on the screen adapter board.
- Reinstall Hood: Align the fan position and the screw holes, and put the hood into the mounting position. Be careful to sort out the internal wiring of the printer. Use a 2.0mm Allen wrench to tighten the four screws securing the hood at the bottom of the printer.
- Reinstall Middle Plate: Align the screw holes and place the middle plate into the mounting position. Sort out the internal cables of the printer to avoid the cables being pressed or hidden inside. Use a 2.5mm Allen wrench to tighten the six screws securing the middle plate.
- Reconnect Motherboard Cables: Plug the motor cable back into the Z-MOTOR port on the motherboard. Plug the limit switch cable back into the Z-port on the motherboard. Plug the cooling fan cable back into the MB-F port on the motherboard. Plug the USB port cable back into the ACL port on the motherboard.
- Reconnect LCD Screen Cable: Plug the LCD screen cable back into the motherboard port. Oharra: The LCD screen cable is installed in a fixed direction. Stick the black tape back to the LCD cable port.
- Reconnect Wi-Fi Cable: Plug the Wi-Fi cable back into the motherboard port.
- Atzeko estalkia berriro instalatu: Align the screw holes and place the printer back cover into the mounting position. Use a 2.0mm Allen wrench to tighten the 6 screws fixed on the back cover of the printer. Use a 2.5mm Allen wrench to tighten the 2 screws fixed under the back cover of the printer.
- Test Printer: Power on the printer. Operate "Tool-Screen Exposure-Test" on the touch screen. Observe that the exposure screen lights up with a specific pattern, and you can use the printer normally.
7. Arazoak
- Prints not sticking to build plate: Ensure the build plate is properly leveled. Clean the build plate thoroughly with IPA. Increase the bottom exposure time in your slicing software. Check the resin tank's FEP film for damage or cloudiness.
- Print failures (e.g., partial prints, warped prints): Verify resin exposure settings (bottom exposure, normal exposure) are appropriate for your specific resin and ambient temperature. Ensure the resin is well-mixed. Check for debris in the resin tank.
- Software compatibility issues: If experiencing issues with file formats (e.g., .ctb), try using alternative slicing software like Lychee Slicer, which is known to support the required formats. Ensure your slicing software is updated to the latest version.
- Inprimagailua ez da pizten: Check the power cable connection and ensure the power outlet is functional. If the DC port is suspected, refer to the DC Port Replacement section in Maintenance.
- Lines appearing on LCD screen: This may indicate a damaged LCD screen. Refer to the manufacturer's support for replacement options.
8. Zehaztapenak
| Zehaztapena | Balioa |
|---|---|
| Produktuaren neurriak | 23.82 x 10.63 x 11.22 hazbete (5.5 kilogramo) |
| Elementuaren pisua | 12.1 kilo |
| Modelo zenbakia | Mars 4 Ultra |
| Fabrikatzailea | ELEGOO |
| Materiala | Alloy steel, Aluminum, Polycarbonate |
| Modu aktiboan energia-kontsumoa | 72 watt |
| LCD bereizmena | 8520x4320 (9K) |
| XY Ebazpena | 18 µm |
| Sistema eragilea | Linux OS with 4G RAM |
| Wi-Fi euskarria | 2.4G and 5G networks (6-10Mbps transfer speed) |
| Ukipen-pantaila | 4-inch HD IPS (800*480 pixels), 12 languages support |
9. Bermea eta Laguntza
For warranty information, technical support, or service inquiries, please refer to the official ELEGOO webwebgunera edo jarri harremanetan bezeroarentzako arreta-zerbitzura zuzenean. Gorde erosketa-agiria erosketaren frogagiri gisa berme-erreklamazioetarako.
Official ELEGOO Store: ELEGOO Amazon Store
Ask a question about this manual
Ask about setup, troubleshooting, compatibility, parts, safety, or missing instructions. Manuals+ will review the question and use this page’s manual context to help answer it.