
1. Sarrera
Thank you for choosing the Crivit Auriol Radio-Controlled Projection Alarm Clock. This device combines a precise radio-controlled clock with a clear LCD display, dual alarms, and a convenient projection feature. This manual will guide you through the setup, operation, and maintenance of your new alarm clock.

Aurrealdea view of the alarm clock displaying time, date, and temperature.
2. Segurtasun-argibideak
- Irakurri arretaz argibide guztiak erabili aurretik eta gorde itzazu etorkizuneko erreferentzia izateko.
- Ez jarri gailua tenperatura altuen, eguzki-argiaren eraginpean edo hezetasun handiaren eraginpean.
- Saihestu gailua kolpe gogorrak erortzea edo jasaten.
- Ez saiatu gailua zeuk desmuntatzen edo konpontzen. Jarri harremanetan zerbitzu-langile kualifikatuekin.
- Mantendu bateriak haurren eskura ez dauden lekuetan. Bota erabilitako bateriak tokiko araudien arabera.
- Use only the provided AC adapter or one with identical specifications.
3. Paketearen edukia
Mesedez, egiaztatu paketea elementu hauek dituen:
- Crivit Auriol Radio-Controlled Projection Alarm Clock (Model 373928)
- AC Potentzia Egokitzailea
- Bateriak (aurrez instalatuta edo bereizita)
- Erabiltzailearen eskuliburua (dokumentu hau)

Included AC power adapter.
4. Produktuaren ezaugarriak
- Radio-Controlled Time: Automatic time synchronization for precise timekeeping.
- Proiekzio funtzioa: Projects time, alarm times, or ambient temperature onto a wall or ceiling.
- Pivoting Projection Arm: Adjustable projection angle with easy focus adjustment.
- LCD pantaila: Clear screen showing time, day, month, week number/day of the week, and indoor temperature.
- Alarma bikoitzak: Two independent alarm settings with snooze function.
- Ukipen-sentsorea: Activates short-term projection and screen backlight.
- Potentzia aukerak: Operates via AC adapter or batteries.
- USB-A kargatzeko ataka: Convenient 5V, 800mA output for charging external devices.
- Distira erregulagarria: Customizable display brightness.
5. Osagaien identifikazioa
Aurrealdea View:
Aurrealdea view LCD pantailarekin.
- LCD pantaila: Shows time, date, temperature, alarm status, and radio control signal.
- Ukipen-sentsorearen eremua: Located above the display, for temporary backlight and projection.
- Projection Indicator: Icon indicating projection is active.
- Alarma adierazleak: Icons for Alarm 1 and Alarm 2.
- Biraketa botoia: Adjusts projection orientation.
Aldea View (Projection Arm):
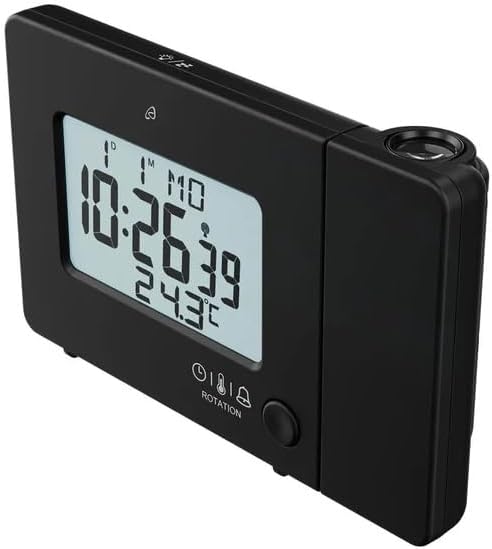
Aldea view with projection arm extended.
- Proiekzio besoa: Pivots to direct the projection.
- Fokuaren gurpila: Proiektatutako irudiaren argitasuna doitzen du.
- Proiekzio lentea: Emits the time/temperature display.
Atzekoa View:

Atzekoa view with control buttons and ports.
- -/WEEK Button: Decreases values, sets week display.
- +/ZONE Button: Increases values, sets time zone.
- °C/°F botoia: Toggles temperature unit.
- LANG Button: Selects display language for day of the week.
- 12/24 botoia: Toggles 12/24 hour format.
- MODE botoia: Cycles through settings modes (Time, Alarm 1, Alarm 2).
- SET botoia: Enters setting mode for current display.
- Berrezarri botoia: Resets the device to factory defaults (use a pointed object).
- Bateriaren konpartimendua: For backup batteries.
- DC IN ataka: Korronte alternoko egokitzailea konektatzeko.
- USB-A irteerako ataka: Kanpoko gailuak kargatzeko.
6. Konfigurazioa
6.1. Piztea
The alarm clock can be powered by either the included AC adapter or batteries for backup.
- Bateriaren instalazioa: Open the battery compartment on the rear of the unit. Insert the included batteries, observing the correct polarity (+/-). Batteries primarily serve as backup in case of power outage.
- AC egokigailuaren konexioa: Connect the small plug of the AC adapter into the DC IN port on the back of the alarm clock. Plug the AC adapter into a standard wall outlet. The display will light up.
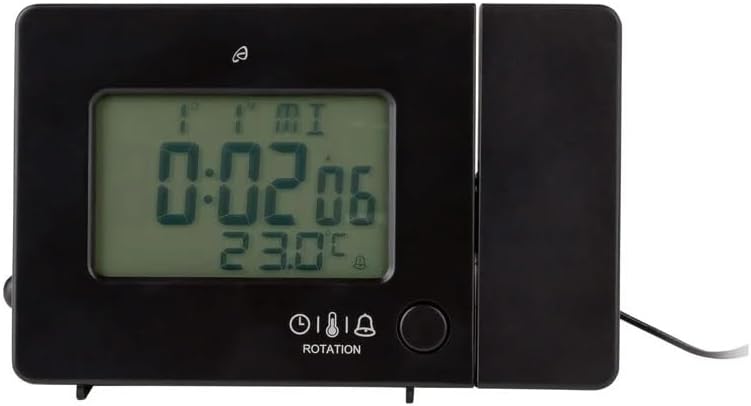
Alarm clock connected to power.
6.2. Initial Setup and Radio Control Synchronization
Upon first power-up or after a reset, the clock will automatically attempt to synchronize with the radio-controlled time signal (DCF77). This process can take several minutes to an hour, depending on your location and signal strength. During synchronization, a radio tower icon will flash on the display.
- Jarri erlojua leiho baten ondoan seinalea hobeto jasotzeko.
- Avoid placing it near electronic devices that may cause interference.
- Once synchronized, the radio tower icon will appear solid on the display.
If the radio signal is not received, you may need to set the time manually (see Section 7.1).
6.3. Basic Settings (if not automatically set or for adjustment)
Sakatu EZARTU button to enter setting mode. Use the -/WEEK eta +/ZONE buttons to adjust values, and EZARTU berresteko eta hurrengo ezarpenera joateko.
- Ordu-eremua: Adjust if you are not in the standard time zone for the radio signal.
- 12/24 orduko formatua: Sakatu 12/24 button to toggle between 12-hour (with AM/PM) and 24-hour formats.
- Tenperatura unitatea: Sakatu ° C / ° F botoia Celsius eta Fahrenheit artean aldatzeko.
- Bistaratzeko hizkuntza: Sakatu LANG button to select the language for the day of the week display (5 languages available).
7. Funtzionamendu-argibideak
7.1. Ordua eskuz ezartzea
If the radio-controlled time signal is weak or unavailable, you can set the time manually:
- Eduki sakatuta EZARTU botoia orduko digituak keinuka hasi arte.
- Erabili -/WEEK eta +/ZONE ordua doitzeko botoiak.
- Sakatu EZARTU to confirm and move to minutes, then year, month, and day.
- Sakatu EZARTU again to exit manual time setting.
7.2. Alarmak ezartzea (1. alarma eta 2. alarma)
Erlojuak bi alarma independente ditu.
- Sakatu MODUA button once to display Alarm 1 time, or twice for Alarm 2 time. The corresponding alarm icon (e.g., A1) will flash.
- Alarmaren ordua bistaratzen den bitartean, sakatu eta eutsi botoiari EZARTU botoia orduko digituak keinuka hasi arte.
- Erabili -/WEEK eta +/ZONE ordua doitzeko botoiak.
- Sakatu EZARTU to confirm and move to minutes. Adjust minutes using -/WEEK eta +/ZONE.
- Sakatu EZARTU again to confirm and exit alarm setting.
- Alarma aktibatzeko/desaktibatzeko, sakatu MODUA button to display the desired alarm, then press the +/ZONE button. The alarm icon (bell) will appear/disappear on the display.
7.3. Errepikapen funtzioa
When an alarm sounds, touch the Ukitu sentsorearen eremua edo sakatu SNOOZE / ARGIA button (if available, otherwise use the touch sensor) to activate the snooze function. The alarm will pause for approximately 5 minutes and then sound again. To stop the alarm completely, press any other button.
7.4. Projection Function
The alarm clock can project the time, alarm times, or ambient temperature onto a wall or ceiling.
- Proiekzioa aktibatu: The projection is continuously active when powered by the AC adapter. If running on batteries, touch the Ukitu sentsorearen eremua for short-term projection.
- Doitu proiekzio angelua: Pivot the projection arm to direct the image to your desired location.
- Doitu fokua: Erabili Fokatze gurpila on the projection arm to sharpen the projected image.
- Change Projected Content: Sakatu MODUA button repeatedly to cycle through projecting Time, Alarm 1, Alarm 2, or Temperature.
- Biratu proiekzioa: Sakatu BIRATZEA button to rotate the projected image by 90-degree increments (4 orientations available).

Time projected onto a surface.
7.5. Bistaratu Atzeko argia
When powered by the AC adapter, the display backlight is continuously on. When running on batteries, touch the Ukitu sentsorearen eremua to activate the backlight for a few seconds.
7.6. USB Charging Output
The USB-A port on the back of the unit provides a 5V, 800mA output for charging small electronic devices like smartphones or tablets. Connect your device's USB charging cable to this port.
8. Mantentzea
- Garbiketa: Garbitu gailua zapi leun eta lehor batekin. Ez erabili garbitzaile edo disolbatzaile urratzailerik.
- Bateria ordezkatzea: If using batteries for backup, replace them annually or when the display becomes dim during power outages. Ensure correct polarity.
- Biltegiratzea: Gailua denbora luzez gordetzen baduzu, kendu bateriak isuriak saihesteko.
9. Arazoak
| Arazoa | Kausa posiblea | Irtenbidea |
|---|---|---|
| Pantaila hutsik edo ilun dago. | No power, dead batteries, or AC adapter not connected. | Ensure AC adapter is securely connected. Replace batteries if using for backup. |
| Radio-controlled time not synchronizing. | Weak signal, interference, or incorrect time zone. | Move the clock to a window or open area. Avoid electronic devices. Manually set time if necessary. Check time zone setting. |
| Proiekzioa lausoa da. | Fokua ez da doitu. | Egokitu Fokatze gurpila on the projection arm. |
| Alarmak ez du jotzen. | Alarma ez dago aktibatuta edo gaizki konfiguratuta. | Ensure the alarm icon is visible on the display. Recheck alarm time settings. |
| USB kargatzeak ez du funtzionatzen. | Device not properly connected, or device requires more power than 800mA. | Ensure the USB cable is securely connected. Check if your device's charging requirements exceed 5V/800mA. |
10. Zehaztapenak

Produktuaren neurriak.
- Modelo zenbakia: 373928
- Neurriak (L x W x H): 15 x 3.81 x 9.5 cm (approx. 15l x 9.5H centimeters)
- Materiala: Plastikoa
- Bistaratzeko mota: LCD digitala
- Energia iturria: AC Adapter (included) or Batteries (included)
- USB irteera: 5V, 800mA
- Ezaugarri bereziak: Adjustable brightness, Snooze, Projection, Radio-controlled time
- Mugimendu mota: Kuartzoa
- Muntatze mota: Mahaigaina
- Barruan/Kanpoan erabilera: Barruan
11. Bermea eta Laguntza
This Crivit Auriol Projection Alarm Clock comes with a standard manufacturer's warranty. Please refer to the warranty card included in your package or contact your retailer for specific warranty terms and conditions.
For technical support or inquiries, please contact the customer service department of your retailer or the Crivit support line as indicated on the product packaging or official webgunea.