
Beetronics 19VG7M
Beetronics 19VG7M 19-Inch Full HD IPS Monitor User Manual
Professional Industrial-Grade Display
Sarrera
This manual provides comprehensive instructions for the installation, operation, and maintenance of your Beetronics 19VG7M 19-Inch Full HD IPS Monitor. Designed for professional and continuous use, this industrial-grade display offers exceptional visual clarity, versatile connectivity, and robust construction. Please read this manual thoroughly before using the monitor to ensure proper setup and optimal performance.

1. irudia: Aurrealdea view of the Beetronics 19VG7M Monitor.
Paketearen edukia
Konfigurazioarekin jarraitu aurretik, egiaztatu osagai guztiak paketean daudela:
- Beetronics 19VG7M Monitor
- Elikatze-iturria eta kablea
- Urruneko Kontrola
- Flush Mounting Brackets (if applicable)
- Desktop & Surface Mounting Stand
- Erabiltzailearen eskuliburua (dokumentu hau)
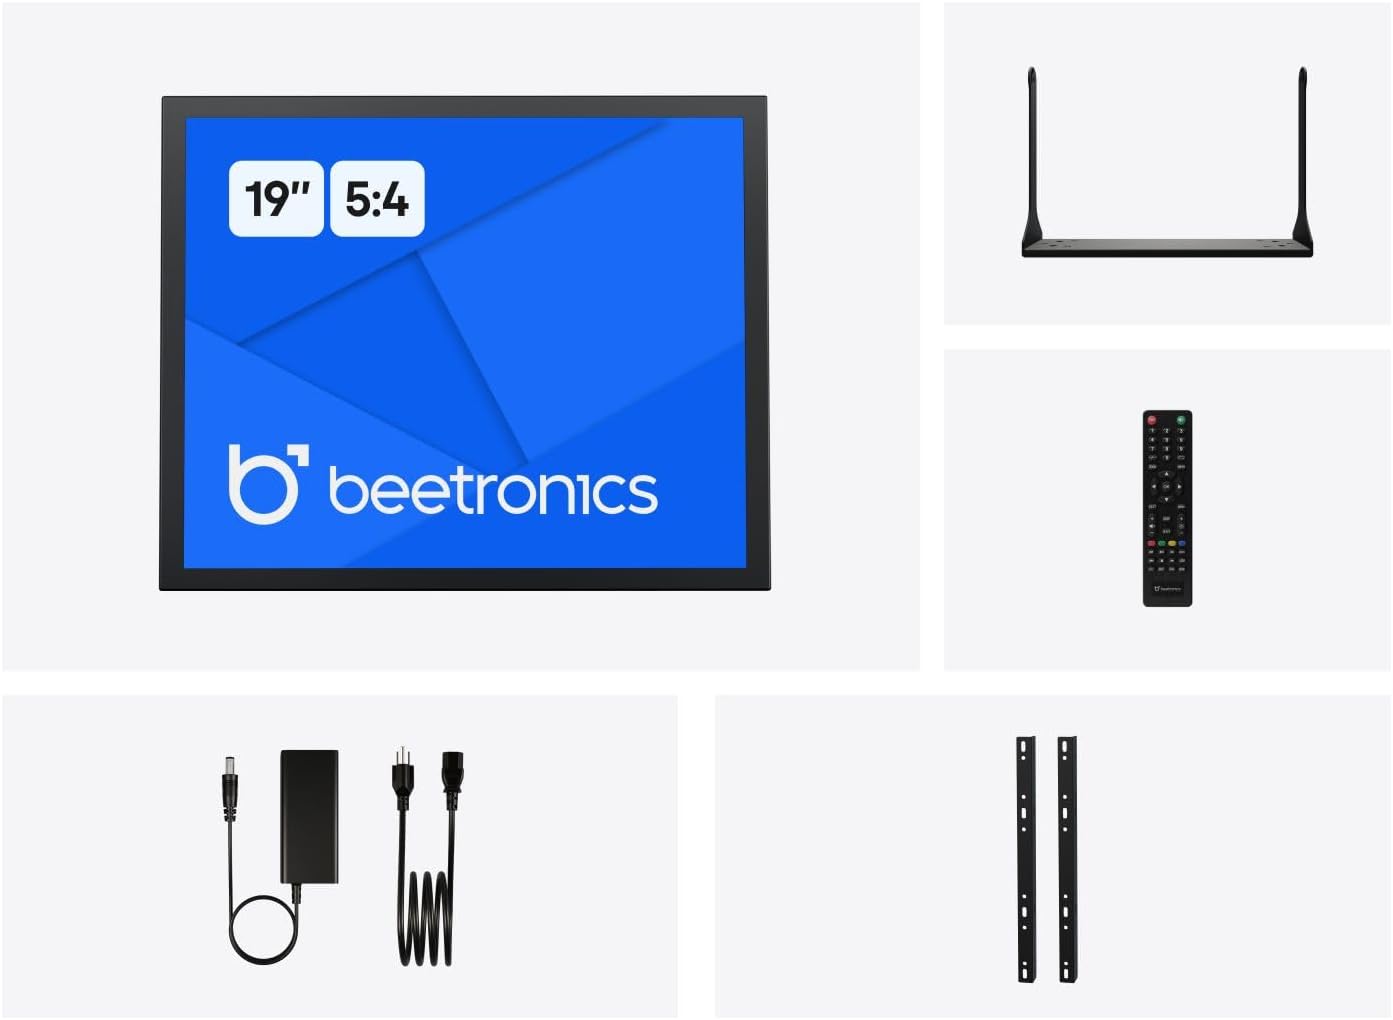
Figure 2: Included accessories with the Beetronics 19VG7M Monitor.
Konfigurazioa
1. Muntatzeko aukerak
The 19VG7M monitor offers flexible mounting solutions, including a collapsible desktop stand and VESA 100mm compatibility for wall or arm mounting.
Desktop Stand Installation:
- Kontu handiz jarri monitorearen aurpegia behera gainazal leun eta garbi batean, marradurak saihesteko.
- Attach the desktop stand to the designated mounting points on the rear of the monitor using the provided screws. Ensure it is securely fastened.
- Jarri monitorea gainazal egonkor eta lau batean.
VESA Wall/Arm Mounting:
- If the desktop stand is attached, remove it.
- Align the VESA 100mm mounting holes on the back of the monitor with your VESA-compatible wall mount or arm.
- Secure the monitor to the mount using appropriate VESA screws (M4 x 10mm recommended, not always included with monitor).

Figure 3: Monitor dimensions with desktop stand.
2. Konektatzeko kableak
The 19VG7M monitor features a variety of input ports located on the rear, facing downwards for neat cable management. Ensure the monitor and all connected devices are powered off before making connections.

Figure 4: Downward-facing input ports.
- HDMI: Connect an HDMI cable from your source device (e.g., computer, media player) to the HDMI port on the monitor.
- VGA: Connect a VGA cable from your source device to the VGA port on the monitor.
- BNC: For professional video applications, connect a BNC cable to the BNC input.
- RCA (AV): Use RCA cables for composite video and stereo audio input. Connect the yellow plug for video, and red/white for audio.
- USBa: (If applicable for touch functionality or specific peripherals, consult product specifications for exact USB function).
- Potentzia: Connect the provided power supply to the DC input port on the monitor, then plug the power cord into a wall outlet. The monitor supports a wide input voltage range of 9-36 Volts.

5. Irudia: Atzeko panela gaineanview with control buttons and ports.
Funtzionamendu-argibideak
1. Piztu/Itzaltzea
Sakatu ON/OFF button located on the rear panel or on the remote control to power the monitor on or off. The power indicator light will illuminate when the monitor is on.
2. Sarrera hautapena
To switch between different video inputs (HDMI, VGA, BNC, RCA):
- Sakatu AUTO button on the rear panel or the SARRERA urrutiko aginteko botoia.
- Erabili + or - buttons to navigate through the available inputs.
- Sakatu MENUA button or wait a few seconds to confirm your selection.
3. Pantailako pantaila (OSD) menua
The OSD menu allows you to adjust various display settings. To access and navigate the OSD menu:
- Sakatu MENUA button on the rear panel or remote control to open the OSD menu.
- Erabili + or - botoiak menuko aukeren artean nabigatzeko.
- Sakatu MENUA button again to enter a sub-menu or confirm a setting.
- To exit the OSD menu, navigate to the "Exit" option or press the MENUA button repeatedly until the menu disappears.
OSD ezarpen arruntak:
- Irudia: Adjust brightness, contrast, color temperature, and aspect ratio (e.g., 5:4).
- Audioa: Control volume and mute settings.
- OSD ezarpenak: Doitu OSD hizkuntza, gardentasuna eta denbora-muga.
- Berrezarri: Berrezarri fabrikako ezarpen lehenetsiak.
The monitor also supports a fully dimmable backlight, which can be adjusted via the OSD menu or dedicated dimmer controls if available.
Mantentzea
Proper maintenance ensures the longevity and optimal performance of your Beetronics monitor.
Monitorea garbitzea:
- Itzali beti monitorearen energia eta deskonektatu entxufetik garbitu aurretik.
- Pantaila: Erabili lipurrik gabeko zapi leun bat dampened with water or a non-abrasive, monitor-specific cleaning solution. Do not spray liquid directly onto the screen.
- Casing: Wipe the metal housing with a soft, dry cloth. Avoid using harsh chemicals, abrasives, or solvents, as they may damage the finish.
Arreta orokorra:
- Saihestu objektu astunak monitorearen edo haren kableen gainean jartzea.
- Do not block ventilation openings on the monitor.
- Keep the monitor away from direct sunlight, excessive heat, and high humidity.
- If the monitor will not be used for an extended period, it is recommended to unplug it from the power source.
Arazoak konpontzea
Monitorearekin arazoak badituzu, jo ezazu honako arazo eta irtenbide ohikoenei:
| Arazoa | Kausa posiblea | Irtenbidea |
|---|---|---|
| Ez dago irudirik pantailan |
|
|
| Irudia ilun/distiratsegi edo koloreak okerrak dira |
|
|
| Audiorik ez |
|
|
| Monitor flickering or unstable image |
|
|
If the problem persists after trying these solutions, please contact Beetronics customer support.
Zehaztapenak
Key technical specifications for the Beetronics 19VG7M 19-Inch Full HD IPS Monitor:
| Modelo zenbakia | 19VG7M |
| Pantailaren tamaina | 19 hazbete |
| Aspektu-erlazioa | 5:4 |
| Ebazpena | 1280 x 1024 (HD osoa) |
| Panel mota | IPS |
| Viewangelua | 178° (Horizontala/Bertikala) |
| Distira | 470 Kandela |
| Sarrera boltage | 9-36 Voltio (DC) |
| Sarrerako Portuak | HDMI, VGA, BNC, RCA (AV), USB |
| Produktuaren neurriak (L x W x H) | 1.6 x 16.1 x 15.2 hazbete (euskarririk gabe) |
| Elementuaren pisua | 3.3 kilo |
| Fabrikatzailea | Beetronics |
| Pantailaren gainazala | Matea |

Figure 6: Internal components and key features.
Bermea eta Laguntza
Bermearen informazioa
The Beetronics 19VG7M monitor comes with a solid 2 urteko bermea, ensuring reliability and peace of mind. This warranty covers defects in materials and workmanship under normal use. Please retain your proof of purchase for warranty claims.
For detailed warranty terms and conditions, please refer to the official Beetronics webwebgunean edo jarri harremanetan bezeroarentzako laguntzarekin.
Bezeroarentzako Arreta
If you require technical assistance, have questions about your product, or need to initiate a warranty claim, please contact Beetronics customer support:
- Webgunea: Visit the official Beetronics webMaiz egiten diren galderen, laguntza-baliabideen eta harremanetarako formularioen gunea. www.beetronics.com
- Posta elektronikoa: Refer to the Beetronics webwebgunean laguntza-helbide elektroniko eguneratuena lortzeko.
- Telefonoa: Refer to the Beetronics webeskualdeko laguntza telefono zenbakien gunea.
When contacting support, please have your monitor's model number (19VG7M) and purchase information readily available.
Ask a question about this manual
Ask about setup, troubleshooting, compatibility, parts, safety, or missing instructions. Manuals+ will review the question and use this page’s manual context to help answer it.