
Tera P01 (ZA05-U007K series)
Tera P01 ibilgailu elektrikoentzako kargagailu eramangarriaren erabiltzailearen eskuliburua
Model: P01 (ZA05-U007K series) | Brand: Tera
1. Sarrera
This manual provides detailed instructions for the safe and efficient use of your Tera Portable EV Charger P01. This Level 1 & 2 J1772 charger is designed for electric vehicles, offering flexible charging options with NEMA 14-50 and 5-15 compatibility, Wi-Fi connectivity, and a 25FT cable. Please read this manual thoroughly before operation and retain it for future reference.
2. Segurtasun informazioa
OHARRA: Segurtasun-jarraibide hauek ez betetzeak sutea, deskarga elektrikoa, lesioak edo produktuari edo ondasunei kalteak eragin ditzake.
- Ensure the charging unit is properly grounded.
- Ez erabili kargagailua kablea edo konektorea hondatuta badago.
- Ez sartu kargagailua uretan edo beste likido batzuetan.
- Mantendu haurrak kargatzeko eremutik urrun funtzionamenduan zehar.
- Only use the charger with compatible electric vehicles (J1772 EVs).
- Deskonektatu korrontea garbiketa edo mantentze-lanak egin aurretik.
- The charger is ETL & Energy Star certified, indicating adherence to high safety and energy efficiency standards.
The Tera EV Charger is designed with multiple protection features including overvoltage, overload, overheat, ground, earth leakage, and short circuit protection. It also features IP66 and Type 4 protection for water and dust resistance.

Image: Safety and Reliability features of the Tera EV Charger, highlighting ETL and FCC certifications, IP66 rating, and 24/7 support.
3. Paketearen edukia
Egiaztatu elementu guztiak paketean daudela:
- Portable EV Charger (1 unit)
- J1772 Cable Wall Mount Box Holder (1 unit)
- Biltegiratze poltsa (unitate 1)
- EV Charger Screw Kit (1 set)
- Erabiltzailearen eskuliburua (kopia 1)

Image: Contents of the Tera Portable EV Charger P01 package, showing the main unit, connectors, wall mount, storage bag, and screw kit.
4. Konfigurazioa
4.1 Erabilera eramangarria
For portable use, simply connect the NEMA 14-50 plug to a compatible 240V outlet or use the appropriate adapter for a 120V outlet (if applicable, verify product specifications for 5-15 compatibility). Ensure the outlet is rated for the charger's current draw.

Image: The Tera Portable EV Charger P01 and its storage bag, illustrating its portability.
4.2 Horma-instalazioa
The charger can be permanently installed using the included wall mount box holder. Choose a suitable location near your parking spot with access to a compatible electrical outlet.
- Select a sturdy wall surface.
- Use the screw kit to securely attach the J1772 Cable Wall Mount Box Holder to the wall.
- Mount the charger unit onto the holder.
- Ensure the charging cable can reach your vehicle's charging port without strain.

Image: The Tera Portable EV Charger P01 installed on a wall, showcasing its fixed-use capability.
5. Funtzionamendu-argibideak
5.1 Connecting to Your EV
- Ziurtatu kargagailua elikadura-iturri batean konektatuta dagoela.
- Ireki zure ibilgailuaren kargatzeko ataka.
- Insert the J1772 connector firmly into the vehicle's charging port until it clicks into place.
- The charger will begin the charging process automatically if in "Plug-and-Play" mode.
5.2 LED pantaila adimenduna
The integrated LED screen provides real-time charging information:
- Amparoa: Current charging rate (e.g., 32A).
- Kargatzeko abiadura: Indication of charging progress.
- Sarrera boltage: Egungo liburukiatage from the power source (e.g., 240V).
- Atzerapen-denbora: If scheduled charging is active.
- Kargatzeko praktikak: Status indicators.
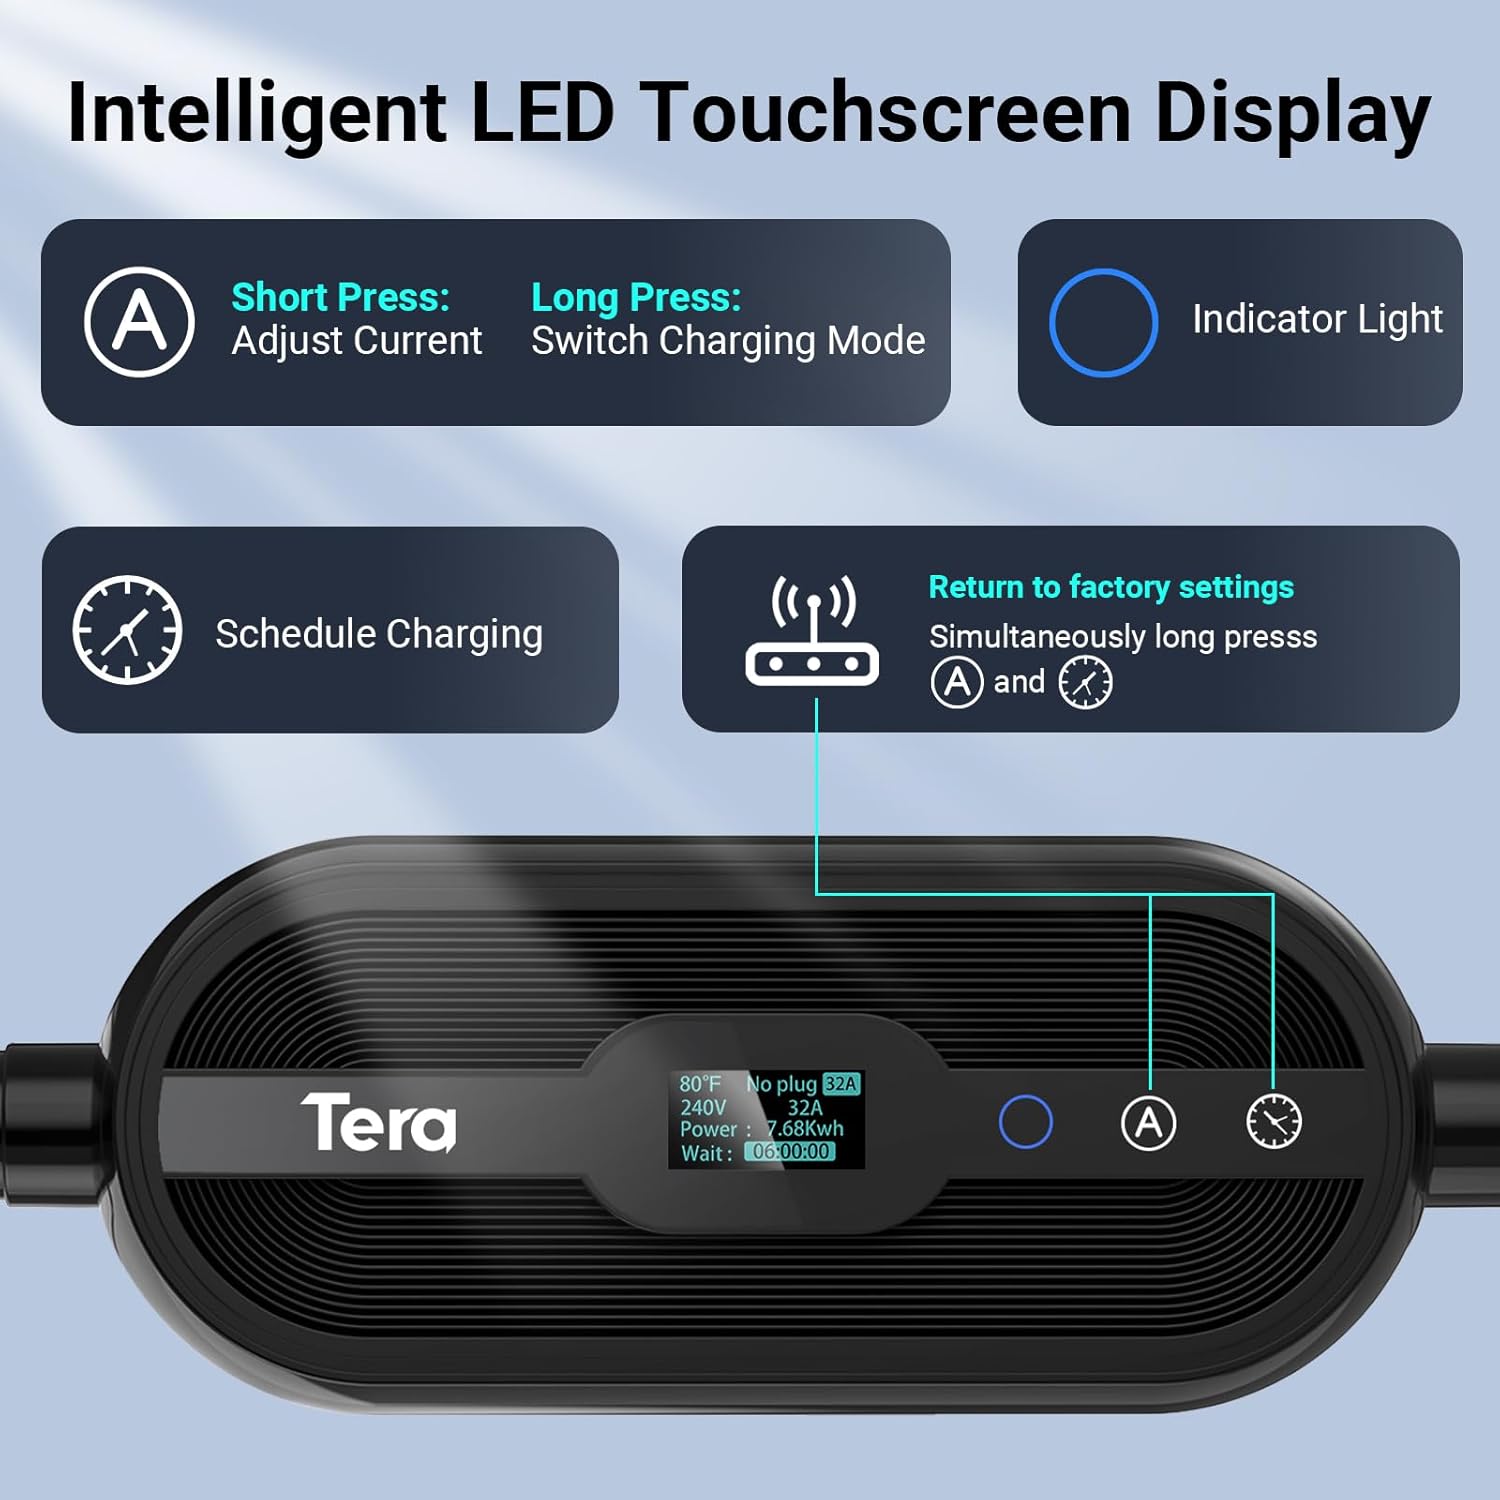
Irudia: Xehetasun handikoa view of the Tera EV Charger's LED touchscreen, illustrating the controls for current adjustment, charging mode selection, and scheduling.
5.3 Adjustable Current with Memory Function
The charger supports adjustable current settings from 8A to 32A. The system remembers the last used current setting for continuous use. It will only revert to the default 12 amps after a reboot.
- 'A' botoia laburki sakatuta: Adjust current (8A, 15A, 24A, 32A).
- 'A' botoia luze sakatuta: Switch charging mode (Plug-and-Play or APP Start).
Note: Hybrid vehicles may automatically reduce current based on their maximum allowed value.
5.4 Aplikazioen kontrola (Bizitza adimenduna)
The Tera EV Charger can be controlled via the Smart Life app, offering advanced features:
- Reserve Charging: Schedule charging times to take advantage elektrizitate-puntuetako tarifak.
- Monitor kargatzen: View real-time charging status.
- View Expenses & Historical Records: Track your charging costs and history.
- Full-Charge Notifications: Receive alerts when your vehicle is fully charged.
Download the Smart Life app from the App Store or Google Play Store.

Image: The Smart Life app interface on a smartphone, demonstrating remote control and monitoring capabilities for the Tera EV Charger.
5.5 Kargatzea programatzea
You can schedule charging via the touchscreen, the Smart Life app, or your vehicle's onboard system. Scheduling allows you to charge during off-peak hours to save on costs.
- Ukipen-pantaila: Use the clock button to set delay times (1-12 hours).
- Aplikazioa: Utilize the "Schedule" function within the Smart Life app.
- Vehicle Onboard System: Refer to your vehicle's manual for scheduling options.
Video: A demonstration of the Tera EV Charger's APP User Guide, showing how to control and schedule charging via the mobile application.
6. Mantentzea
- Regularly inspect the charging cable and connector for any signs of wear or damage.
- Keep the charger unit clean and free from dust and debris. Use a soft, dry cloth for cleaning.
- Ensure the charging port on your vehicle is clean before connecting the charger.
- Store the charger in its storage bag when not in use, especially for portable applications, to protect it from environmental elements.
7. Arazoak
| Gaia | Balizko Kausa / Irtenbidea |
|---|---|
| Ukipen-botoiek ez dute erantzuten | Ensure the connector is pulled out from the vehicle. Touch buttons will not respond if the charging gun is inserted. |
| Charging not starting (APP Start mode) | If your mode is set to "APP Start", pull out the charging gun, long-press the 'A' button to switch to "Plug-and-Play" mode, then re-insert. |
| Abnormal behavior when adjusting current via App | Pause the charging process before making current adjustments via the App. |
| Kargagailua ez da pizten | Check the power outlet and ensure the NEMA 14-50 plug is fully inserted. Verify power supply to the outlet. |
| Errore-argia adierazlea | Refer to the LED indicator guide for specific error codes (e.g., flashing patterns for over voltage, ground fault, over-current, leakage, over-temperature). Disconnect and reconnect the charger. If the issue persists, contact customer support. |
Video: A short demonstration on how to reset the Tera EV Charger, which can resolve certain operational issues.
8. Zehaztapenak
- Eredua: P01 (ZA05-U007K series)
- Sarrera boltage: 110V / 240V
- Korronte erregulagarria: 8A, 15A, 24A, 32A
- Gehienezko potentzia: 7.68 kWh (at 32A, 240V)
- Kablearen luzera: 25 FT (Pure Copper)
- Konektore mota: J1772 EVs
- Entxufe mota: NEMA 14-50 (with 5-15 compatibility, verify with manufacturer)
- Ziurtagiriak: ETL, Energy Star, FCC, UL2231-1/-2, UL 991, UL 2231, UL 2251, UL1998 & UL 2594
- Babes maila: IP66, Type 4 (Waterproof)
- Funtzionamendu-tenperatura: -22°F eta 122°F (-30°C eta 50°C)
- Neurriak: 15.83 x 12.76 x 7.05 hazbete (Paketea)
- Pisua: 12.8 kilo
9. Bermea eta Laguntza
Tera is a US-based brand with over 20 years of legacy. They offer a 2-year warranty on this product.
- Bermea: 2 urteko bermea.
- Laguntza teknikoa: Bizi osorako laguntza teknikoa.
- Bezeroarentzako arreta: 24/7 email support and phone support from 7 AM to 6 PM PST, Monday to Friday (excluding public holidays).
For assistance, please refer to the contact information provided with your product or visit the official Tera webgunea.

Image: Tera's commitment as a US-based brand, emphasizing design, development, and support in the USA.
Ask a question about this manual
Ask about setup, troubleshooting, compatibility, parts, safety, or missing instructions. Manuals+ will review the question and use this page’s manual context to help answer it.