1. Produktua amaitu daview
The Tilta Full Camera Cage is custom-designed for the Canon R7 camera body, providing enhanced protection and versatile mounting options for various accessories. Constructed from durable aluminum, this cage integrates seamlessly with the camera's form factor while maintaining access to all essential controls and ports.
Key features include multiple 1/4"-20 threads with locating points, cold shoe mounts, and a NATO rail for attaching accessories such as monitors, microphones, and LED lights. The integrated Arca-Swiss compatible bottom plate allows for quick transitions between tripods and gimbals, including compatibility with DJI RS3 Pro. A dedicated cable clamp secures HDMI and USB-C cables, ensuring stable data transmission. For convenience, a multi-tool with an M3 Allen key and flat head screwdriver is magnetically integrated into the bottom plate.

Figure 1.1: Tilta Full Camera Cage installed on a Canon R7 camera, viewed from the side, highlighting the robust construction and accessory attachment points.

1.2. Irudia: Atzealdea view of the cage on the Canon R7, demonstrating clear access to the camera's rear screen and operational buttons.

1.3. irudia: Aurrealdea view of the cage on the Canon R7, illustrating how the cage frames the camera body without obstructing the lens.
2. Zer dago kutxan
Egiaztatu osagai guztiak zure paketean daudela:
- 1 x Full Camera Cage for Canon R7 – Black
- 1 x EF-R Mount Adapter Support for Canon R8 – Black (Note: This component is included but primarily for R8 compatibility; it may not be directly used with the R7 cage.)
- 1 x Micro HDMI and USB-C Cable Clamp for Canon R7 – Black
- 1 x Slotted and Allen Key (Multi-tool)
3. Konfigurazio gida
3.1 Attaching the Camera Cage
- Ensure your Canon R7 camera is powered off and any lens or accessories are removed.
- Align the camera with the cage, ensuring the 1/4"-20 mounting screw on the bottom of the cage aligns with the camera's tripod socket.
- Secure the camera to the cage using the integrated 1/4"-20 screw. Use the magnetically attached multi-tool (slotted screwdriver end) located on the bottom of the cage to tighten the screw firmly.
- For additional security, align the two side strap anchor points on the camera with the corresponding pins on the cage. This provides a three-point attachment for maximum stability.

3.1. irudia: Xehetasuna view of the cage's mounting points and camera attachment mechanism.
3.2 Attaching the Cable Clamp
- Locate the Micro HDMI and USB-C Cable Clamp.
- Erantsi clamp to the side of the cage near the camera's HDMI and USB-C ports using the provided thumb screws.
- Route your HDMI and USB-C cables through the clamp and tighten the thumb screws to secure them. This prevents accidental disconnections and protects the camera's ports.

Figure 3.2: The cable clamp in use, securing connected cables to the cage.
4. Operating the Cage
4.1 Accessory Mounting
The cage offers multiple attachment points for various camera accessories:
- 1/4"-20 Threads with Locating Points: Use these threads to attach articulating arms, external monitors, LED lights, and other accessories that require anti-twist security.
- Cold Shoe Receivers: Located on the top of the cage, these are ideal for mounting microphones, small LED lights, or wireless receivers.
- NATO Rail: The integrated NATO rail on the side allows for quick attachment and detachment of NATO-compatible handles or other accessories.
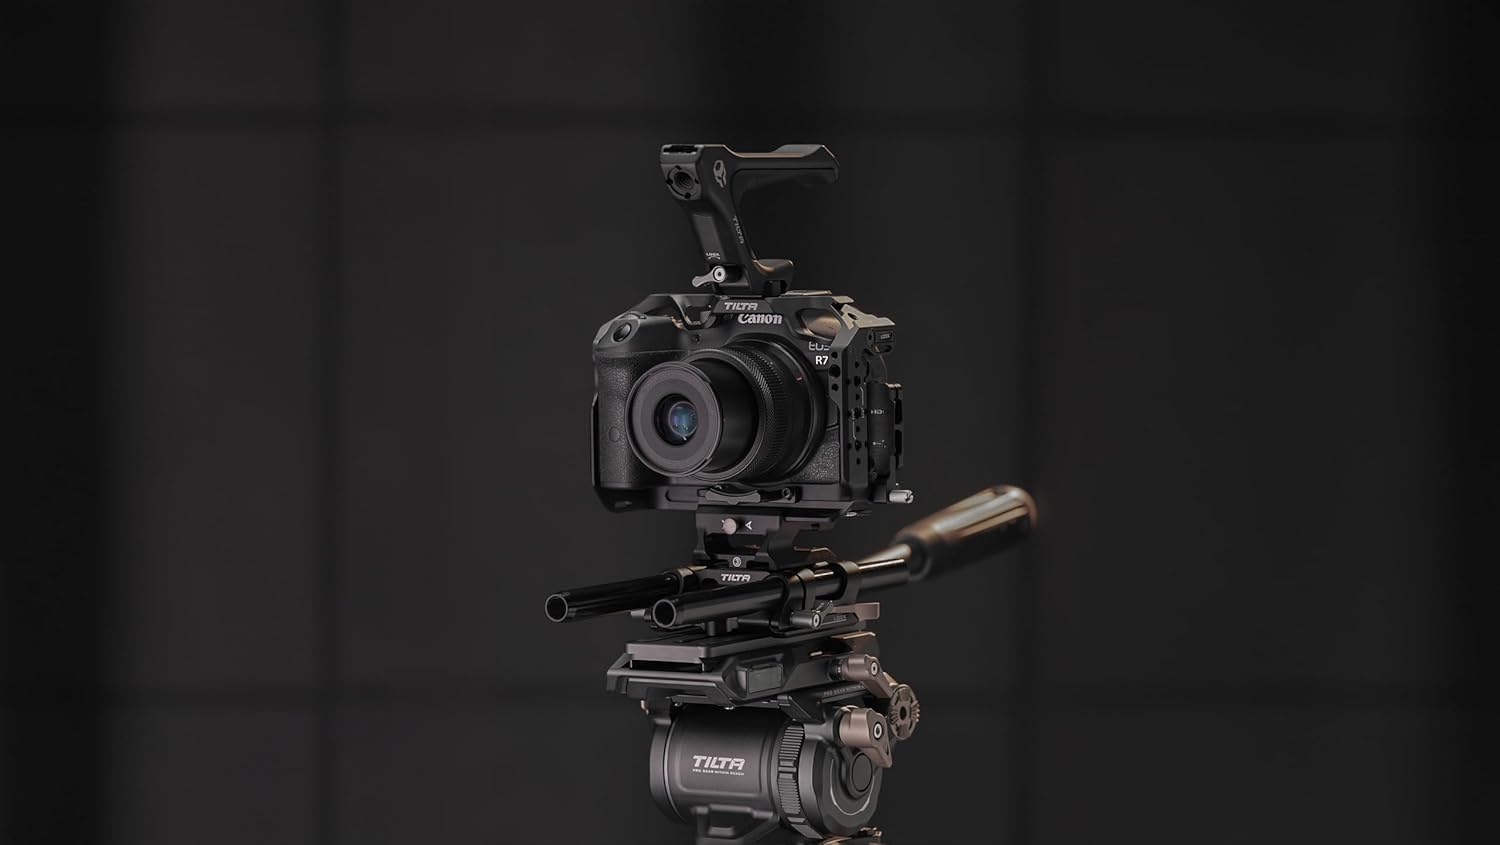
Figure 4.1: The cage with an optional top handle attached, showcasing bere modularitatea.
4.2 Arca-Swiss Compatibility
The bottom plate of the cage is Arca-Swiss compatible, allowing for direct mounting onto Arca-Swiss tripod heads and gimbals, including the DJI RS3 Pro. This feature enables rapid transitions between handheld, tripod, and gimbal setups without needing to remove the cage or attach additional quick release plates.

Figure 4.2: Close-up of the Arca-Swiss compatible base plate for quick mounting.
4.3 Integrated Multi-Tool
A multi-tool, comprising an M3 Allen key and a flat head screwdriver, is magnetically stored in the bottom of the cage. This tool is essential for tightening the camera mounting screw and other cage components, ensuring it is always accessible when needed.

Figure 4.3: The multi-tool conveniently stored within the cage's design.
5. Mantentzea
To ensure the longevity and optimal performance of your Tilta Full Camera Cage, follow these maintenance guidelines:
- Garbiketa: Wipe the cage regularly with a soft, dry cloth to remove dust and fingerprints. For stubborn dirt, a slightly damp Oihal bat erabil daiteke, eta berehala lehortu ondoren. Saihestu garbitzaile edo disolbatzaile urratzaileak.
- Ikuskapena: Periodically check all screws and mounting points for tightness. Re-tighten any loose connections using the integrated multi-tool.
- Biltegiratzea: Store the cage in a dry, clean environment when not in use. If storing with the camera, ensure the camera is powered off and protected.
6. Arazoak
6.1 Difficulty Accessing Record Button
Some users may find the camera's record button slightly less accessible due to the cage's design. This is a minor ergonomic consideration due to the protective nature of the cage.
- Irtenbidea: Adapt your grip slightly to reach the button. Alternatively, consider remapping a more easily accessible button on your Canon R7 to function as the record button if your camera firmware allows.
6.2 Loose Accessories
If accessories mounted to the cage feel loose or wobbly:
- Irtenbidea: Ziurtatu torloju eta giltza guztiakamps securing the accessories are fully tightened. Utilize the locating pins on 1/4"-20 threads where available to prevent rotation.
7. Zehaztapenak
| Atributua | Balioa |
|---|---|
| Produktuaren neurriak | 9 x 6 x 3.5 hazbete |
| Elementuaren pisua | 9.6 ontza |
| ASIN | B0CL5LR3W7 |
| Elementuaren eredu-zenbakia | TA-T59-FCC-B |
| Fabrikatzailea | Tilta |
| Jatorrizko Herrialdea | Txina |
| Marka | Tilta |
| Muntatze Mota | Cold Shoe Mount |
| Kolorea | Beltza |
| Materiala | Aluminioa |
| UPC | 810076278681 |
8. Bermea eta Laguntza
Tilta products are manufactured to high-quality standards. For information regarding warranty coverage and terms, please refer to the official Tilta webgunera edo jarri harremanetan zuzenean bezeroarentzako arreta-zerbitzuarekin.
For technical assistance, product inquiries, or support, please visit the Tilta Store on Amazon edo haien ofiziala webgunea.