1. Sarrera
This manual provides comprehensive instructions for the RUIZHI ESP32 ESP32-WROOM-32D Development Board. It covers product features, setup procedures, operating guidelines, maintenance tips, troubleshooting, and detailed specifications. Please read this manual carefully before using the product to ensure proper functionality and to maximize its potential.
2. Produktua amaitu daview
The ESP-WROOM-32 is a versatile and powerful Wi-Fi and Bluetooth enabled microcontroller unit (MCU) module, designed for a wide range of applications. It features a dual-core CPU and integrated Wi-Fi and Bluetooth connectivity, making it ideal for IoT projects, smart home devices, and various embedded systems.

2.1. irudia: Aurrealdea view of the RUIZHI ESP32-WROOM-32D Development Board, highlighting its compact design and integrated components.
Ezaugarri nagusiak:
- Tamaina trinkoa: Designed for easy integration into various products.
- Errendimendu indartsua: Equipped with a dual-core processor, supporting Wi-Fi and Bluetooth protocols, and FreeRTOS.
- Hainbat funtzionamendu modu: Supports Access Point (AP), Station (STA), and AP+STA coexistence modes for flexible network configurations.
- Lua Programmability: Simplifies development for users of all programming skill levels.
- USB C motako interfazea: Modern and convenient connectivity.
- Stable CH340 USB-to-TTL Chip: Ensures reliable serial communication.
- Deskarga automatikoa: Facilitates easy firmware uploading without manual button presses.
- Bateragarritasun zabala: Compatible with Windows systems and development environments like Cygwin and MSYS32.
- Energia Baxuko Diseinua: Optimized for battery-powered applications requiring extended battery life.
3. Konfigurazio gida
Follow these steps to set up your RUIZHI ESP32 Development Board.
3.1 Paketearen edukia
- 2 x RUIZHI ESP32 ESP32-WROOM-32D Development Boards
3.2 Connecting the Board
The ESP32 development board can be easily connected to a breadboard or a custom PCB for prototyping. Ensure correct pin alignment when inserting the board.

3.1. irudia: Illustration of connecting the ESP32 development board to a larger baseboard, showing proper pin alignment.
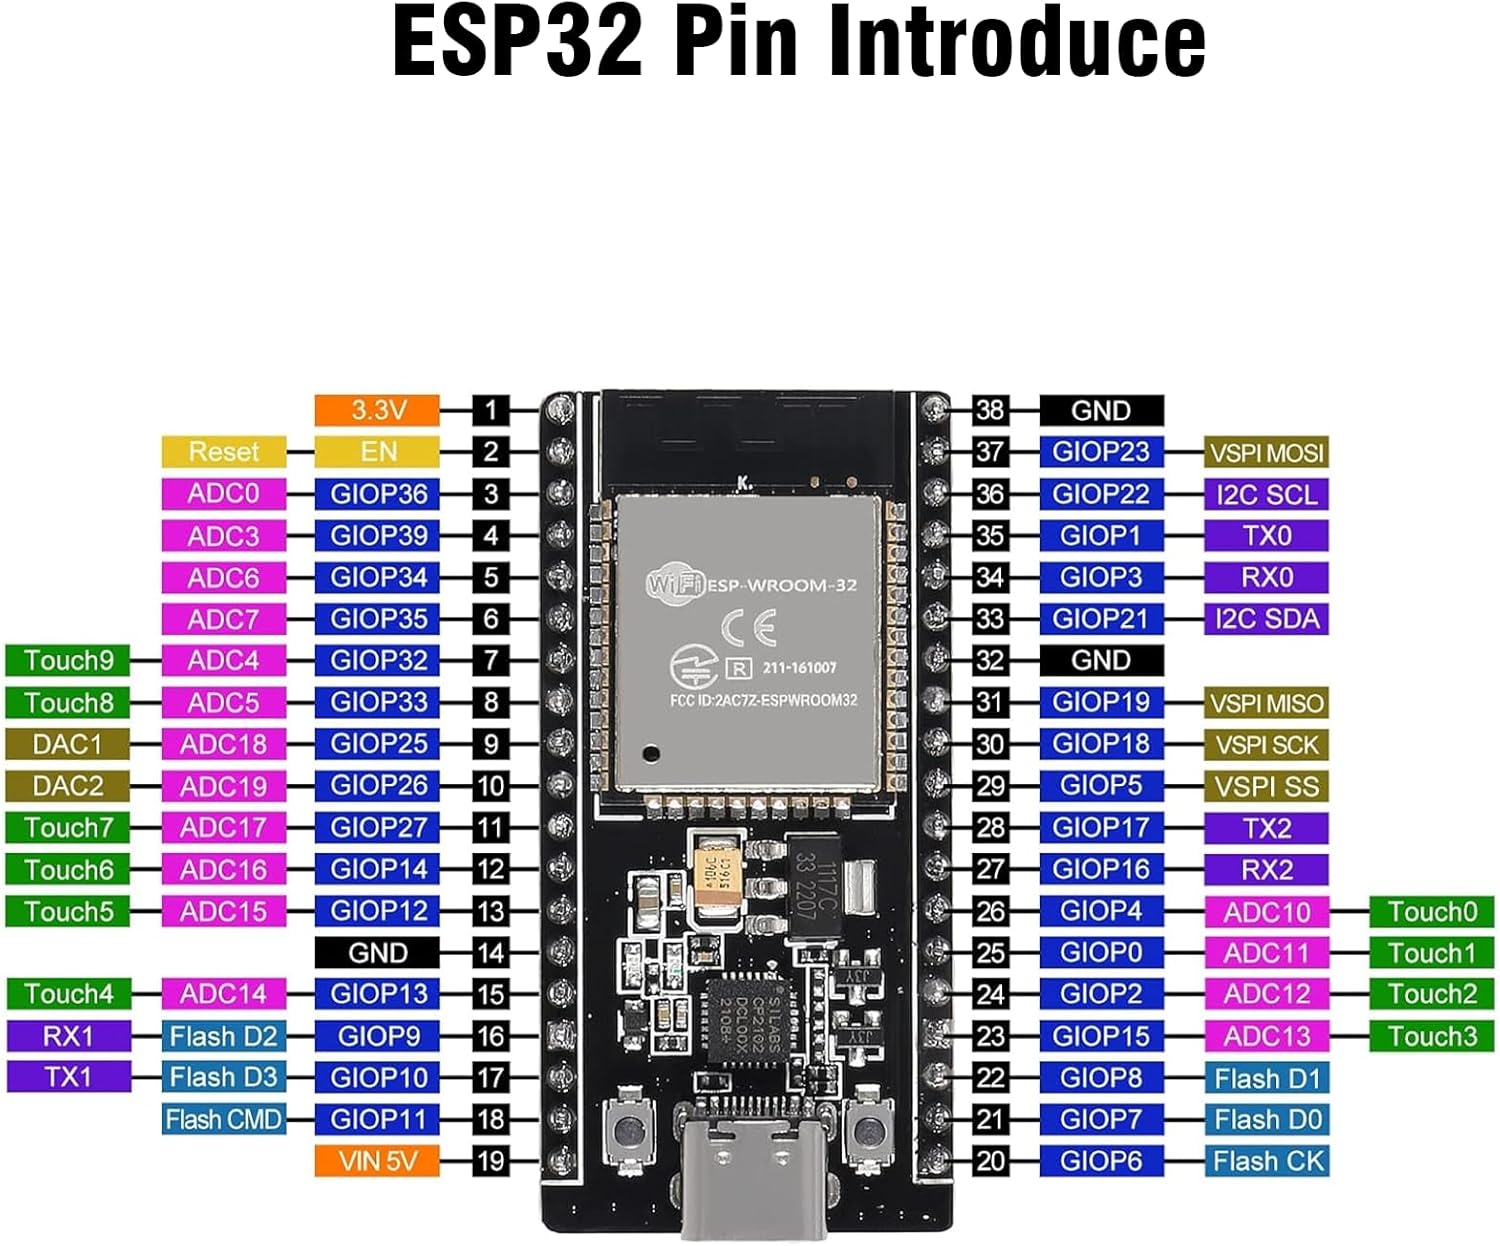
3.3 Pinout diagrama
Refer to the following diagram for the pin assignments of the ESP32-WROOM-32D module. Understanding the pinout is crucial for proper wiring and programming.

3.2. irudia: Detailed pinout diagram for the ESP32-WROOM-32D module, indicating GPIO numbers, power pins, and special function pins.
3.4 Gidariaren instalazioa
The board uses a CH340 USB-to-TTL chip for serial communication. If your operating system does not automatically install the driver, you may need to download and install it manually. Drivers are typically available from the CH340 manufacturer's website or common ESP32 development resources.
- Connect the ESP32 board to your computer using a USB Type-C cable.
- If the device is not recognized, search online for "CH340 driver" and download the appropriate version for your operating system (Windows, macOS, Linux).
- Instalatu kontrolatzailea emandako argibideei jarraituz.
- Verify installation by checking your device manager for a new COM port.
4. Funtzionamendu-argibideak
This section outlines the basic steps for operating your ESP32 development board, including programming and mode selection.
4.1. irudia: Example applications of the ESP32 board, demonstrating its use in various projects with external components.
4.2 Programming the ESP32
The RUIZHI ESP32 board is compatible with various development environments, including the Arduino IDE and ESP-IDF. It supports Lua programming for simplified development.
- Arduino IDEa instalatu: Deskargatu eta instalatu Arduino IDE ofizialetik. webgunea.
- Gehitu ESP32 plakaren euskarria: In the Arduino IDE, go to File > Hobespenak and add the ESP32 board manager URL. Then, go to Tresnak > Arbela > Arbelen kudeatzailea and search for "ESP32" to install the board package.
- Hautatu plaka eta ataka: Bertatik Tresnak > Arbela, select "ESP32 Dev Module" or a similar ESP32 board. Then, from Tresnak > Ataka, select the COM port corresponding to your connected ESP32 board.
- Kargatzeko kodea: Write or open an example sketch, then click the "Upload" button to compile and upload your code to the ESP32. The CH340 chip supports automatic download, so manual boot button pressing is usually not required.
4.3 Funtzionamendu moduak
The ESP32 supports three primary Wi-Fi operating modes:
- Estazio (ESTA) Modua: The ESP32 connects to an existing Wi-Fi network (like your home router) as a client device.
- Sarbide puntua (AP) modua: The ESP32 creates its own Wi-Fi network, allowing other devices to connect to it.
- AP+STA Coexistence Mode: The ESP32 operates as both an Access Point and a Station simultaneously, connecting to an existing network while also hosting its own.
These modes are configured through your programming code (e.g., using the Wi-Fi library in Arduino IDE).
5. Mantentzea
Proper care and maintenance will ensure the longevity and reliable operation of your ESP32 development board.
- Biltegiratzea: Store the board in an anti-static bag when not in use to protect it from electrostatic discharge.
- Garbiketa: Use a soft, dry brush or compressed air to remove dust from the board. Avoid using liquids or harsh chemicals.
- Manipulazioa: Always handle the board by its edges to avoid touching sensitive components or pins.
- Elikatze-iturria: Ensure you provide the correct voltage (typically 5V via USB or VIN pin) to prevent damage.
- Firmware eguneraketak: Regularly check for and apply firmware updates for the ESP32 chip and development environment to benefit from bug fixes and new features.
6. Arazoak
Hona hemen ohiko arazo batzuk eta haien konponbideak:
| Arazoa | Kausa posiblea | Irtenbidea |
|---|---|---|
| Board not recognized by computer. | Missing or incorrect CH340 driver. Faulty USB cable. | Install the correct CH340 driver. Try a different USB Type-C cable. Check device manager for COM port. |
| Code upload fails. | Incorrect board/port selection. Corrupted code. Power issue. | Ensure correct board and COM port are selected in IDE. Verify code syntax. Ensure stable power supply. Try pressing the BOOT button while uploading if automatic upload fails. |
| Wi-Fi/Bluetooth-ak ez du funtzionatzen. | Incorrect code configuration. Antenna issue. | Review your code for correct Wi-Fi/Bluetooth initialization and credentials. Ensure the board's antenna is not obstructed. |
| Taula berotzen da funtzionamenduan zehar. | Overcurrent draw from peripherals. Short circuit. | Check your circuit for short circuits. Reduce current draw from GPIO pins. Ensure power supply is adequate. |
7. Zehaztapenak
Detailed technical specifications for the RUIZHI ESP32 ESP32-WROOM-32D Development Board.
| Ezaugarri | Xehetasuna |
|---|---|
| Marka | RUIZHI |
| Modelo zenbakia | XU142 |
| Seriea | ESP-GELA-32 |
| CPU fabrikatzailea | Espressif |
| Prozesadore kopurua | 2 (nukleo bikoitza) |
| Memoriaren Teknologia | LPDDR4 |
| Haririk gabeko konexioa | Wi-Fi, Bluetootha |
| Sistema eragilearen euskarria | FreeRTOS |
| Konektibitate Teknologia | USB C motakoa |
| Gailu bateragarriak | PC, Smartphone, Arduino |
| Neurriak (gutxi gorabehera) | 50 mm x 28 mm (1.96 hazbete x 1.1 hazbete) |
| Elementuaren pisua | 20 gramo |
| Pilak barne | Ez |

7.1. irudia: Physical dimensions of the ESP32 development board, showing approximate length and width.
8. Bermea eta Laguntza
For warranty information and technical support, please refer to the RUIZHI official webwebgunearekin edo jarri harremanetan zure saltzailearekin. Gorde erosketa-agiria erosketaren frogagiri gisa.
- Sareko baliabideak: Many online communities and forums are dedicated to ESP32 development, offering extensive tutorials and troubleshooting advice.
- Fabrikatzailearen laguntza: For specific product inquiries or issues, contact RUIZHI customer support.