NOYAFA NF-8509
NOYAFA NF-8509 Network Cable Tester and Multimeter User Manual
Modeloa: NF-8509
1. Produktua amaitu daview
The NOYAFA NF-8509 is a versatile testing instrument combining the functionalities of a network cable tester and a digital multimeter. It is designed for professionals and enthusiasts to perform various network and electrical measurements efficiently.

Image 1.1: The NOYAFA NF-8509 device, showcasing its main unit and receiver, along with test leads.
Ezaugarri nagusiak:
- Network Cable Testing: Includes POE tester, RJ45/RJ11 CAT5/CAT6 cable testing, continuity testing, port flashing, and anti-jamming wire tracing.
- Multimetroaren funtzioak: Neurriak AC/DC voltage, AC/DC current, resistance, continuity, diode, and temperature.
- Time Domain Reflectometry (TDR): Measures cable length from 5 to 200 meters and calibrates Velocity of Propagation (VoP) values.
- POE Tester: Identifies standard PoE device information such as voltage, power supply polarity, power supply mode, and PSE type (af or at standard).
- Portu keinukaria: Automatically detects and switches between 10M/100M/1000M modes to locate network ports by flashing the port light on hubs and switches.
- NCV (Kontakturik gabeko boltage) Detekzioa: Provides non-contact AC signal detection with an alarm for safety.
- Anti-Burnout Protection: Intelligent protection against incorrect operation up to 250V.
2. Gailuaren osagaiak
The NF-8509 consists of a main transmitter unit and a receiver unit. Familiarize yourself with the components before operation.

Image 2.1: Diagram illustrating the various buttons, ports, and display elements on both the transmitter and receiver units of the NF-8509.
Igorle-unitatea:
- Bistaratzeko pantaila: Shows measurement results, battery level, and function indicators.
- Multimeter Probe Sockets: For connecting test leads for electrical measurements.
- RJ45/RJ11 Ports: For network and telephone cable testing.
- Funtzio-botoiak: For selecting modes (SCAN, CONT, Flash, Length, POE), holding readings, and switching multimeter functions.
- C motako interfazea: Gailua kargatzeko.
Hartzailearen unitatea:
- Signal Probe: Used for tracing cables.
- Pizteko botoia: Hartzailea piztu/itzaltzeko.
- Sentikortasunaren doikuntza: Dial to adjust the sensitivity of the wire tracing function.
- Modu aldatzeko botoia: Toggles between Analog and Digital scanning modes.
- Linterna: Ingurune ilunetan argiztatzeko.
- 3.5 mm aurikularretarako konektua: For private listening during wire tracing.
3. Konfigurazioa eta hasierako erabilera
Before using the NF-8509, ensure it is properly set up.
3.1 Gailua kargatzea
- Connect the provided USB Type-C cable to the Type-C interface on the transmitter unit and to a standard USB power adapter (not included).
- The battery indicator on the display will show charging status. Ensure the device is fully charged for optimal performance.
3.2 Piztu/Itzaltzea
- Igorlea: Press and hold the power button (usually the central button) until the screen illuminates. Press and hold again to power off.
- Hartzailea: Rotate the power/scan dial clockwise to turn on. Rotate counter-clockwise to turn off.
3.3 Connecting Test Leads (for Multimeter Functions)
- Sartu proba-kable gorria 'VΩHz' sarrera-hartunean.
- Sartu proba-kable beltza 'COM' sarrera-hartunean.
- For current measurements, insert the red test lead into the '5A' input jack.
4. Funtzionamendu-argibideak
This section details the various functions of the NOYAFA NF-8509.
4.1 Network Cable Testing

Image 4.1: The NF-8509 display showing a network cable continuity test, indicating wire mapping.
4.1.1 Wire Map (Continuity) Test
- Connect one end of the RJ45 or RJ11 cable to the corresponding port on the transmitter unit.
- Connect the other end of the cable to the remote unit (if testing a long cable run) or directly to the receiver's RJ45 port for a direct test.
- On the transmitter, select the 'CONT' mode.
- The display will show the wire map, indicating continuity for each pin. Any breaks or miswires will be clearly displayed.
4.1.2 Cable Length Measurement (TDR)

Image 4.2: The NF-8509 in use, demonstrating its Time Domain Reflectometry (TDR) technology for precision cable length measurement.
- Ensure the cable to be measured is disconnected from all network devices.
- Connect one end of the cable to the RJ45 port on the transmitter unit.
- Select the 'Length' mode on the transmitter.
- The device will display the estimated length of the cable. The Velocity of Propagation (VoP) can be calibrated for improved accuracy.
4.1.3 Portuaren keinua
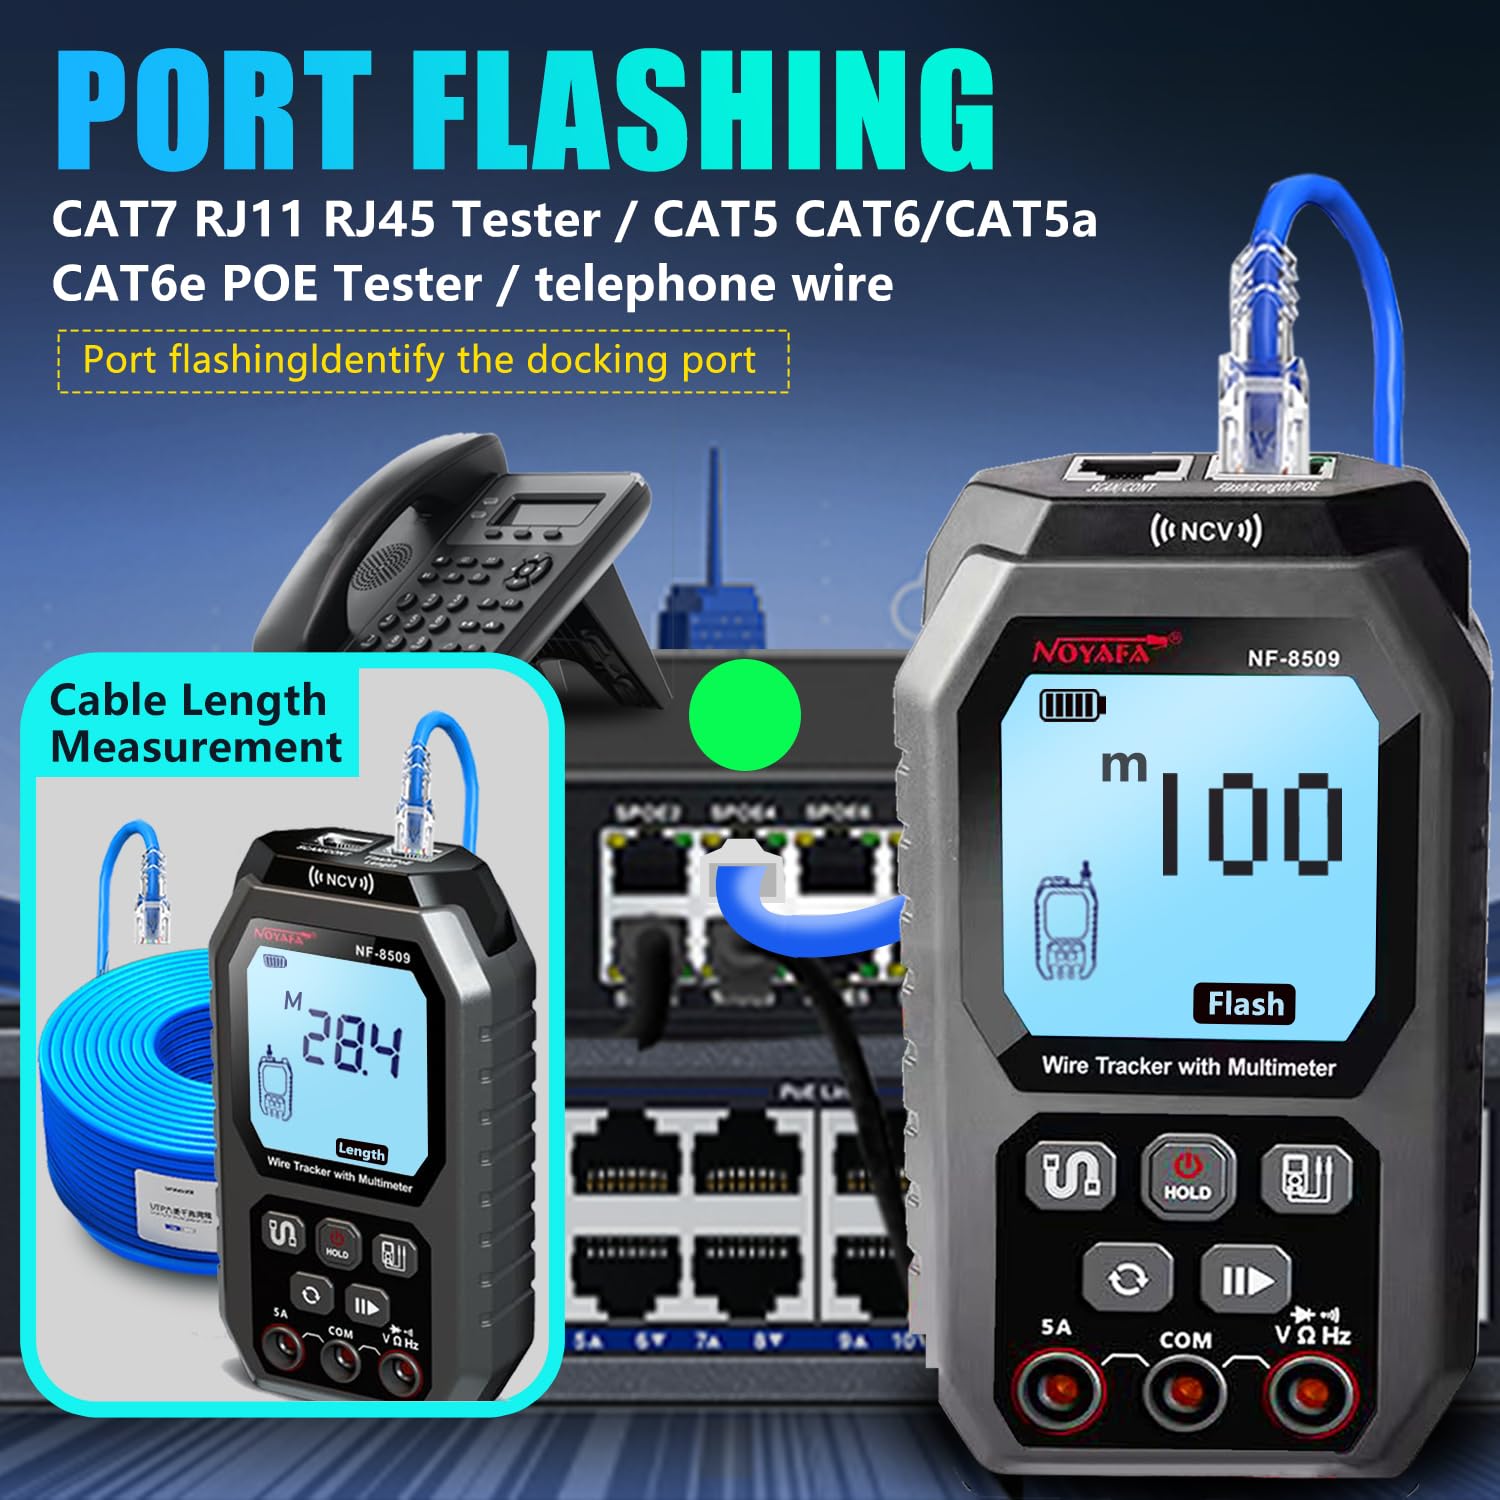
Image 4.3: The NF-8509 connected to a network switch, illustrating the port flashing function to identify the connected port, alongside a cable length measurement display.
- Connect the RJ45 cable from the transmitter unit to a port on a network switch or hub.
- Select the 'Flash' mode on the transmitter.
- The corresponding port light on the connected network device will flash, allowing for easy identification of the cable's termination point.
4.1.4 Wire Tracing (SCAN Mode)
- Connect the cable to be traced to the RJ45 port on the transmitter unit.
- Select the 'SCAN' mode on the transmitter.
- Turn on the receiver unit and adjust its sensitivity.
- Use the receiver's probe to scan along the cable path. The receiver will emit an audible tone when it detects the signal from the transmitter, helping to locate the specific cable within a bundle.
- Switch between Analog and Digital modes on the receiver for different tracing environments and interference levels.
4.1.5 POE Testing

Image 4.4: The NF-8509 transmitter unit displaying POE test results, indicating power over Ethernet detection.
- Connect the RJ45 cable from a PoE-enabled port to the RJ45 port on the transmitter unit.
- Select the 'POE' mode on the transmitter.
- The device will display information about the PoE connection, including voltage, power supply polarity, power mode, and the type of Power Sourcing Equipment (PSE) (e.g., 802.3af or 802.3at).
4.2 Multimetroaren funtzioak

Image 4.5: A collage of the NF-8509 display showing different autoranging functional measurements, including AC/DC voltage, resistance, AC/DC current, and buzzer continuity tests.
Ensure test leads are correctly connected to the 'VΩHz' and 'COM' jacks for most measurements, and '5A' for current measurements.
4.2.1 AC/DC Voltage Neurketa
- Aukeratu dagokion bolumenatage mode (AC V or DC V) using the function switch button.
- Connect the test leads across the circuit or component to measure voltage.
- Pantailak bolumena erakutsiko dutagirakurketa.
4.2.2 AC/DC korrontearen neurketa
- Ensure the red test lead is in the '5A' jack and the black lead in 'COM'.
- Select the appropriate current mode (AC A or DC A).
- Break the circuit and connect the test leads in series with the component to measure current.
- The display will show the current reading.
4.2.3 Erresistentzia Neurketa
- Select the resistance mode (Ω).
- Ziurtatu zirkuitua deskonektatuta dagoela. Konektatu proba-kableak osagaiaren artean erresistentzia neurtzeko.
- The display will show the resistance value.
4.2.4 Jarraitutasun-proba (Buzzerra)
- Select the continuity mode (usually indicated by a buzzer icon).
- Konektatu proba-kableak zirkuituan edo osagaian zehar.
- If continuity exists (low resistance), the device will emit an audible beep.
4.2.5 Diodoaren proba
- Select the diode test mode (usually indicated by a diode symbol).
- Connect the test leads across the diode.
- Pantailak aurrerako bolumena erakutsiko dutage erorketa. Alderantzikatu kableak zirkuitu irekia dagoen egiaztatzeko.
4.2.6 NCV (Kontakturik Gabeko Bolumena)tage) Detekzioa

Image 4.6: The NF-8509 performing NCV (Non-Contact Voltage) detection, showing the device detecting an AC signal near a wall outlet.
- Select the NCV mode.
- Bring the top part of the transmitter unit (where the NCV sensor is located) close to an AC voltage source (e.g., live wire, electrical outlet).
- The device will emit an alarm and indicate the presence of AC voltage kontaktu zuzenik gabe.
4.2.7 Tenperaturaren Neurketa
If your model includes a temperature probe (not always standard), connect it to the appropriate input jacks and select the temperature mode (°C/°F) to measure temperature.
5. Mantentzea
Mantentze-lan egokiak zure NF-8509aren iraupena eta zehaztasuna bermatzen ditu.
5.1 Garbiketa
- Garbitu gailua leun batekin, damp oihal. Ez erabili garbitzaile edo disolbatzaile urratzailerik.
- Ensure no moisture enters the ports or openings.
5.2 Biltegiratzea
- Gorde gailua leku fresko eta lehor batean, eguzki-argitik eta muturreko tenperaturetatik babestuta.
- If storing for extended periods, ensure the battery is partially charged (around 50%) to prolong battery life.
5.3 Bateria zaintzea
- Kargatu berriro gailua bateriaren adierazleak bateria baxua erakusten duenean.
- Saihestu bateria maiz erabat deskargatzea.
6. Arazoak
If you encounter issues with your NF-8509, refer to the following common troubleshooting steps.
- Gailua ez da pizten: Check battery level and ensure it is charged. If using test leads, ensure they are correctly inserted.
- Neurketa zehaztugabeak: Ensure proper connection of cables/test leads. Verify the correct mode is selected for the measurement. Calibrate TDR VoP if cable length measurements are inconsistent.
- Wire tracing signal is weak or noisy: Adjust the sensitivity dial on the receiver. Ensure the transmitter is in SCAN mode. Check for strong electromagnetic interference in the environment.
- POE test fails or times out: Verify the connected port is indeed PoE-enabled. Ensure the cable is functional and correctly connected.
- Pantaila hutsik edo izoztuta dago: Saiatu gailua berrabiarazten. Arazoak jarraitzen badu, jarri harremanetan bezeroarentzako arreta-zerbitzuarekin.
7. Zehaztapenak
| Ezaugarri | Zehaztapena |
|---|---|
| Modelo zenbakia | NF-8509 |
| Produktuaren neurriak | 6 x 2.5 x 2 hazbete |
| Elementuaren pisua | 1.34 kilo |
| Energia iturria | Bateriaren bidez |
| Kolorea | Beltza |
| Cable Length Measurement Range | 5 eta 200 metro bitartekoa |
| Onartutako kable motak | RJ45, RJ11, CAT5, CAT6 |
| Segurtasun Araua | FCC |
| Fabrikatzailea | NOYAFA |
8. Bermea eta Laguntza
NOYAFA is committed to providing high-quality products. For warranty information, technical support, or service inquiries, please refer to the official NOYAFA webgunera edo jarri harremanetan zuzenean bezeroarentzako arreta-zerbitzuarekin.
You can visit the official NOYAFA store for more information and support: NOYAFA Store on Amazon
Ask a question about this manual
Ask about setup, troubleshooting, compatibility, parts, safety, or missing instructions. Manuals+ will review the question and use this page’s manual context to help answer it.