1. Sarrera
Thank you for choosing the Gasbye Dual Hose Portable Air Conditioner. This manual provides essential information for the safe and efficient operation of your new appliance. Please read it thoroughly before installation and use, and keep it for future reference.
This 2025 upgraded model features a full DC Inverter Compressor, offering energy-saving performance with a 13.6 CEER rating and low noise levels (approximately 45dB). Designed to cool rooms up to 500 sq. ft., it includes a backlit remote control for convenient operation.

Figure 1.1: Gasbye CoolPrime 10000 Portable Air Conditioner and Remote Control.
The Gasbye CoolPrime 10000 unit is shown in black, with its main air outlet at the top. A white remote control with a digital display and various function buttons is positioned to the left of the unit. A white exhaust hose is visible extending from the back of the unit towards a window.
2. Segurtasun informazioa
Beti jarraitu oinarrizko segurtasun neurriak tresna elektrikoak erabiltzean, sute, deskarga elektriko edo lesio arriskua murrizteko.
- Ziurtatu elikadura hornidura bolumenarekin bat datorrelatagUnitatearen balorazio-etiketan zehaztuta dago.
- Ez erabili unitatea hondatutako kable edo entxufe batekin.
- Mantendu unitatea material sukoietatik eta sugar irekietatik urrun.
- Ez blokeatu airearen sarrerak edo irteerak.
- Deskonektatu unitatea garbitu edo zaindu aurretik.
- Tresna hau ez da gaitasun fisiko, sentsorial edo mental murriztua duten edo esperientzia eta ezagutza falta duten pertsonek (haurrak barne) erabiltzeko, baldin eta haien segurtasunaz arduratzen den pertsona batek gailuaren erabilerari buruz gainbegiratu edo jarraibiderik eman ez badu.
3. Produktua amaitu daview
3.1 Funtsezko osagaiak
- Main Unit (Portable Air Conditioner)
- Air Exhaust Hose Assembly (2 hoses, 5.9" diameter, 59" length)
- Window Vent Kits (two 20-inch brackets, one 10-inch bracket)
- Atzeko argiztatutako Urruneko Kontrola
- Drainage Hose (for manual drainage, if needed)
3.2 Kontrol-panela eta pantaila
The unit features an intuitive control panel on the top surface. The digital display shows the current room temperature or set temperature. Indicator lights show the selected mode, fan speed, and other functions.
3.3 Urruneko kontrola
The included remote control allows for convenient operation from a distance. It features a backlit display for easy use in low-light conditions.

Figure 3.1: Backlit Remote Control.
A hand holds the white backlit remote control, pointing it towards the Gasbye portable air conditioner in a bedroom setting. The remote's screen is illuminated, showing temperature settings, making it easy to operate in the dark.
4. Konfigurazioa eta instalazioa
Proper installation is crucial for optimal performance. This unit is designed for use with sliding windows (vertical & horizontal) and is not suitable for outward-opening windows.
4.1 Leiho-kitaren instalazioa
- Assemble the window vent kits according to your window size. The package includes two 20-inch and one 10-inch bracket. Additional brackets can be requested for free if your window is larger.
- Securely install the window kit in your window opening, ensuring a tight seal to prevent air leakage.

Figure 4.1: Window Installation Examples.
Two images show the Gasbye portable AC unit successfully installed with its dual hoses in both a vertical sliding window and a horizontal sliding window, demonstrating its adaptability to different window types.
4.2 Hodi-konexioa
The Gasbye CoolPrime 10000 utilizes a dual-hose system for enhanced cooling efficiency. Both intake and exhaust hoses are 5.9 inches in diameter and 59 inches in length.
- Connect the intake hose to the designated inlet on the unit and the window kit.
- Connect the exhaust hose to the designated outlet on the unit and the window kit.
- Ensure both hoses are securely attached and free from kinks or obstructions.
Ohar garrantzitsua: We do not recommend using extension hoses, as they can increase resistance to heat dissipation and reduce the unit's cooling performance. If your window is higher than the hose length allows, consider placing the AC unit on a small, sturdy table or stand to raise its height.

Figure 4.2: Dual Hose vs. Single Hose Design.
This image illustrates the difference between a dual-hose portable AC and a single-hose portable AC. The dual-hose system (Gasbye) uses outdoor air to cool the compressor, preserving indoor cool air and maintaining balanced indoor pressure. The single-hose system uses indoor air, which can cause negative pressure and draw in hot outdoor air, making it less efficient.
5. Funtzionamendu-argibideak
Your Gasbye portable AC offers various modes and settings for optimal comfort.
5.1 Piztu/Itzali
Sakatu Boterea button on the control panel or remote control to turn the unit on or off. When powered off, the top vent will close to prevent dust accumulation.
5.2 Modu hautaketa
Sakatu Modua botoia eskuragarri dauden moduen artean txandakatzeko:
- Cool modua: Hozte indartsua eskaintzen du.
- Deshezegailu modua: Gehiegizko hezetasuna kentzen du airetik.
- Fan modua: Airea hoztu gabe zirkulatzen du.
- Inbertsore modua: Reduces compressor frequency to 50% load for quiet operation (approx. 45dB), ideal for nighttime.
- Turbo modua: Provides maximum cooling power for rapid temperature reduction, suitable for daytime use.
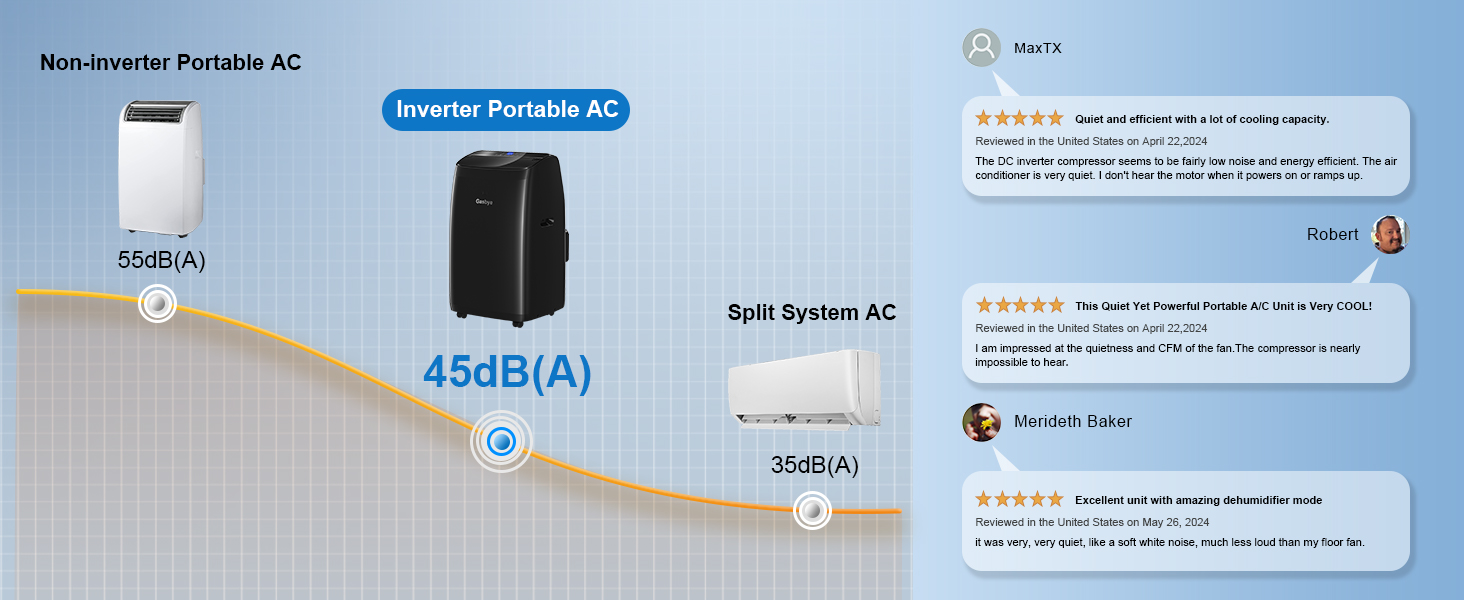
Figure 5.1: Inverter Mode vs. Turbo Mode.
This image visually compares the Inverter Mode, which downshifts to 50% capacity for silent 45dB nights, with the Turbo Mode, which upscales to 100% capacity for intense daytime cooling. This illustrates the unit's adaptive cooling capabilities.
5.3 Tenperaturaren ezarpena
Erabili Up eta Behera arrows on the control panel or remote to set your desired temperature (range: 60°F - 90°F).
5.4 Haizagailuaren abiaduraren doikuntza
Sakatu Fan Abiadura button to select between High, Mid, Low, or Auto fan speeds.
5.5 Tenporizadorearen funtzioa
Set a timer for automatic power on or off using the Tenporizadorea urrutiko aginteko botoia.
5.6 Lo modua
Aktibatu Lo modua for quiet operation during the night, which automatically adjusts settings for comfortable sleep.
6. Mantentzea
Mantentze-lan erregularrak zure aire girotuaren iraupena eta eraginkortasuna bermatzen ditu.
6.1 Iragazkien garbiketa
Clean the air filter every two weeks or more frequently depending on usage and air quality. A dirty filter can reduce cooling efficiency.
- Deskonektatu unitatea korronte-hartunetik.
- Kendu aire-iragazkia unitatearen atzealdetik.
- Garbitu iragazkia ur epel eta xaboitsuarekin. Ondo garbitu.
- Utzi iragazkia guztiz lehortzen berriro instalatu aurretik.
6.2 Drainatzea
In most cases, the portable AC unit features auto-evaporation, meaning manual drainage is not required. However, if humidity exceeds 85% RH and the room is not sealed, continuous moisture from outside may exceed the unit's capacity, requiring manual drainage.
The unit includes an additional drainage outlet positioned higher on the back for easier access compared to bottom outlets found on many portable ACs.
- Deskonektatu unitatea.
- Place a shallow pan or container under the drainage outlet.
- Kendu hustubideko tapoia ura atera dadin.
- Hustu ondoren, jarri berriro hustubideko tapoia ondo finkatuta.
7. Arazoak
Bezeroarentzako arreta-zerbitzuarekin harremanetan jarri aurretik, mesedez, kontsultatu arazo eta irtenbide ohikoenak:
| Arazoa | Kausa posiblea | Irtenbidea |
|---|---|---|
| Unitatea ez da pizten. | Argindarrik ez, kablea deskonektatuta, etengailu magnetotermikoa jauzi egin du. | Egiaztatu konexio elektrikoa, berrezarri etengailua. |
| Unitateak ez du eraginkortasunez hozten. | Dirty air filter, blocked air inlets/outlets, room too large, windows/doors open, direct sunlight. | Clean filter, clear obstructions, ensure room is sealed, close blinds/curtains. |
| Unitatea zaratatsua da. | Unit not level, fan speed too high. | Place on a flat, stable surface. Select a lower fan speed or Inverter Mode. |
| Ur-ihesak. | Drain plug not secure, high humidity exceeding auto-evaporation. | Ensure drain plug is tight. Perform manual drainage if necessary. |
8. Zehaztapenak
| Ezaugarri | Xehetasuna |
|---|---|
| Marka | Gasbye |
| Modelo zenbakia | CoolPrime 10000 |
| Hozteko gaitasuna (ASHRAE) | 14,000 BTU |
| Hozte Ahalmena (SACC) | 10,500 BTU |
| CEER Rating | 13.6 |
| Zarata Maila | 45 dB |
| Estaldura Eremua | 500 oin koadro arte. |
| Produktuaren neurriak (L x W x H) | 15.5" x 17.7" x 29.3" |
| Elementuaren pisua | 65 kilo |
| liburukiatage | 115 Volt |
| Wattage | 1290 watt |
| Hodiaren Diametroa | 5.9 hazbetekoa |
| Hodiaren luzera | 59 hazbetekoa |
| Dakarten osagaiak | Window Vent Kits, Air Exhaust and Intake Hose Assembly, Backlit Remote Control |
9. Bermea eta Laguntza
9.1 Bermearen Estaldura
Gasbye offers a 3-Year Quality Coverage for this portable air conditioner. If the product does not meet your expectations based on the listing statement after use, you may contact Gasbye Support for a full refund or a free replacement. All replacement units provided are brand new, not refurbished.
Bermearen baldintza zehatzak lortzeko, jo ezazu ofizialki Bermearen PDFa.
9.2 Bezeroarentzako laguntza
For any questions, technical assistance, or warranty claims, please contact Gasbye Customer Support. We are committed to providing excellent service and stand behind our products with confidence.
Informazio gehiago eta harremanetarako datuak aurki ditzakezu webgunea bisitatuz Gasbye Store on Amazon.