1. Segurtasun informazioa
Please read all safety instructions carefully before using this product. Failure to follow these instructions may result in electric shock, fire, or other hazards.
- Ez jarri proiektorea euri edo hezetasunera sua edo deskarga elektrikoa saihesteko.
- Ez ireki proiektorea casing. Ez dago erabiltzaileak konpondu beharreko piezarik barruan. Konponketa guztiak zerbitzu-langile kualifikatuei eskatu.
- Ziurtatu aireztapen egokia dagoela. Ez blokeatu aireztapen-irekidurak.
- Erabili proiektorearekin batera datorren korronte-egokitzailea soilik.
- Saihestu proiektorearen lentearen eraginpean zuzenean egotea begietan l denean.amp piztuta dago.
- Mantendu proiektorea bero-iturrietatik eta eguzki-argitik zuzenean urrun.
2. Paketearen edukia
Egiaztatu behean zerrendatutako elementu guztiak zure paketean sartuta daudela:
- 1 x Jectse Mini LED Projector
- 1 x Remote Control (2 AAA batteries not included)
- 1 x AV Line (3-in-1 RCA cable)
- 1 x Argibide eskuliburua
- 1 x korronte egokitzailea

Figure 2.1: Contents of the Jectse Mini LED Projector package.
3. Produktua amaitu daview
The Jectse Mini LED Projector is a compact and portable device designed for various multimedia applications. It features a 1080P resolution, LED light source, and multiple connectivity options.

3.1. irudia: Aurrealdea eta goialdea view of the Jectse Mini LED Projector.
3.1 Proiektorearen osagaiak

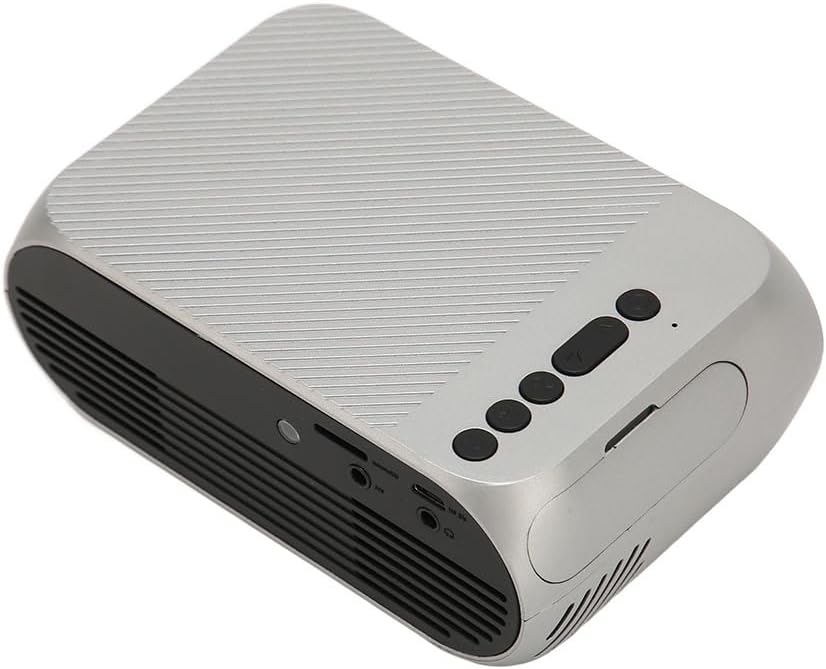
Figure 3.2: Top panel controls of the Jectse Mini LED Projector.
- Lentea: Irudia pantailan proiektatzen du.
- Aireztapen-sareta: Hozteko aire-fluxu egokia bermatzen du.
- Kontrol-botoiak: (Refer to Figure 3.2) For basic navigation and power control.
- Fokuaren gurpila: Irudiaren argitasuna doitzen du.
3.3 irudia: Atzealdea eta albokoa view with input/output ports.
3.2 Sarrera/Irteera Portuak
- HD Multimedia Interface (HDMI): For connecting devices like laptops, gaming consoles, and media players.
- AV ataka: Gailu zaharrak barne hartzen duen AV kablea erabiliz konektatzeko.
- USB ataka: USB unitateak konektatzeko multimedia erreproduzitzeko files zuzenean.
- Potentzia sarrera: Korronte-egokigailua konektatzeko.
- Audio Output (3.5mm Jack): Kanpoko bozgorailuak edo entzungailuak konektatzeko.
4. Konfigurazioa
4.1 Jartzea
Place the projector on a stable, flat surface. Ensure there is adequate space around the projector for ventilation. The ideal projection distance is between 1.5 to 2 meters for optimal image size and clarity.

Figure 4.1: Recommended projection distance and screen sizes.
4.2 Energia-konexioa
- Konektatu korronte-egokitzailea proiektorearen elikatze-sarrera atakara.
- Entxufatu korronte-egokitzailea entxufe elektriko egoki batera (100-240V).
4.3 Sarrera iturriak konektatzea
The projector supports HD Multimedia Interface, AV, and USB inputs.

Figure 4.2: Projector compatibility with various devices.
- HD Multimedia Interface: Connect an HD Multimedia Interface cable from your source device (e.g., laptop, game console) to the projector's HD Multimedia Interface port.
- OF: Connect the included AV cable to the projector's AV port and the corresponding audio/video output ports on your source device.
- USBa: Insert a USB flash drive into the projector's USB port.
4.4 Fokuaren doikuntza
After powering on the projector, rotate the focus wheel (usually located near the lens) until the projected image appears clear and sharp.
5. Funtzionamendu-argibideak
5.1 Piztu/Itzaltzea
- Pizteko: Press the Power Switch button on the projector or the power button on the remote control.
- Itzaltzeko: Press the Power Switch button again. The projector will shut down.
5.2 Iturria hautatzea
After powering on, use the "Signal Source Button" on the projector or the "Source" button on the remote control to cycle through available input sources (HD Multimedia Interface, AV, USB).
5.3 Menu Nabigazioa
Use the Direction Buttons and Confirm Button on the projector or the arrow keys and OK button on the remote control to navigate through the projector's on-screen menu for settings adjustments (e.g., picture mode, aspect ratio, sound settings).
5.4 Urruneko kontrolaren erabilera
Insert two AAA batteries (not included) into the remote control. Point the remote control towards the projector's IR receiver to operate functions such as power, source selection, volume, and menu navigation.
6. Mantentzea
6.1 Lentea garbitzea
Erabili lente optikoetarako bereziki diseinatutako zapi leun eta lint-gabea proiektorearen lentea astiro-astiro garbitzeko. Ez erabili garbitzaile urratzailerik edo indar gehiegirik, lentea urra baitezake.
6.2 Garbiketa orokorra
Wipe the exterior of the projector with a soft, dry cloth. Do not use liquid cleaners or solvents. Ensure the ventilation grilles are free from dust and debris to maintain optimal cooling.
7. Arazoak
| Arazoa | Kausa posiblea | Irtenbidea |
|---|---|---|
| Ez da irudirik proiektatuta |
|
|
| Irudia lausoa da |
|
|
| Soinurik ez |
|
|
| Urruneko kontrola ez dabil |
|
|
8. Zehaztapenak
| Ezaugarri | Xehetasuna |
|---|---|
| Marka | Jetse |
| Modelo zenbakia | Jectse3giz17bkpy |
| Ebazpena | 1920*1080p |
| Argi iturria | LED |
| LED Bizitza | 3000 ordu |
| Proiekzio Distantzia | 1.5-2 m |
| Proiekzio-erlazioa | 1.6:1 |
| Aspektu-erlazioa | 16:9 |
| Potentzia Sarrera | 100-240V |
| Produktuaren Tamaina | 13 x 8.5 x 5 cm (gutxi gorabehera 5.1 x 3.3 x 2 hazbete) |
| Elementuaren pisua | 1.1 kilo |
| Konektibitate Teknologia | HD Multimedia Interface, AV, USB |
| Ezaugarri bereziak | Adjustable, Portable Design |
9. Bermea eta Laguntza
For warranty information or technical support, please refer to the contact details provided with your purchase or visit the official Jectse webgunea. Gorde erosketaren egiaztagiria bermearen erreklamazioetarako.