1. Sarrera
Thank you for choosing the Geevon Wireless Indoor Outdoor Weather Station. This manual provides detailed instructions for setting up, operating, and maintaining your device. Please read it thoroughly before use to ensure optimal performance and longevity of your weather station.

Figure 1.1: Geevon Weather Station main display unit and accompanying wireless outdoor sensor.
2. Paketearen edukia
- Geevon Weather Station Main Unit
- Wireless Outdoor Sensor (1 included, supports up to 3)
- AC Potentzia Egokitzailea
- Erabiltzailearen eskuliburua (dokumentu hau)
3. Produktuaren ezaugarriak
- Large 7.5-inch Color HD Display: 350° zabalera ematen du viewing angle for easy readability of all information.
- Barruko/Kanpoko Tenperatura eta Hezetasuna: Displays current readings with tendency arrows, max/min values, and customizable high/low alerts.
- Eguraldi Iragarpena: Predicts weather for the next 12-24 hours.
- Erosotasun adierazlea: Shows indoor comfort levels.
- Presio barometrikoa: Uneko presio atmosferikoa erakusten du.
- Ilargiaren faseak: Uneko ilargi-fasea adierazten du.
- Atomic Clock with Snooze: Automatically syncs with WWVB radio signal for precise time and includes a snooze function.
- Calendar & Time: Data eta ordua bistaratzen ditu.
- USB kargatzeko ataka: Allows charging of mobile devices directly from the weather station.
- Atzeko argi erregulagarria: 3-level brightness adjustment for optimal viewargiztapen-baldintza ezberdinetan aritzea.
- Kanal anitzeko euskarria: Connects with up to 3 remote sensors (one included) within a 200ft/60m transmission range.
- Potentzia bikoitzeko moduak: Operates via AC power adapter or 3 AAA batteries (not included).

3.1 Irudia: Gainetikview of the multi-functional display and dimensions of the Geevon Weather Station.
4. Konfigurazioa
4.1 Unitate nagusia elikatzea
The main unit can be powered by the included AC power adapter or by 3 AAA batteries (not included).
- AC potentzia: For continuous backlight and optimal performance, plug the AC power adapter into the DC 5V port on the back of the main unit and then into a wall outlet. The backlight will remain on with adjustable brightness.
- Bateria Potentzia: For portable use or as a backup, insert 3 AAA batteries into the battery compartment on the back of the unit. When operating on batteries, the backlight will turn off after 10 seconds to conserve power. Press the SNZ/LIGHT button to temporarily illuminate the display.

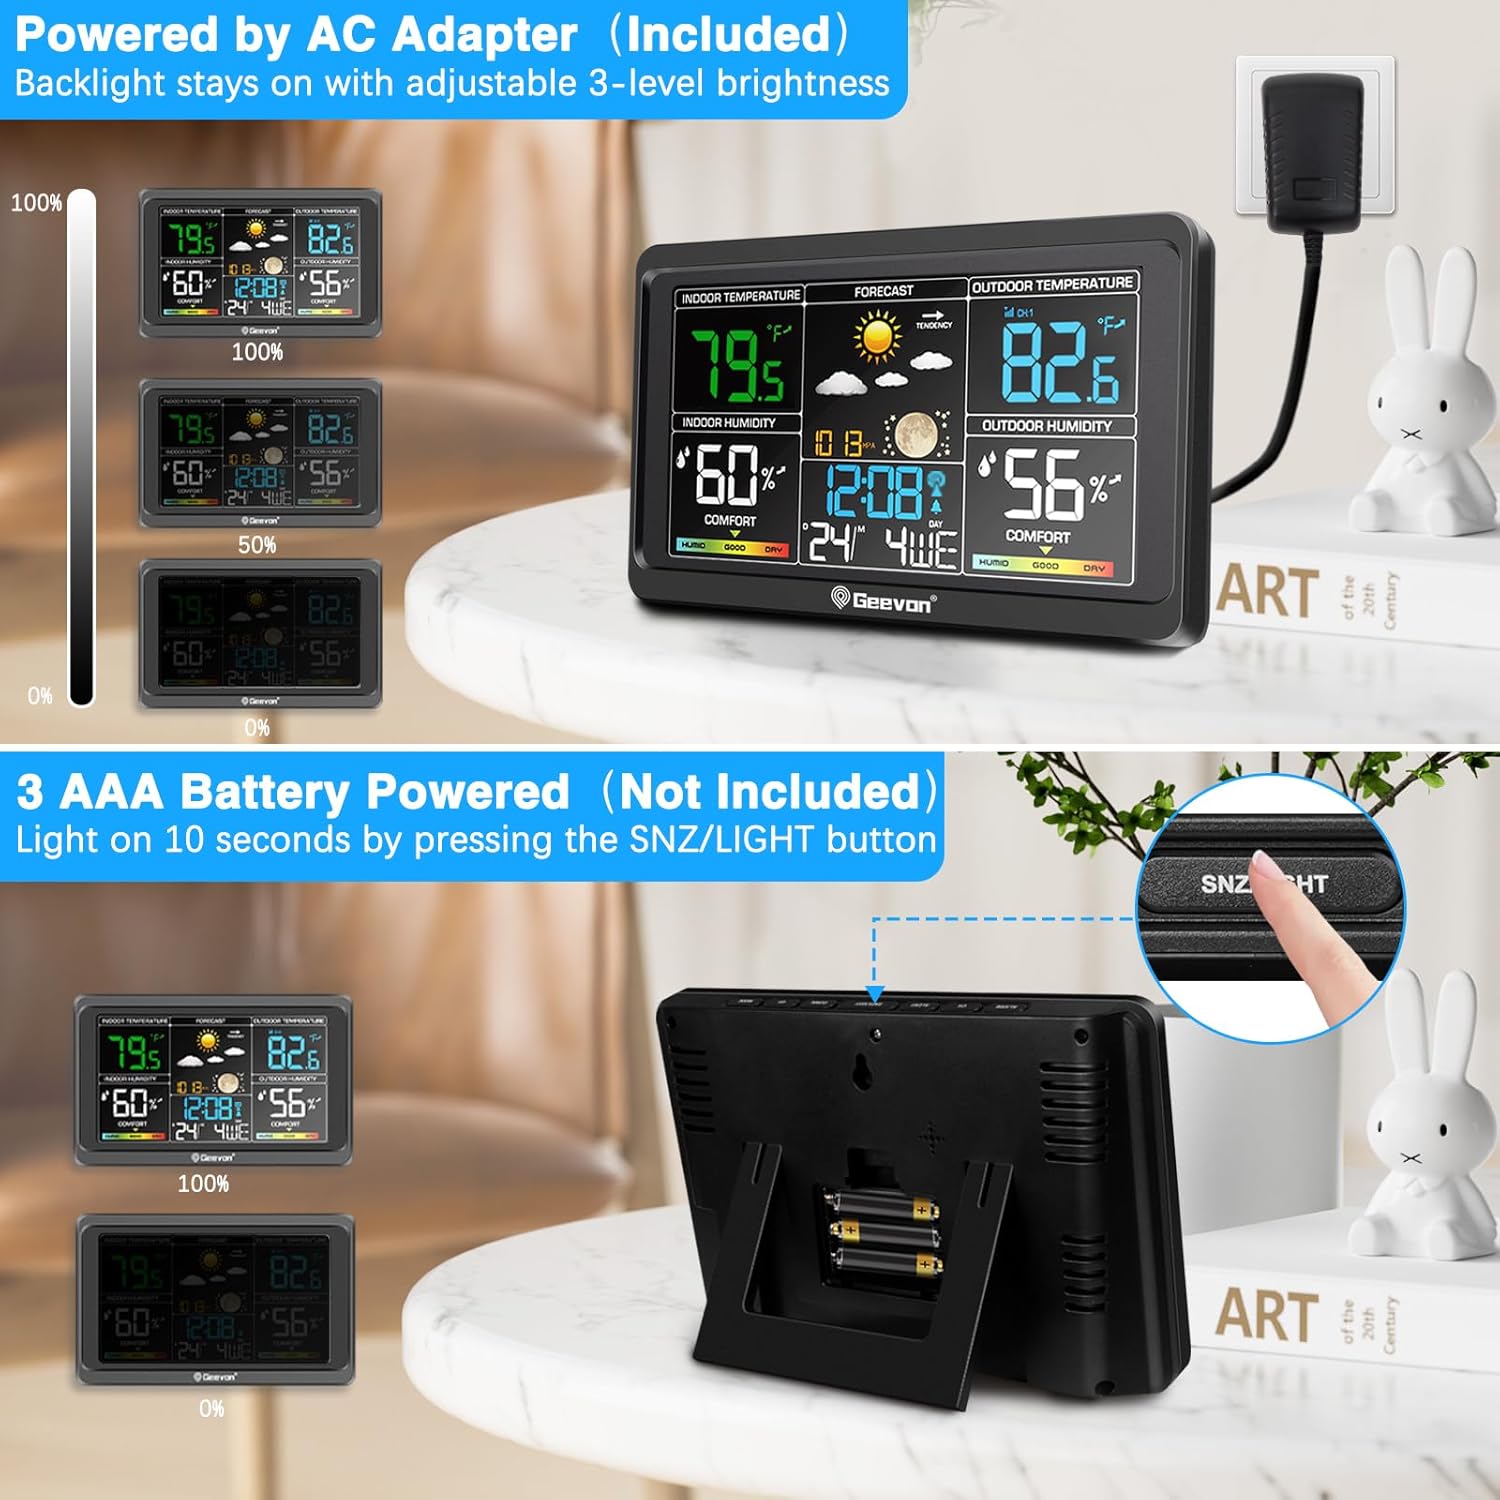
Figure 4.1: Powering options for the main unit: AC adapter (left) and AAA batteries (right).
4.2 Installing the Wireless Outdoor Sensor
The wireless outdoor sensor requires 2 AA batteries (not included). Ensure the batteries are inserted with correct polarity. The sensor is splash-proof (IPX4), but for best results and longevity, place it in a sheltered location, such as under an eave, away from direct sunlight and heavy rain.
The sensor will automatically connect to the main unit. If connection is not established, press the 'CH' button on the main unit to cycle through channels or initiate a search for the sensor.

Figure 4.2: The weather station supports up to 3 remote sensors, allowing monitoring in various locations like a garden or garage.
4.3 Atomic Clock (WWVB) Setup
The weather station features a WWVB atomic clock that automatically synchronizes with the official US time signal for precise accuracy. Upon initial power-up or after a power outage, the clock will attempt to receive the WWVB signal. This process may take several hours, especially overnight.
- Ensure the main unit is placed away from large metal objects or electronic devices that may interfere with the signal.
- Set your desired time zone (AST, EST, CST, MST, PST, AKST, HST) on the main unit. The clock will automatically adjust for Daylight Saving Time (DST).

Figure 4.3: The atomic clock automatically sets and updates by syncing with the WWVB signal.
4.4 Placement of the Main Unit
The main unit can be placed on a desk or mounted on a wall.
- Mahaiaren kokapena: Use the built-in stand bracket to place the unit on any flat surface, such as a bedside table or office desk.
- Hormako muntaia: Utilize the hanging hole on the back of the unit to mount it securely on a wall.
Figure 4.4: The weather station can be conveniently placed on a desk or mounted on a wall.
5. Funtzionamendu-argibideak
5.1 Pantaila ulertzea
The 7.5-inch color HD display provides a comprehensive overview of weather and time information. Its 350° wide viewing angle ensures digits are easy to read even from a distance.

Figure 5.1: The upgraded color HD display offers a wide viewing angle for superior readability.
5.2 Tenperatura eta hezetasunaren neurketa
The weather station displays indoor and outdoor temperature and humidity. You can switch between Celsius (°C) and Fahrenheit (°F) by inserting a needle into the small hole on the back of the outdoor sensor.

Figure 5.2: The device offers a wide measuring range with high accuracy, and temperature units are switchable.
5.3 Using the USB Charging Port
An integrated USB charging port is located on the side of the main unit. This port can be used to charge your mobile phones, tablets, or other electronic devices, providing convenience and reducing clutter.
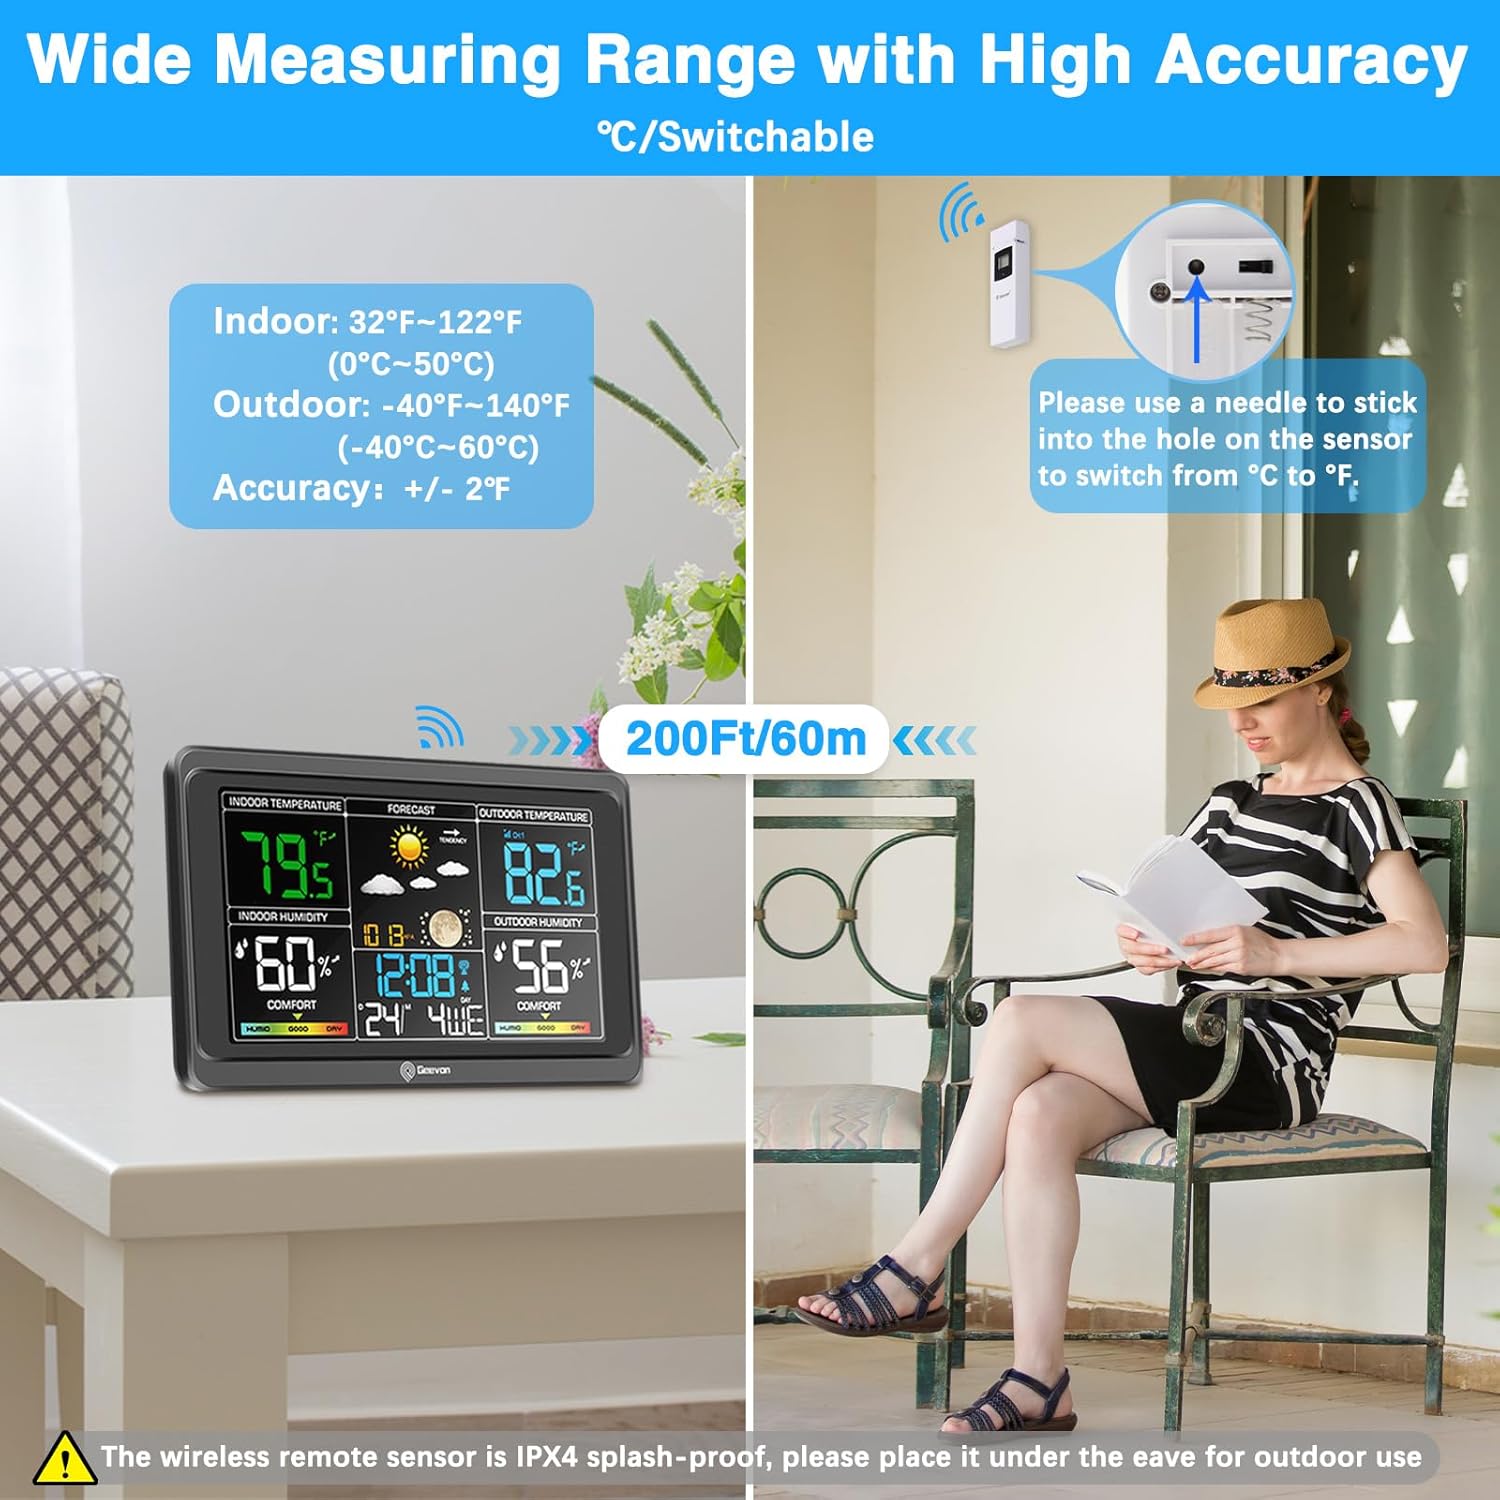
Figure 5.3: The weather station includes a USB output interface for charging your devices.
5.4 Alarm Clock and Snooze Function
The weather station functions as an alarm clock with a snooze feature. Set your desired alarm time. When the alarm sounds, press the 'SNZ/LIGHT' button to activate the snooze function, providing an additional 5 minutes of sleep.
5.5 Adjusting Backlight Brightness
When powered by the AC adapter, the display backlight can be adjusted to 3 different levels of brightness to suit your preference and ambient lighting conditions. Refer to the specific buttons on your device for brightness control (usually labeled 'LIGHT' or similar).
6. Mantentzea
- Garbiketa: Wipe the display and unit surfaces with a soft, dry cloth. Avoid using abrasive cleaners or solvents.
- Bateria ordezkatzea: Replace batteries in both the main unit and the outdoor sensor when the low battery indicator appears on the display. Ensure correct polarity.
- Sentsoreen kokapena: Periodically check the outdoor sensor's placement to ensure it remains sheltered from direct elements and has clear transmission to the main unit.
7. Arazoak
| Arazoa | Kausa posiblea | Irtenbidea |
|---|---|---|
| Ez dago pantailarik unitate nagusian | Argirik ez edo bateriak agortuta. | Ensure AC adapter is properly connected or replace AAA batteries. |
| Kanpoko tenperatura/hezetasuna ez da bistaratzen edo zehaztugabea da | Sensor out of range, dead batteries in sensor, or interference. | Move sensor closer to main unit (within 200ft/60m). Replace AA batteries in sensor. Relocate main unit or sensor away from electronic interference. Press 'CH' button on main unit to re-sync. |
| Atomic clock not syncing | Weak WWVB signal or interference. | Place the main unit near a window, away from electronic devices. Allow up to 24 hours for initial sync, especially overnight. Ensure correct time zone is selected. |
| Backlight not staying on | Unit is running on battery power. | Connect the AC power adapter for continuous backlight. When on batteries, backlight is temporary to save power. |
8. Zehaztapenak
- Modelo zenbakia: VA8665-RCC
- Produktuaren neurriak: 2.54 x 19.81 x 12.7 cm; 453.59 g
- Unitate nagusiaren potentzia: AC Power Adapter (included) or 3 x AAA batteries (not included)
- Kanpoko sentsorearen potentzia: 2 x AA bateria (ez dago barne)
- Barruko tenperatura-tartea: 32°F~122°F (0°C~50°C)
- Kanpoko tenperatura-tartea: -40°F~140°F (-40°C~60°C)
- Tenperaturaren zehaztasuna: +/- 2 ° F
- Haririk gabeko transmisio-eremua: 200ft/60m (open area)
- Materiala: Plastikoa
- Ezaugarri bereziak: Adjustable Brightness, USB Charging Port, Atomic Clock (WWVB)
9. Bermea eta Laguntza
Geevon offers a 30 eguneko dirua itzultzeko bermea eta a 12 hilabeteko bermea for this product. We also provide lifetime consulting services izan ditzakezun galdera edo arazoekin laguntzeko.
For support, please refer to the contact information provided with your purchase or visit the official Geevon webgunea.