VEVOR AQ-905F-UV 12W
VEVOR Aquarium Filter User Manual
Model: AQ-905F-UV 12W
Sarrera
Thank you for choosing the VEVOR Aquarium Filter. This 4-stage canister filter with UV protection is designed to provide efficient and quiet filtration for your aquarium, ensuring a clean and healthy environment for your aquatic life. Please read this manual thoroughly before installation and operation to ensure proper use and maintenance.
Segurtasun-argibideak
- Deskonektatu beti energia-iturria mantentze-lan edo garbiketa egin aurretik.
- Ensure the filter is placed on a stable, level surface below the aquarium water level.
- Ez erabili iragazkia korronte-kablea edo entxufea hondatuta badago.
- Etxetresna hau barrualdean erabiltzeko soilik da.
- Do not immerse the power head or electrical components in water.
- Mantendu haurren eskura.
- UV lamp emits ultraviolet radiation. Do not look directly at the UV lamp piztuta dagoenean.
Paketearen edukia
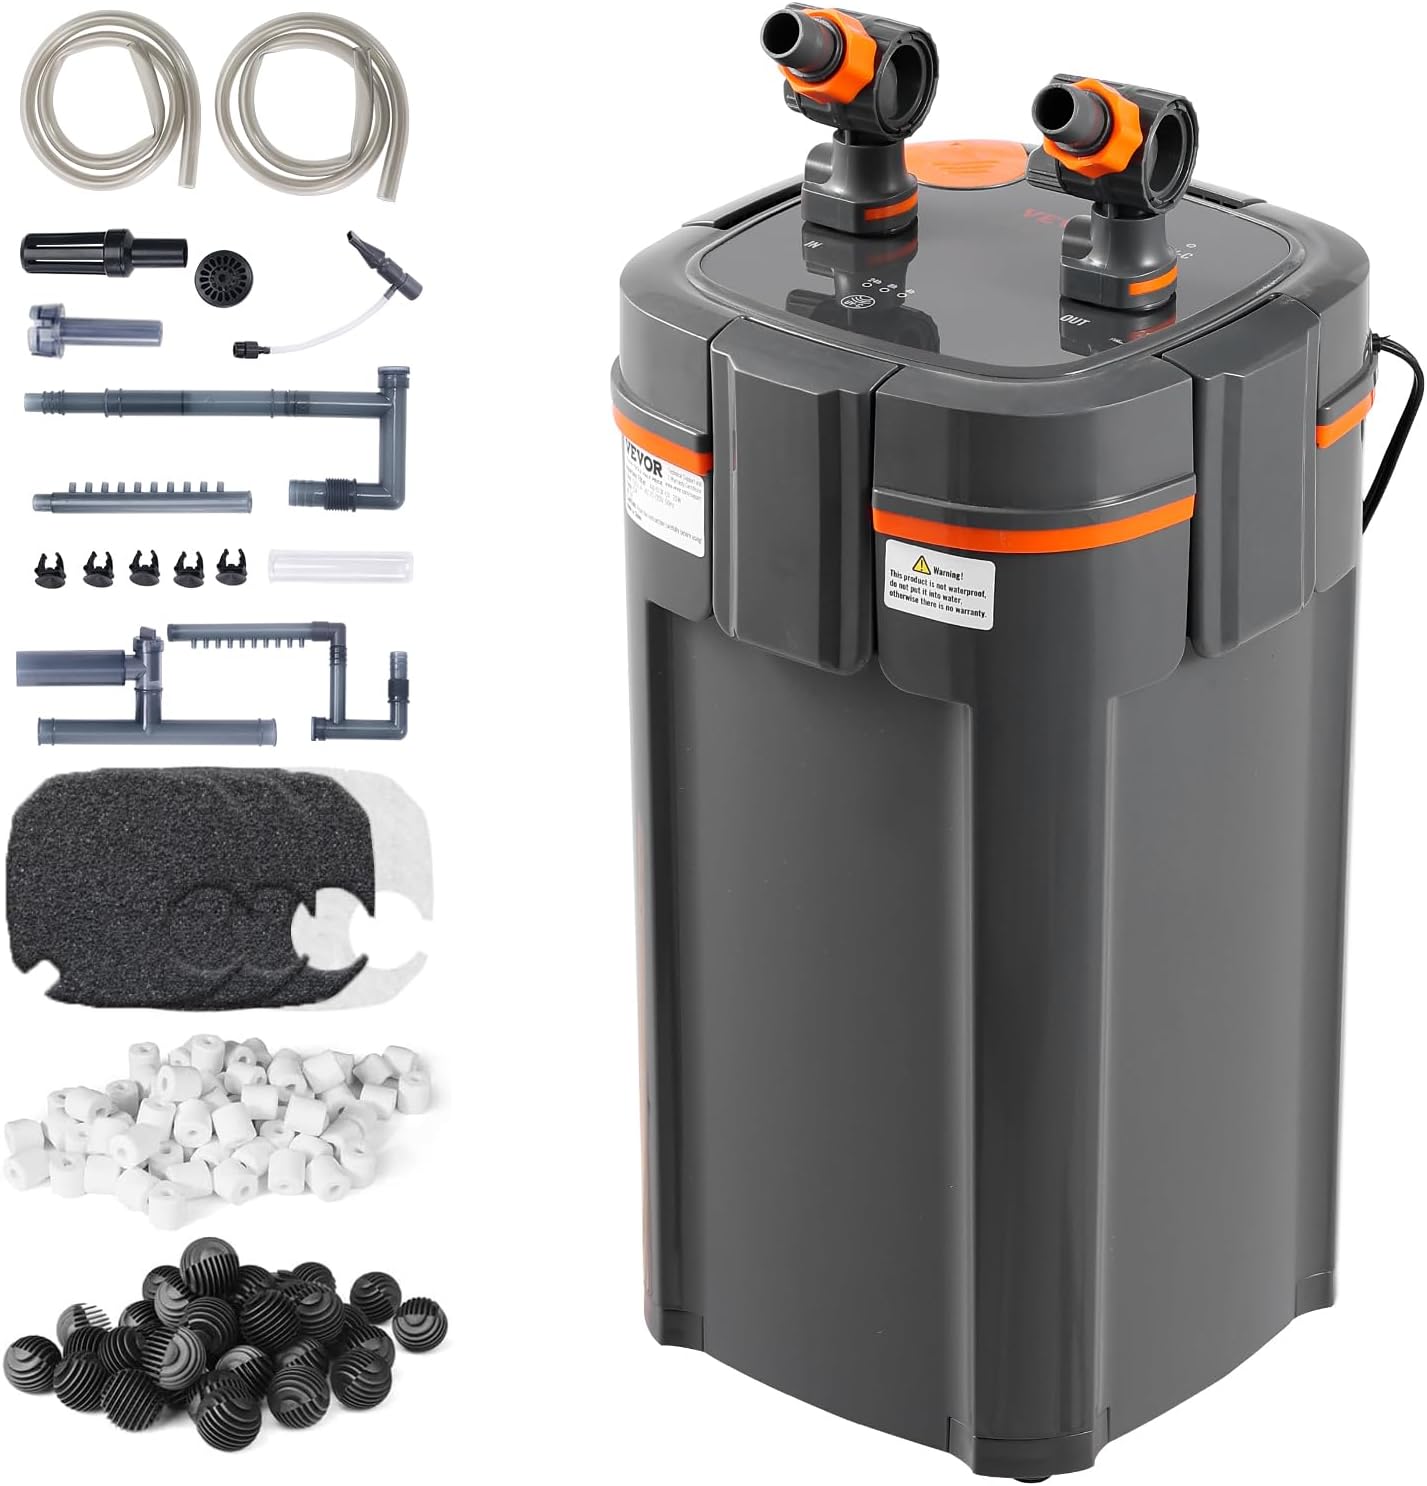
The package includes the main aquarium filter unit and various components necessary for installation and operation. This image displays the primary filter unit along with all the accessories such as hoses, inlet/outlet components, and filtration media.
- 1 x Aquarium Filter Unit
- 2 x Inlet/Outlet Components
- 2 x PVC Hoses (47.24''/1.2m each)
- 1 x Sarrerako mahuka
- 1 x Inlet Adjustment Switch
- 1 x New Oil Film Remover
- 1 x Oil Film Remover Adjustment Switch
- 1 x Float Head
- 1 x Luzapen-hodia
- 1 x Telescopic Tube
- 1 x Basket 1 (with filtration media)
- 1 x Irteerako mahuka
- 1 x Outlet Adjustment Switch
- 1 x Elbow Tube
- 1 x Air Flow Regulator
- 1 x Aire-hodi
- 1 x Outlet Nozzle
- 1 x Basket 2 (with filtration media)
- 1 x Plug
- 5 x bentosak
- 2 x Rainfall Pipes
- 1 x UV Lamp Beirazko Hodia
- 1 x Erabiltzailearen eskuliburua

This detailed diagram illustrates each accessory included in the package with corresponding numbers for easy identification. Key components include PVC water pipes, surface clear skimmer, rain shower pipe assembly, floating head, quartz glass tube for UV lamp, rain pipe, various tubes and switches, and the essential filtration media like ceramic rings and bio balls.
Zehaztapenak

This image provides a visual representation of the filter's dimensions and a summary of its key specifications, including model number, power, flow rate, and recommended tank capacity.
| Ezaugarri | Xehetasuna |
|---|---|
| Eredua | AQ-905F-UV 12W |
| Ponpa-potentzia | 12W |
| Gehienezko Emaria | 317 GPH (1200 L/H) |
| Recommended Tank Capacity | 100 gallons / 378.5 L |
| Number of Filtration Layers | 4 |
| Timed UV Function | Yes (4/8/24-hour intervals) |
| Zarata Maila | < 50 dB |
| Produktuaren neurriak (L x W x H) | 8.27 x 8.27 x 14.65 hazbete (210 x 210 x 372 mm) |
| Produktuaren pisua | 10.14 lb (4.6 kg) |
| Material nagusia | ABS |
| Kolorea | Grisa |
Konfigurazioa
1. Preparing the Filter Media

This image illustrates the internal structure of the filter, highlighting the four stages of filtration and the UV sterilizer. It shows the placement of the white sponge, bio balls, and ceramic rings within the filter baskets.
- Open the filter unit by releasinaskapen azkarreko giltzaamps.
- Carefully remove the filter baskets.
- Rinse all filter media (sponges, ceramic rings, bio-balls) thoroughly with aquarium water or dechlorinated tap water before placing them into the baskets. This removes any manufacturing dust.
- Arrange the media in the baskets according to the recommended order:
- Bottom Basket: Coarse sponge, ceramic rings (for biological filtration)
- Middle Baskets: Bio-balls, finer sponges (for biological and mechanical filtration)
- Top Basket: Fine filter floss/sponge (for mechanical filtration)
- Ensure the UV lamp glass tube is securely in place.
- Reassemble the filter baskets and close the filter unit securely, ensuring the quick-release clamps guztiz inplikatuta daude.
2. Connecting Hoses and Inlet/Outlet Components
- Attach the PVC hoses to the inlet and outlet ports on the filter head. Ensure a tight connection.
- Connect the inlet hose assembly (with oil film remover and adjustment switch) to the inlet hose.
- Connect the outlet hose assembly (with rainfall pipes or outlet nozzle) to the outlet hose.
- Secure the inlet and outlet components to the rim of your aquarium using the provided suction cups. Ensure the inlet is submerged and the outlet is positioned to create good water circulation.
3. Iragazkia prestatzea
- Ensure all hose connections are secure and the filter unit is below the aquarium water level.
- Open the quick-release head design valves on the inlet and outlet.
- Press the lift-and-release air vent valve (priming button) on the top of the filter head repeatedly (2-4 times) until water begins to flow into the filter unit and fills it completely. This removes air from the system.
- Once water is flowing steadily through both hoses and the filter is full, you can proceed to power on.
Funtzionamendu-argibideak
1. Piztea
Once the filter is primed and full of water, plug the power cord into a grounded electrical outlet. The filter pump will start operating, and water will begin to circulate through the system.
2. Ur-emaria doitzea

This image highlights the water flow adjustment knob and the lift-and-release air vent valve on the filter head, demonstrating how to control water flow and prime the unit.
The filter features a flow adjustment valve. Rotate the water flow adjustment knob on the filter head to regulate the water flow rate from maximum to minimum, or to shut it off completely for maintenance.
3. UV Lamp Funtzionamendua
UV lamp has a timed function. You can set it to operate for 4, 8, or 24-hour intervals. Refer to the specific controls on the filter head for setting the UV timer. The UV light helps to control algae and harmful bacteria in the water.

This image emphasizes the filter's low-noise operation, featuring a brushless copper motor that contributes to a sound level below 50 decibels, ensuring a quiet environment.
The filter is designed for ultra-quiet operation, thanks to its internal pure copper brushless motor. The sound level is typically below 50 decibels, ensuring minimal disturbance.
Mantentzea
Regular maintenance is crucial for the optimal performance and longevity of your VEVOR Aquarium Filter.
1. Routine Cleaning (Monthly/Bi-Monthly)
- Deskonektatu iragazkia korronte-iturritik.
- Close the quick-release head design valves on the inlet and outlet hoses to prevent water backflow.
- Detach the filter head from the canister by releasing clamps.
- Carefully remove the filter baskets.
- Rinse mechanical filter media (sponges, filter floss) thoroughly with old aquarium water (from a water change) to preserve beneficial bacteria. Replace if heavily clogged or deteriorated.
- Rinse biological filter media (ceramic rings, bio-balls) gently with old aquarium water. Avoid tap water as chlorine can kill beneficial bacteria.
- Clean the inside of the canister and the impeller chamber of the filter head. The impeller can be removed for thorough cleaning.
- Inspect the O-rings and seals for any signs of wear or damage. Lubricate with silicone grease if necessary.
- Reassemble the filter, ensuring all components are correctly seated and the clamps ondo lotzen dira.
- Reprime the filter as described in the Setup section before reconnecting power.

This image highlights the double quick-connect design and the thickened waterproof rubber ring, which contribute to the enhanced leak-proof sealing of the filter, making maintenance and disassembly easier.
2. UV Lamp Replacement (Annually or as needed)
UV lamp has a limited lifespan and its effectiveness diminishes over time. It is recommended to replace the UV lamp annually or if you notice a decrease in its performance (e.g., increased algae growth). Ensure to use a compatible replacement UV lamp (9W). Always disconnect power before replacing the UV lamp.
Arazoak konpontzea
| Arazoa | Kausa posiblea | Irtenbidea |
|---|---|---|
| Filter not starting or low flow |
|
|
| Water leaking from filter |
|
|
| Gehiegizko zarata |
|
|
| Ura lainotuta geratzen da |
|
|
Bermea eta Laguntza
VEVOR produktuak iraunkortasun eta errendimendu handikoak izateko diseinatuta daude. Bermeari buruzko informazioa, laguntza teknikoa edo ordezko piezen informazioa lortzeko, jarri harremanetan VEVOR bezeroarentzako arreta-zerbitzuarekin, haien zerbitzu ofizialaren bidez. website or the contact information provided with your purchase. Please have your model number (AQ-905F-UV 12W) and purchase date ready when contacting support.
For more information, visit the official VEVOR webgunea: www.vevor.com
Ask a question about this manual
Ask about setup, troubleshooting, compatibility, parts, safety, or missing instructions. Manuals+ will review the question and use this page’s manual context to help answer it.