1. Sarrera
This manual provides essential information for the safe and effective operation of your Mastech MS8301A Digital Multimeter. Please read this manual thoroughly before using the device to ensure proper functionality and to prevent potential hazards. Keep this manual for future reference.
2. Segurtasun informazioa
Always adhere to the following safety precautions to avoid electric shock or personal injury, and to prevent damage to the multimeter or the equipment under test.
- Irakurri argibideak: Understand all instructions and safety information before use.
- Balorazio baloratuatage: Ez aplikatu bolumen baloratua baino gehiagotage, as marked on the multimeter, between the terminals or between any terminal and ground.
- Proba-buruak: Egiaztatu proba-kableak isolamendu kaltetua edo metalik agerian dagoen ikusteko. Ordeztu hondatuta badaude.
- Circuit Disconnection: Deskonektatu zirkuituaren potentzia eta deskargatu bolumen handiko guztiaktage kondentsadoreak erresistentzia, jarraitutasuna, diodoak edo kapazitatea probatu aurretik.
- Funtzioa hautatzea: Ensure the function switch is in the correct position for the measurement being performed.
- Zuzeneko zirkuituak: Do not measure current on a live circuit with the test leads connected in parallel.
- Ingurune operatiboa: Do not operate the multimeter in explosive gas, vapor, or damp inguruneak.
- Babes pertsonalerako ekipamendua: Always wear appropriate personal protective equipment, such as safety glasses, when working with electrical circuits.
- Segurtasunaren balorazioa: This device is rated for CAT III 600V. Do not exceed this rating.
3. Produktua amaitu daview
3.1 Ezaugarriak
The Mastech MS8301A Digital Multimeter offers a range of features for various electrical measurements:
- Pantaila: 2000 zenbaketa
- Datuak gordetzea: Freezes the displayed reading for convenient recording.
- Bateriaren probatzailea: For 1.5V and 9V batteries.
- Diseinu trinkoa: Product Size: 150mm x 74mm x 48mm (5.9" x 2.9" x 1.7")
- Arinak: Product Weight: 220g (0.48lb)

Image: Detailed features and specifications of the Mastech MS8301A multimeter, including display count, data hold, battery test function, and physical dimensions.
3.2 Osagaiak
The Mastech MS8301A package typically includes the following components:
- Mastech MS8301A Digital Multimeter Unit
- Proba-kableak (gorria eta beltza)
- AAA Batteries (2x1.5V)
- Kalibrazio-ziurtagiria (aplikagarria bada)
- Hasierako gida azkarra
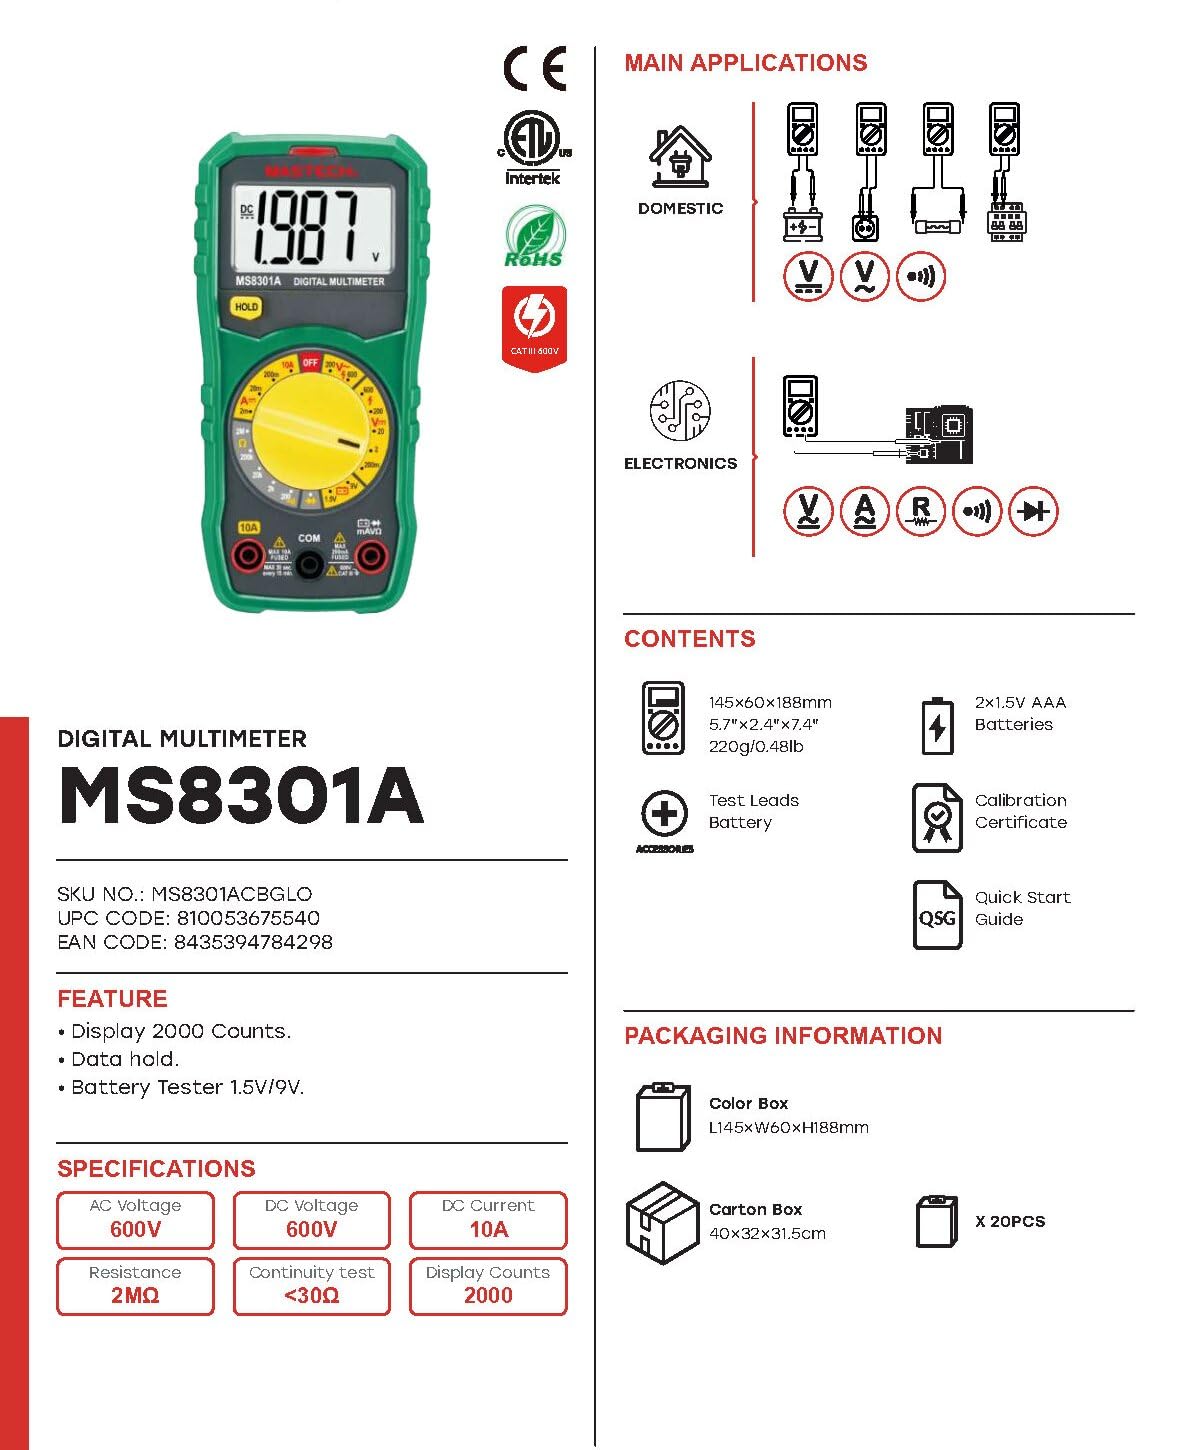
Image: The Mastech MS8301A Digital Multimeter showing its front panel, rotary switch, display, input jacks, and a list of included accessories such as test leads and batteries.
4. Konfigurazioa
4.1 Bateriaren instalazioa
- Ensure the multimeter is turned off and disconnect any test leads.
- Bilatu bateriaren konpartimentuaren estalkia multimetroaren atzealdean.
- Kendu euskarri-torlojua(k) eta kendu estalkia.
- Sartu bi 1.5 V-ko AAA bateria, konpartimentuaren barruan adierazten den polaritatea (+ eta -) errespetatuz.
- Jarri berriro bateriaren konpartimentuaren estalkia eta finkatu torloju(ekin) erabiliz.
4.2 Proba-kableak konektatzea
Konektatu proba-kableak multimetroaren sarrera-hartune egokietara:
- Sartu beltza test lead into the COM (common) jack.
- Neurketa gehienetarako (bolumentage, Resistance, Diode, Continuity, Temperature, Battery Test), insert the gorria test lead into the VΩmA jack.
- For high current measurements (up to 10A), insert the gorria test lead into the 10A jack.
5. Funtzionamendu-argibideak
Before taking any measurement, ensure the test leads are correctly connected and the rotary switch is set to the desired function.
5.1 DC Vol. neurtzeatage (V=)
- Set the rotary switch to the desired V= range (e.g., 20V for measuring up to 20V DC).
- Konektatu proba-kable gorria zirkuituaren alde positibora (+) eta proba-kable beltza alde negatibora (-).
- Irakurri liburukiatagPantailako balioa.
5.2 AC Vol. neurtzeatage (V~)
- Set the rotary switch to the desired V~ range (e.g., 200V for measuring up to 200V AC).
- Konektatu proba-kableak AC bolumenaren artean.tage iturria.
- Irakurri liburukiatagPantailako balioa.
5.3 Korronte zuzena neurtzea (A=)
- Garrantzitsua: Disconnect power to the circuit before connecting the multimeter in series.
- Set the rotary switch to the desired A= range (e.g., 200mA or 10A). Remember to move the red lead to the 10A jack for high current.
- Ireki korrontea neurtu behar den zirkuitua.
- Connect the multimeter in series with the circuit, ensuring the current flows through the multimeter.
- Jarri korrontea zirkuituan eta irakurri uneko balioa pantailan.
5.4 Erresistentzia neurtzea (Ω)
- Garrantzitsua: Ziurtatu zirkuitua deskonektatuta dagoela eta kondentsadore guztiak deskargatuta daudela erresistentzia neurtu aurretik.
- Set the rotary switch to the desired Ω sorta.
- Konektatu proba-kableak neurtu beharreko osagaira.
- Irakurri erresistentziaren balioa pantailan.
5.5 Diodoen proba (→|)
- Garrantzitsua: Ziurtatu diodoa zirkuitutik deskonektatuta dagoela.
- Ezarri etengailua Diodo proba posizioa.
- Konektatu proba-kable gorria diodoaren anodora eta proba-kable beltza diodoaren katodora. Pantailak aurreranzko bolumena erakutsiko du.tage tanta.
- Alderantzikatu kableak. Diodo ona dagoenean, pantailak "OL" (Ireki Begizta) erakutsi beharko luke.
5.6 Jarraitutasun-proba ())))
- Garrantzitsua: Ziurtatu zirkuitua desenergizatuta dagoela.
- Ezarri etengailua Jarraitasun proba posizioa.
- Konektatu proba-kableak probatu beharreko osagaira edo kablera.
- Erresistentzia 30Ω gutxi gorabehera baino txikiagoa bada, txisteak joko du jarraitutasuna adieraziz. Pantailak erresistentziaren balioa ere erakutsiko du.
5.7 Battery Test (1.5V/9V)
- Ezarri etengailua 1.5V or 9V battery test position, corresponding to the battery type.
- Connect the red test lead to the positive (+) terminal of the battery and the black test lead to the negative (-) terminal.
- Irakurri bateria voltage pantailan.
5.8 Datuak gordetzea
Press the "HOLD" button to freeze the current reading on the display. Press it again to release the hold function and resume live readings.
6. Zehaztapenak
| Neurketa | Barrutia | Ebazpena |
|---|---|---|
| DC bolumenatage | 200mV / 2V / 20V / 200V / 600V | 100µV / 1mV / 10mV / 100mV / 1V |
| AC Boltage | 200V / 600V | 100mV / 1V |
| Korronte DC | 2mA / 20mA / 200mA / 10A | 1µA / 10µA / 100µA / 10mA |
| Erresistentzia | 200Ω / 2kΩ / 20kΩ / 200kΩ / 2MΩ | 0.1Ω / 1Ω / 10Ω / 100Ω / 1kΩ |
| Jarraitasun proba | Buzzer sounds at <30Ω | — |
| Diodo proba | Aurrera liburukiatage tanta | — |
| Bateria proba | 1.5V / 9V | — |
Zehaztapen Orokorrak
- Pantaila: 2000 zenbaketa
- Elikatze-iturria: 2 x 1.5V AAA bateria
- Neurriak: 150 mm x 74 mm x 48 mm (5.9" x 2.9" x 1.7")
- Pisua: 220 g (0.48 lb)
- Segurtasunaren balorazioa: CAT III 600V
- Materiala: Akrilonitrilo Butadieno Estirenoa (ABS)
- Kolorea: Urdina

Image: A table detailing manual ranging specifications for various Mastech digital multimeters, including the MS8301A, showing display counts, safety ratings, and measurement capabilities.
7. Mantentzea
7.1 Bateria ordezkatzea
When the battery low indicator appears on the display, replace the batteries immediately to ensure accurate readings. Follow the steps outlined in Section 4.1 for battery installation.
7.2 Garbiketa
Garbitu kasua iragarkiarekinamp oihal bat eta detergente leun bat. Ez erabili urratzailerik edo disolbatzailerik. Ziurtatu multimetroa guztiz lehor dagoela erabili aurretik.
7.3 Biltegiratzea
If the multimeter is not used for an extended period, remove the batteries to prevent leakage and damage to the device. Store in a cool, dry place away from direct sunlight.
8. Arazoak
| Arazoa | Kausa posiblea | Irtenbidea |
|---|---|---|
| Pantailarik ez edo pantaila iluna | Dead or low batteries; incorrect battery polarity. | Replace batteries; check battery orientation. |
| "OL" (Gainkarga) bistaratzen da | Neurketa hautatutako tartetik gorakoa da; zirkuitu irekia. | Select a higher range; check for open circuit in the component or leads. |
| Irakurketa okerrak | Funtzio okerra hautatu da; proba-kableen konexio txarra; proba-kable hondatuak. | Verify function switch position; ensure secure lead connection; inspect and replace damaged leads. |
| Jarraitutasun-txirrinik ez | Open circuit; resistance too high. | Check for breaks in the circuit; ensure resistance is below 30Ω. |
9. Bermea eta Laguntza
Mastech products are designed for reliability and performance. For specific warranty information, please refer to the warranty card included with your product or contact Mastech customer support. Keep your purchase receipt as proof of purchase.
For technical support or service inquiries, please visit the official Mastech webgunearekin edo jarri harremanetan haien baimendutako zerbitzu-zentroekin.